pete_c
Guru
This is a cross post from Homeseer.
Here have always tinkered with Weather Stuff -
1 - AAG 1-Wire weather station in the 1990's
2 - Davis Instruments Weather station in the 2000's
3 - NOAA - weather map downloading - RPi and SDR
4 - Lightning sensor - RPI project


References:
BH1750 ambient light sensor Tasmota
Wemos D1 Mini to Tasmota
Wemos D1 Mini ESP32 Development Board
Build a Multisensor Shield for ESP8266 *
Release binaries for Tasmota firmware 12.5.0 on ESP8266
Tasmotizer
Tasmota Timezone Table
Tasmota commands
* Optional
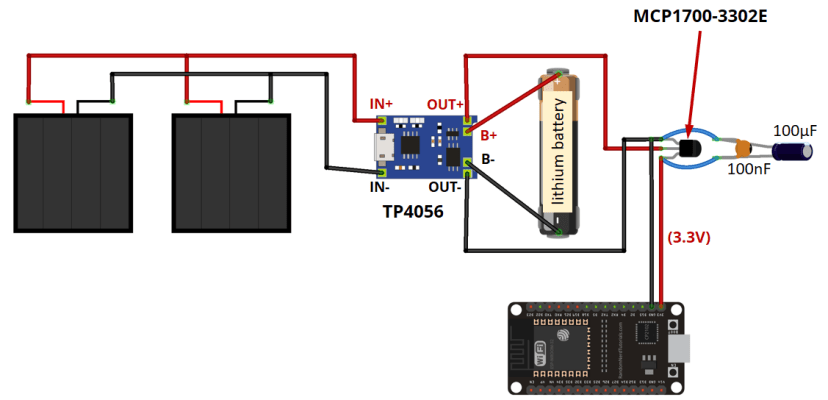
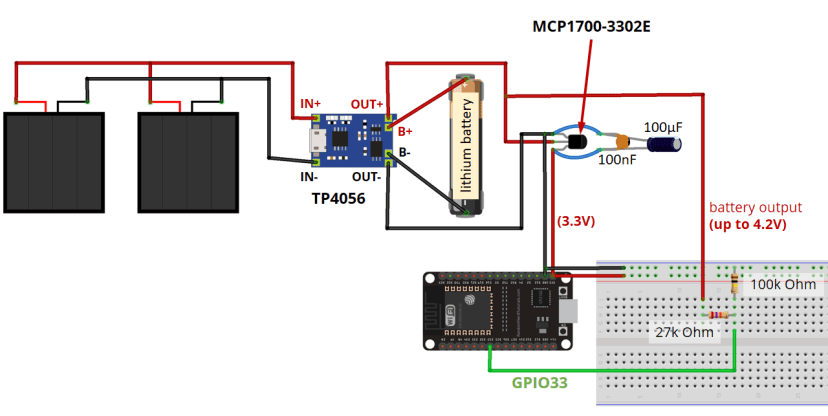
Hardware utilized
1 - BH1750 light sensor - pair purchased on Amazon for $11.39 USD
HiLetgo 2pcs BH1750 BH1750FVI Digital Light Illumination Sensor Light Intensity Sensor Module Light Intensity Ball for Arduino DC 5V
2 - Wemos D1 Mini - 5 purchased on Amazon for $15.99 USD
ACEIRMC ESP8266 ESP-12 ESP-12F NodeMcu Mini D1 Module for WeMos Lua 4M Bytes WLAN WiFi Internet Development Board Base on ESP8266 ESP-12F for Arduino,Compatible with WeMos D1 Mini (5pcs)
2 - might also purchase a multiple sensor "hat" for the WeMos D1 and a weather proof case for outside use.
Configuration:
1 - updating the WeMos with Tasmota-sensors bin
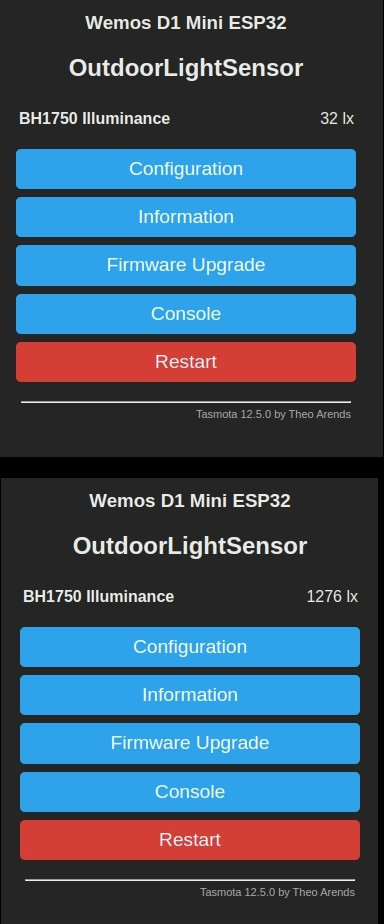
2 - tasmota configuration and testing light sensor
Basic Tasmota configuration used here on all of my Tasmota devices
Testing using 4 pins with ambient light then testing with flash light. Note once configured it sees the BH1750 light sensor as a device.
The following is using blakadder tasmota template
Here have always tinkered with Weather Stuff -
1 - AAG 1-Wire weather station in the 1990's
2 - Davis Instruments Weather station in the 2000's
3 - NOAA - weather map downloading - RPi and SDR
4 - Lightning sensor - RPI project
References:
BH1750 ambient light sensor Tasmota
Wemos D1 Mini to Tasmota
Wemos D1 Mini ESP32 Development Board
Build a Multisensor Shield for ESP8266 *
Release binaries for Tasmota firmware 12.5.0 on ESP8266
Tasmotizer
Tasmota Timezone Table
Tasmota commands
* Optional
Hardware utilized
1 - BH1750 light sensor - pair purchased on Amazon for $11.39 USD
HiLetgo 2pcs BH1750 BH1750FVI Digital Light Illumination Sensor Light Intensity Sensor Module Light Intensity Ball for Arduino DC 5V
2 - Wemos D1 Mini - 5 purchased on Amazon for $15.99 USD
ACEIRMC ESP8266 ESP-12 ESP-12F NodeMcu Mini D1 Module for WeMos Lua 4M Bytes WLAN WiFi Internet Development Board Base on ESP8266 ESP-12F for Arduino,Compatible with WeMos D1 Mini (5pcs)
2 - might also purchase a multiple sensor "hat" for the WeMos D1 and a weather proof case for outside use.
Configuration:
1 - updating the WeMos with Tasmota-sensors bin
- Using Tasmotizer in Linux here....IE: python3 tasmotizer.py
- update D1 mini with current version of Tasmota
- configure device with your home WLAN
- upload minimal tasmota.bin to D1 Mini then upload tasmota sensor bin to D1 Mini
- use generic configuration 18 for D1 Mini
2 - tasmota configuration and testing light sensor
Basic Tasmota configuration used here on all of my Tasmota devices
- Configure time using Tasmota time zone table ==> Chicago
-
Code:
Backlog0 Timezone 99; TimeStd 0,1,11,1,2,-360; TimeDst 0,2,3,1,2,-300 - Configure NTP servers ntpserver1, ntpserver2 and ntpserver3
-
Code:
[*]ntpserver1 xxx[*]ntpserver2 xxx[*]ntpserver3 xxx[*] - configure longitude and latitude
-
Code:
[*]longitude xxx[*]latitude xxx[*]
Testing using 4 pins with ambient light then testing with flash light. Note once configured it sees the BH1750 light sensor as a device.
The following is using blakadder tasmota template
Code:
{"NAME":"Wemos D1 Mini ESP32","GPIO":[0,0,1,0,1,1,0,0,1,1,1,1,1,1,1,1,0,1,1,1,0,1,1,1,0,0,0,0,1,1,1,1,0,0,0,0],"FLAG":0,"BASE":1}
Last edited: