CT Droid
CT Bot
Welcome to my showcase blog. I will do my best to keep this updated as my project evolves (is any home automation project ever finished?)
Newest changes:
Updated picture of my rack with the new Cyberpower UPS and Sony ES receiver removed.
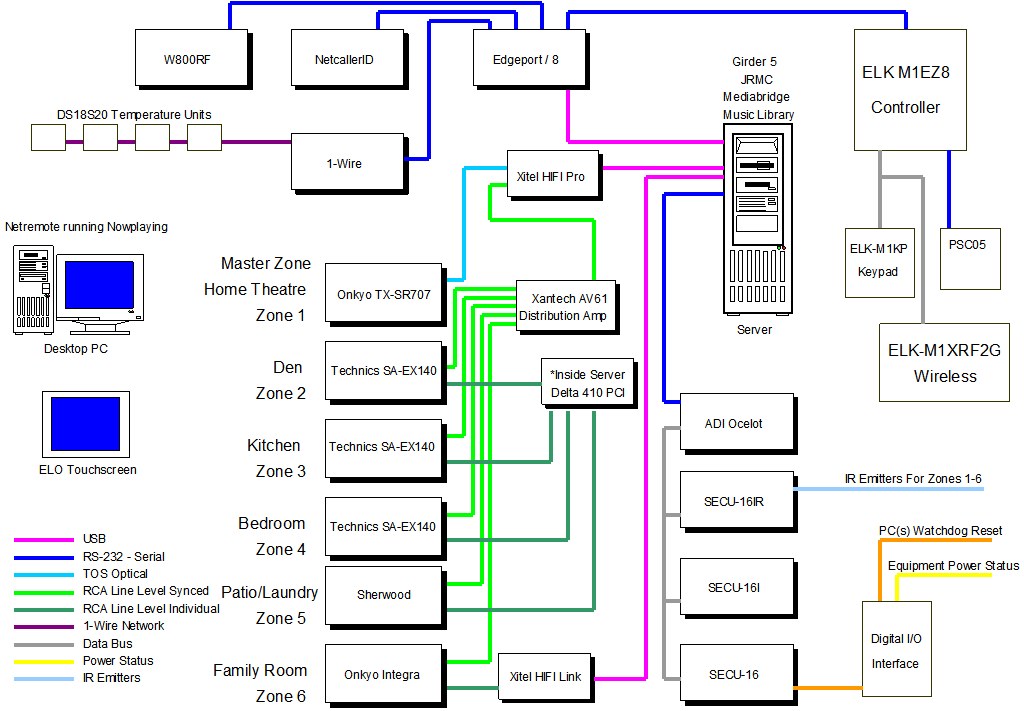
History and block diagram
Real name: John Wilson
Nowplaying is my home automation and whole house music system.
List of equipment
PC's :
3.0 Ghz P4 W/ 1.5 GB Ram automation/music Server running XP, JRMC 11, Girder 5, Netremote Media Bridge and Elk M1EZ8
750GB total storage for 800+ CD's Ripped with APE lossless audio format.
1 - ELO 15" Touchscreen with a dedicated 1.6GHZ system
1 - Nokia 770 touch pad: Running RDP into a server
Dell Axim X5 running Netremote Pro
Hardware User Interfaces:
GUI Interface "Now Playing" for Netremote on the Touchscreens
Automation Hardware:
Elk M1EZ8 with Elk-M1XRF2G wireless receiver and PSC05 X10 interface
Ocelot 16 idependant IR zones
W800 Receiver
Various X10 Modules and Switches
Hobby-boards 1-Wire Master Hub
Other Hardware:
WinXP Pro running SageTV for timeshifting running a 3800+ X2 w/7600GS for HD playback at 1080p
Buffalo WHR-G54S flashed with DD-WRT
16 Port 10/100 Hub
A/V Hardware:
Onkyo TX-SR707 7.1 Home Theater Receiver
4x Technics SA-EX140 200Watt RMS Stereo receivers
1 - Sherwood RX-4109 (for the IR controlled A/B speaker)
Audio Distributed amp via Xantech AV-61.
M-Audio Delta 410 10 Channel Sound Card
Xitel PRO HIFI USB Sound Device used for TOS Output and Zone Synchronization
Xitel HIFI Link USB Sound Device added for 6th zone
Samsung 56" DLP HDTV
Polk Monitor 50 Speakers
Various speakers for the auxilary zones like the BIC in-wall speakers
Also newly added is my CyberPower Intelligent LCD Series CP1500AVRLCD UPS 1500VA
Software:
Girder 5 w/Elk plugin
Netremote 2.0 Pro
Jriver media center V11
Some Applications:
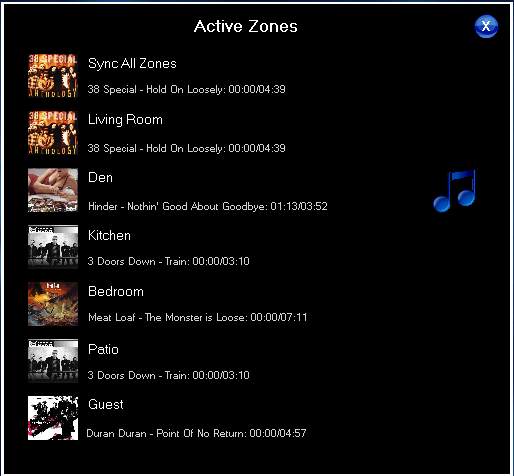
6 independent zone touch screen controlled whole house audio system sourced by 800+ CD's and independent tuners
Announce all caller id and reminders over independent audio distribution system.
Announce end of washer and dryer cycles
Popup for caller id with monitor wakeup and scrolling caller log
Light control popup panels for touch screens
Weather details page for touch screens
Elk Security Panel control
ZoneMinder with 4 IR cameras for remote monitoring and motion capture
Description:
Well here is a short history as to how my whole house audio has evolved in its design. I originally started with the idea of having a single amp and use LPADS in each room. What I came up with was as cheap and offered much more features and felt it was the best solution for the money long term. The problem with using a single receiver to drive multiple speakers are numerous. First you will have to have a way of impedance matching the speakers to your receiver. I seriously looked at devices like the HACS AB8SS but those cost quite a bit more money and you still will have to have some way of adjusting the volume in each room that you have your speakers in. For that you could use a manual or IR controlled LPAD mounted in the wall. Remember that this LPAD has to dissipate the wattage your driving so plan on it getting HOT. In researching LPADS I have read of many horror stories of people having them melt down in the walls. I also would be faced with all the work of mounting them and running the wires. A decent LPAD can run you $50-$100 each for manual control and double that for IR control.
I had no doubt that the 220 watt RMS receiver I currently had would drive all the speakers so power was not on issue. My original idea back several years ago would share a single 400 disc CD changer over multiple zones so again using a single receiver would work quite well. Again what had a big impact on my decision was the cost of the LPADS that I would need to purchase.
After weighing all those ideas (and trust me I was planning on going that route at first) I decided to take a different approach. First I live in a home that has wet plaster walls and its a real pain to mount anything in the walls so I was not looking forward to LPADS in each room anyways. I also wanted IR control so that I could use a touch screen and Homeseer (now Girder 5) to control it down the road. That meant spending big bucks on the speaker switcher/impedance matcher and all the IR controlled LPADS.
What I came up with ended up costing much less and really being much less work. I decided to purchase a Technics 200 watt stereo receivers for each additional room that I wanted to put a 'zone' in. So keeping my home theater system as the main 'zone' I purchased 4 extra receivers. Each receiver is IR controllable from Girder 5 and can be powered off separately. I centrally located all the receivers in a rack.
Each zone then has its own volume, power, mute, bass & treble controls. Since the wiring came down to running speaker wires from the 4 aux zones to each of the rooms it was much easier as I had no LPADS to buy or install. Each room has its own 200 watts RMS so there is no chance of a melt down. Once I chose the Technics SA-EX140 200Watt RMS Stereo receivers I looked on Ebay and bought 4 at an average cost of $50 each. Thats less than the 4 manual LPADS I would have had to buy. All four receivers are close to my home automation server and are totally out of site. No need to have them visible when you can control them remotely with IR control via the touchscreen interface.
Now with separate receivers it opened up a few options. Each zone had its own tuner so that was a bonus. When I first did this I shared a 400 Disc CD changer for all zones. I have since went to a hard drive solution that enabled me to really indulge by having 5 distinct zones. Using the M-Audio 410 PCI Sound Cards that has 10 channels I am able to have a multizone setup with audiophile specifications. I use the built in sound card for my TTS voices and everything works well together. All the receivers are controlled via my 'Now Playing' GUI interface done using Netremote/JRMC/Girder 5/Ocelot. I use the SECU-16IR module for IR control as it has independant IR zones. The IR zones need to be indepenant due to the fact that I am using the same receiver for all the axillary 'zones'.
Every day I sit down at my PC in the den and use my Now Playing GUI front end I have access to over 800+ CD's,
internet radio stations, and 10 preset FM local stations. My wife can play what she likes in the living room,
bedroom or kitchen and I play what I like. With 1500 Watts RMS available I have no worries about heat or clipping
the amplifiers and destroying the speakers. I also have to say it all sounds quite nice.
I originally used Homeseer but have since migrated to Girder 5 as the home automation solution. I find it more stable and integrates better with Netremote.
I also have added an Elk to my setup and use the Elk plugin for Girder 5.
The system design has a hardware based syncing option that lets you play the same CD in more than one zone. This allows the track to be in complete sync unlike most software based syncing solutions I have heard.
I recently upgraded my Sony ES to an Onkyo TX-SR707 receiver for my new LG BD-370 Blu Ray player to get the 7.1 lossless audio formats off Blu Ray discs. I am impressed with it. It has been integrated into the Now Playing project nicely.
More screenshots and information coming
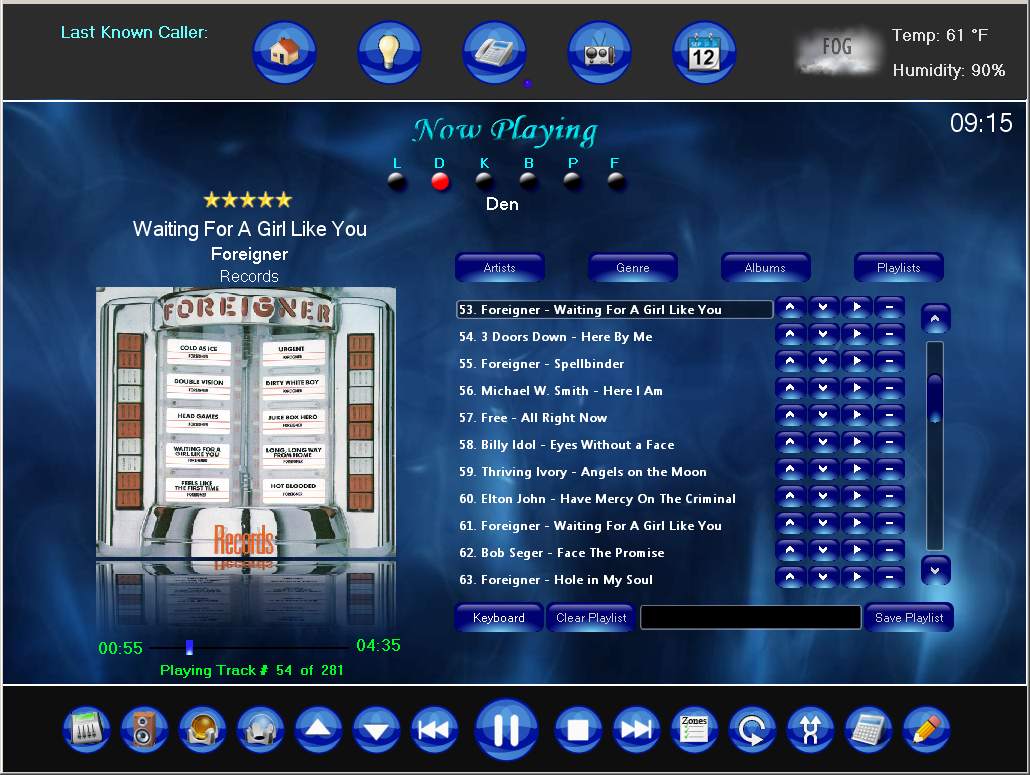
Nowplaying Skin Intro and Mainscreen
I have always loved listening to music and started my record collection (those black vinyl things) when I was fairly young. I jumped into CD's pretty early on and have collected over 800 discs. When I first started down this path I was always frustrated as it seemed that my music library was under utilized. After all having hundreds of CD on racks around the house made finding and selecting a CD time consuming at the very least. Purchasing a 400 CD changer was a step in the right direction. I quickly placed 400 of my favorite CD's into it and with the Sony advanced remote that came with it, I now had some of my library at my finger tips.
I then purchased a Slink-e interface that connected the changer to a PC and with the development of larger hard drives (a whopping huge 300MB) I was able to rip the remaining CD library to disc and merge it with the changers application called CDJ which acted like the database and mp3 player.
Over the years I have always wanted a touchscreen interface. I started playing with my first design when I purchased an Audrey. It was HTML based and it worked somewhat. This first Nowplaying project interfaced with CDJ to allow remote access and control from my desktop and small touchscreens around the house. What I really wanted was a dedicated client side interface. My next stab at this type of interface was actually written in Labview and looked quite nice for its day.
I came across an application called Netremote. It was based off the Pronto system but ran on Windows 32 and Windows Mobile operating systems. I was immediately hooked on it as it was extremely flexible and ran well on slower touchscreens. Editing skins was pretty difficult using a program called Tonto. However Netremote has since matured over the years and now has a very nice GUI designer application. Also the the company merged with the developer of Girder and a tight integration between the two applications developed. Girder has matured and with the latest version it has become a powerful home automation application. I have since migrated from Homeseer to Girder 5 and redesigned Nowplaying to take advantage of all the new features now available.
Many of you have seen the screen shots over the years of my Nowplaying skins. I have recently spent time tweaking the latest version and will post some of the newest screen shots here.
This first screen shot is my main page. Now Playing has six independent zones and from this screen you can pick which zone to control as well as edit the current playlist.
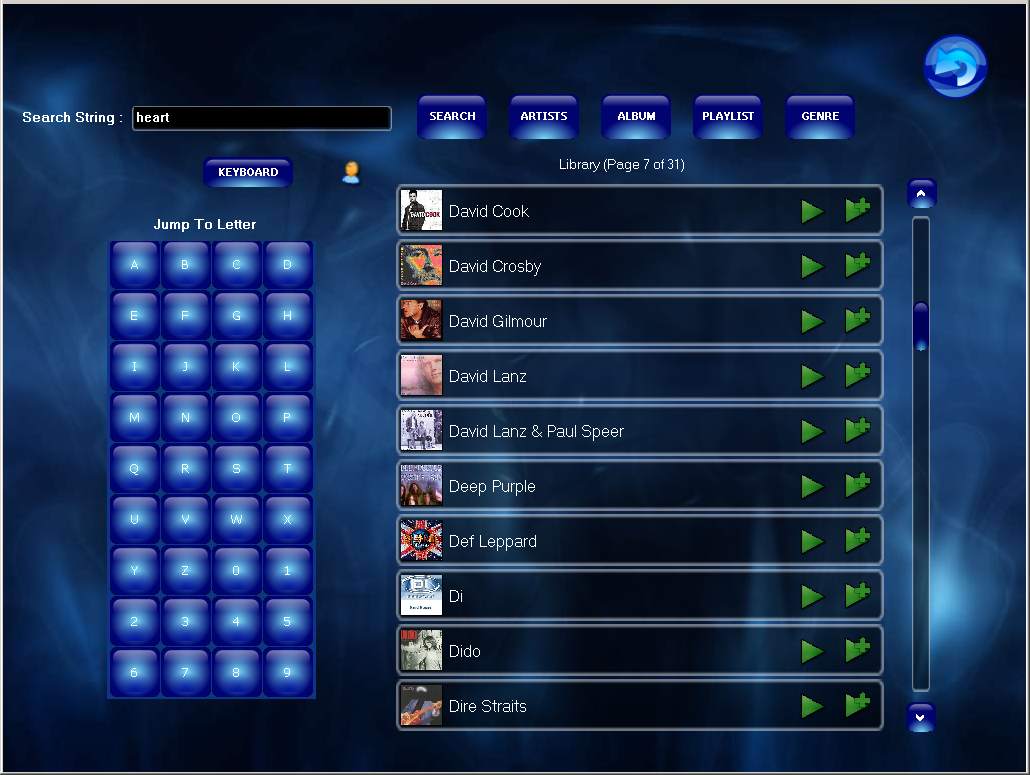
Album Browser
Below is my album browser screen. With Netremote you can create GAC's which originated as 'Grab Album Covers' but has since been greatly embellished. You can think of it as a graphical for-next loop display. With it you can organize objects to view. I have posted these type of screen shots in the past but realized I have never explained their functionality.
The screens main section will display information such as 'albums', 'artist/album', 'genres' and 'playlist'. There is a scroll bar on the right to access the entire list. Any 'view scheme' you want to design in JRMC can be sorted and displayed in this 'GAC'. The buttons along the top will go fetch the information asked for from JRMC and display it. The keypad on the left side allows you to quickly jump to the letter/number of the currently displayed list. There is a 'Search' function as well that will display any results in the 'GAC'. There is a small 'icon' that looks like a man near the top left of the 'GAC'. When this is clicked all the CD's from the artist that is currently being playing are displayed in the 'GAC'.
With any of the returned information displayed in these 'GAC' you can 'drill' down into the data. For instance if you click on one of the albums listed in the list it will switch to display the individual tracks on that album. The same goes if the list is displaying the 'artists'. It will drill down showing all CD's by that artist. There is a small button that appears above the scroll bar that will let you return to the parent list. At the right of each entry in the list being displayed there is a small > and >+ symbol. Clicking the > symbol will tell JRMC to play that track/album/playlist (and all child content). Clicking the >+ will add that item to the currently playing playlist.
As this interface is designed to be used with touchscreens there is an onscreen keyboard that can be brought up to provide the means to enter the search text.
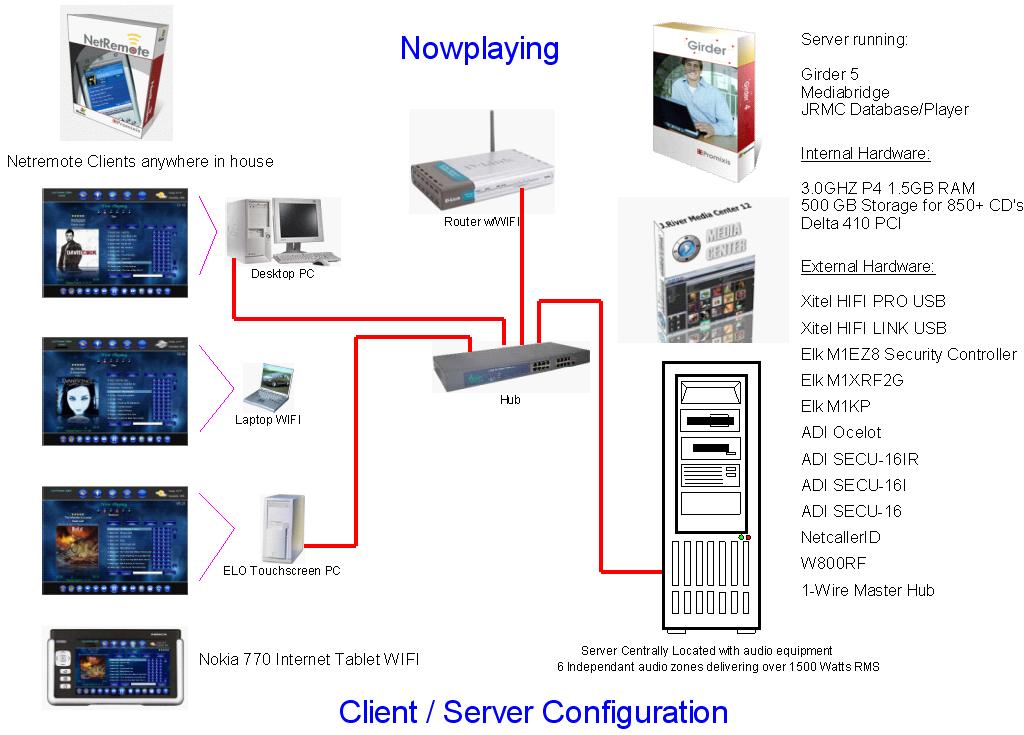
Here is the network configuration showing the client/server relationship of Nowplaying
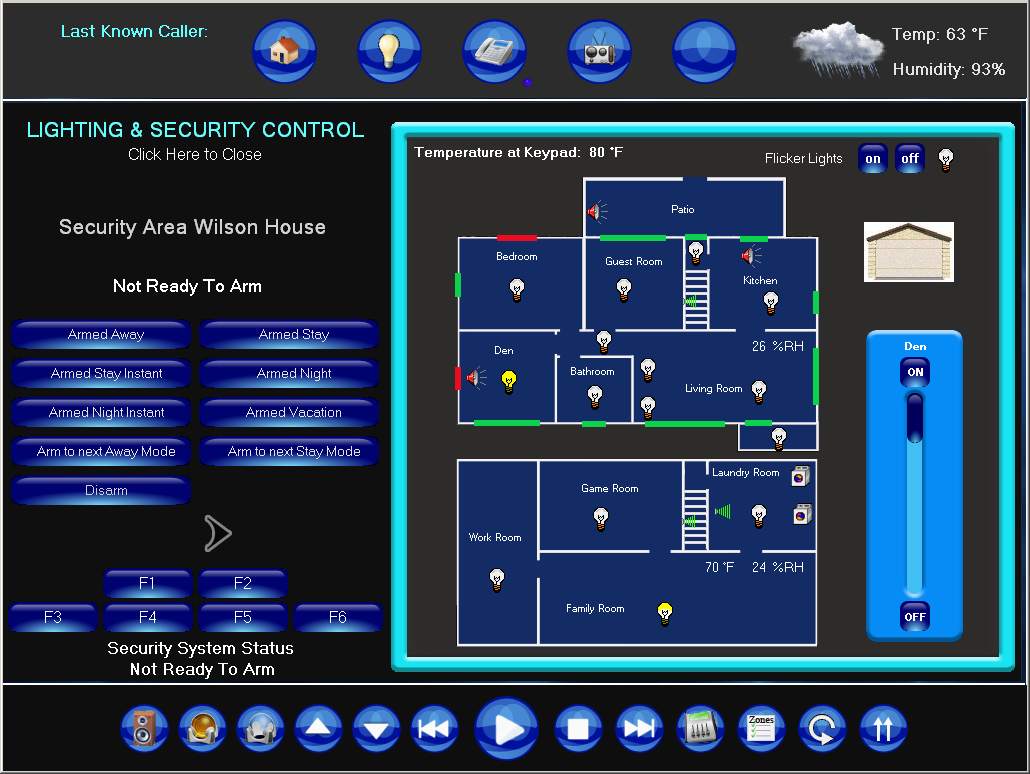
Nowplaying Security and Lighting Control
Below is my Security and Lighting control panel. I can control the lights and arm/disarm the Elk security system. Also from this screen I can view the status of several things including:
Every light in my house
Doors and Windows security status
Audio amplifier power status for each zone (true power status through hardware detection) *
Motion detector status *
Humidity levels
Temperatures from 1-wire as well as Elk keypad
Garage door status
Washing Machine Status *
Dryer Status *
LED indicator for phone hook status
LED indicator if there has been a phone call *
* Animated GIF files used
Another feature added with high WAF (wife acceptance factor) is my phone on/off hook status done using the Elk. The music gets paused by an incoming call via the CallerID handler but now when the phone gets hung up the music will resume.
Also there is a phone line in use icon to see if the phone is being used.
Well at the request of my wife I wrote an Elk routine that makes it possible to pause the music in all zones by picking up the phone and hitting the flash button once. When the phone is hung up the music will resume.
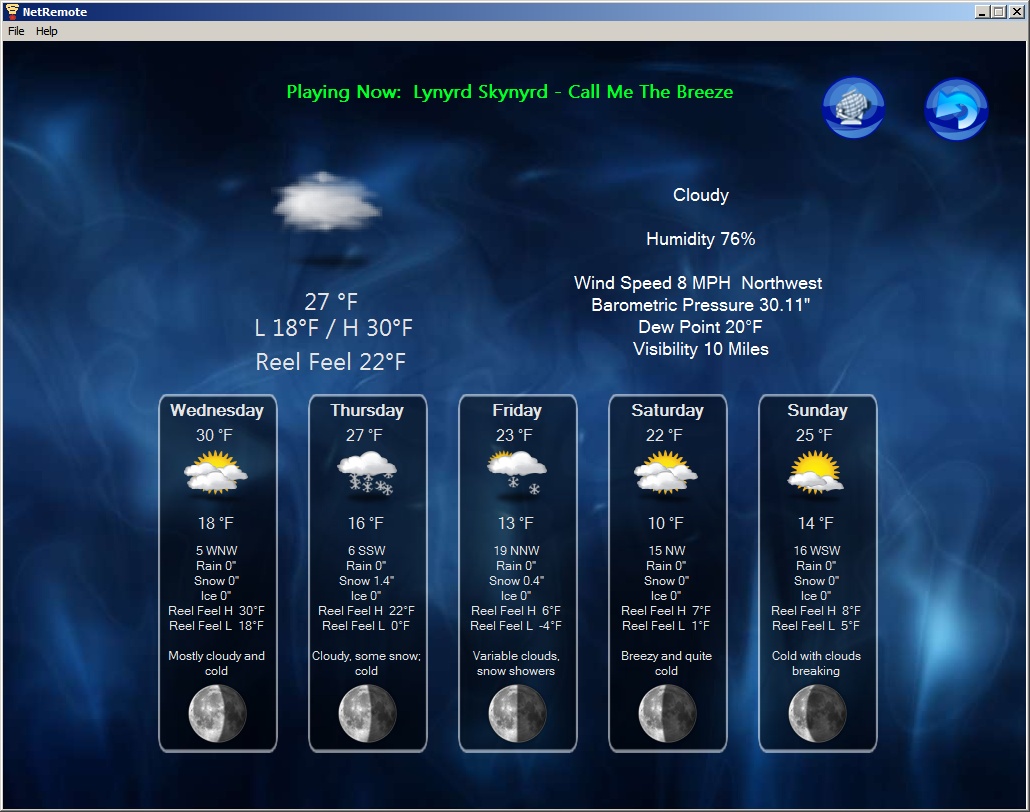
Weather
Nowplaying displays the current weather conditions at the top right of the most screens. It also has a more detailed weather screen that also displays the 5 day forcast and moonphases.
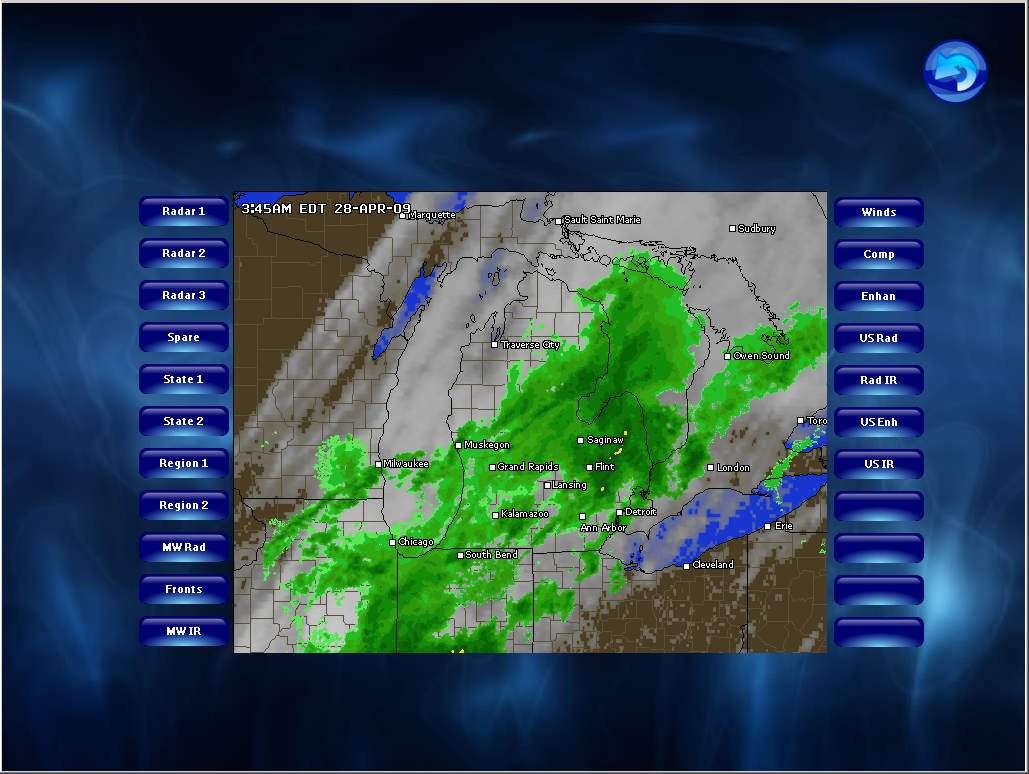
You can also display several animated radar images by selecting the buttons along the left and right sides.
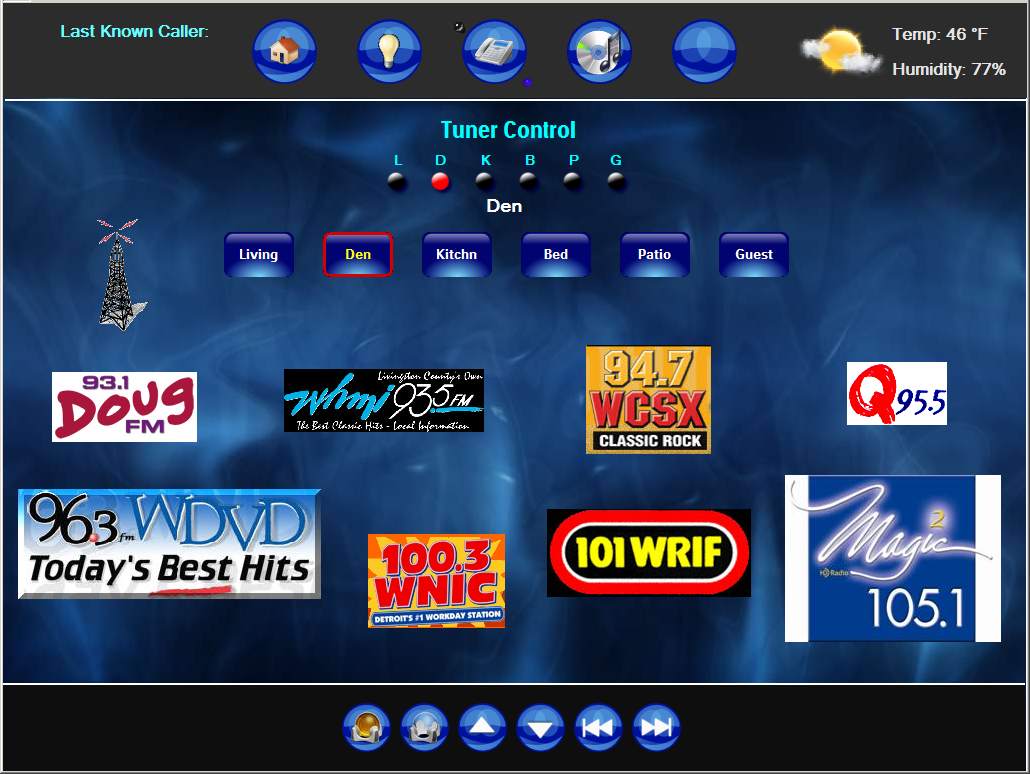
Tuner Control
Well one advantage to using inexpensive receivers for the multiple zones is that each one has its own tuner. So I have all 6 receivers programmed to 10 presets that can be selected from Nowplaying.
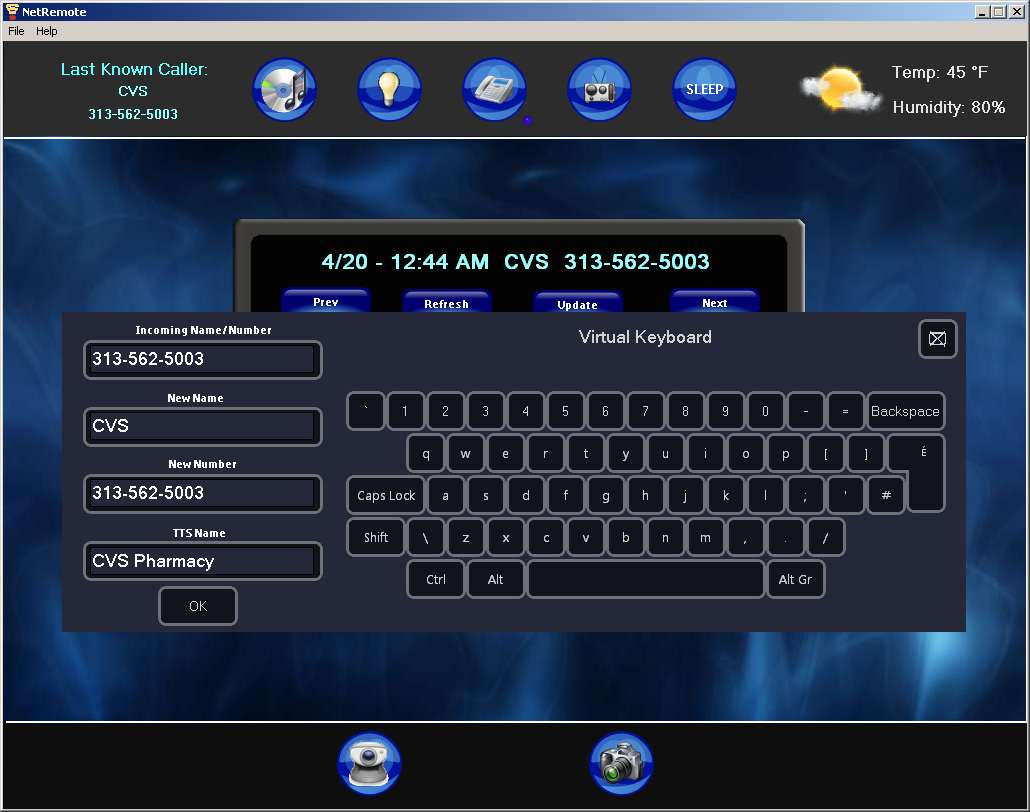
Caller ID Database Updater
Here is my new Caller ID Database Updater. When a new call comes in that is not in the database I can use this popup screen to add it with a new name, number and text to speech announcement.
Nowplaying Hardware
I decided to take a couple pictures of my hardware setup for Now Playing. This picture shows my 3 PC's. The far left one is for my HTPC running SAGETV. The middle one runs Linux with Zoneminder for my security cameras. The far right one is my Now Playing server running Girder 5, JRMC and hosting over 850 CD's ripped using APE lossless format. Below them are the receivers used for the five auxiliary zones (as well as a spare receiver). My main Onkyo receiver was moved to my home theater stand to have HDMI pass through for the Bluray audio formats. Also new to the right of the Dell is my new Cyberpower UPS.
Also shown is the Elk, Edgeport USB and the Netcaller ID boxes.

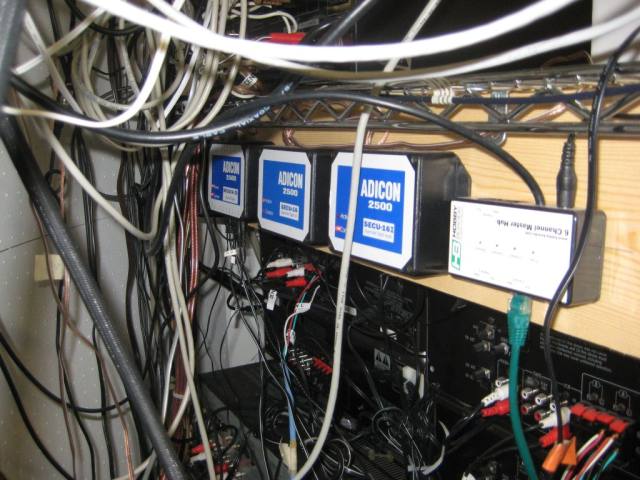
The backside shows my Ocelot, SECU-16, SECU-16I and SECU-16IR along with my 1 wire interface
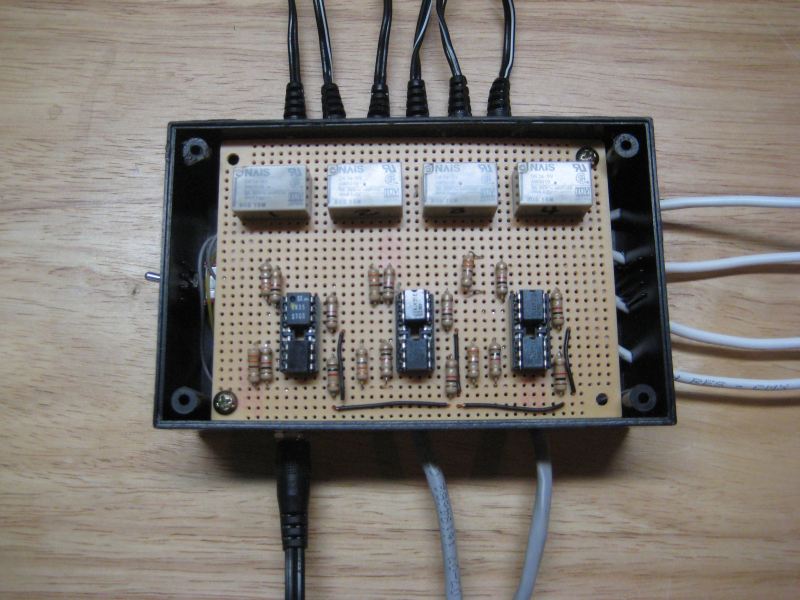
This box hooks up to me SECU-16 and has 6 opto-coupled inputs that will monitor the power status for all six receivers for my whole house audio system. Instead of using current sensors I decided a few months back to use some very cheap wall-warts I found and plug each into the switched outlet of each receiver. This came out to be a cheap as well as functionally neat way of handling it. Also in the box are 4 10AMP mini relays that will be used for such things as my Ocelot watchdog that will monitor my servers.
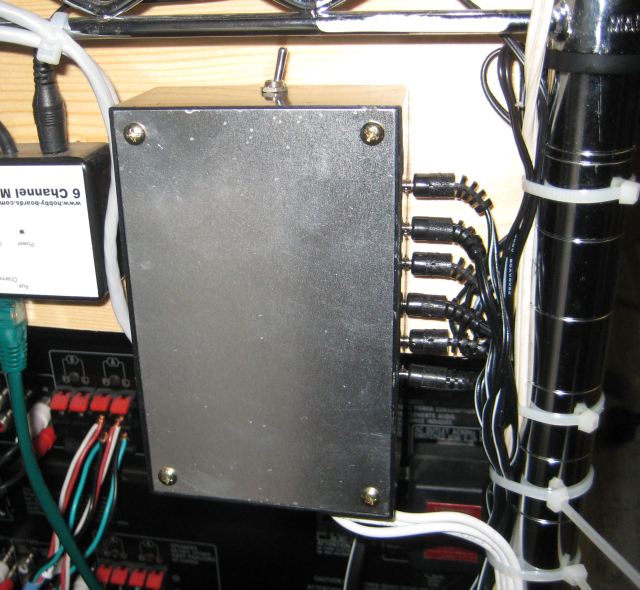
The finished box mounted. The small switch on top is a watchdog override.
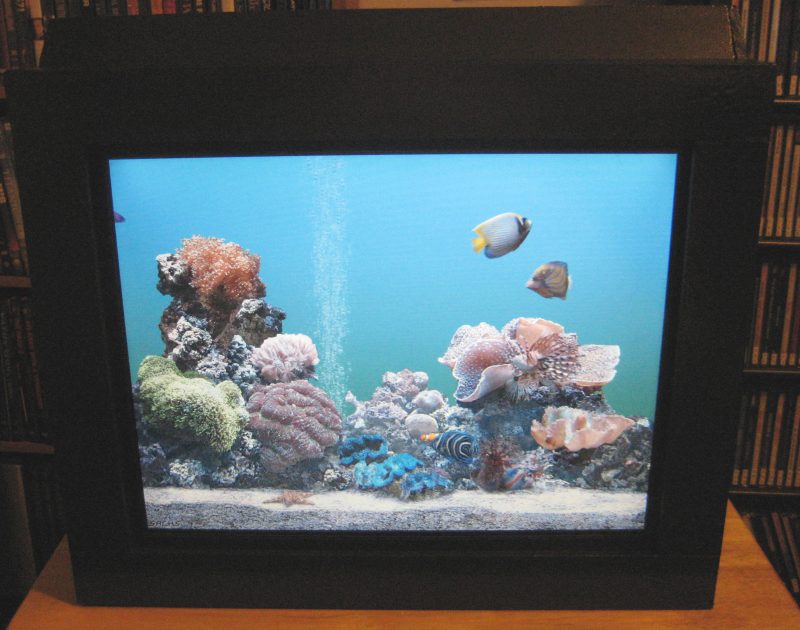
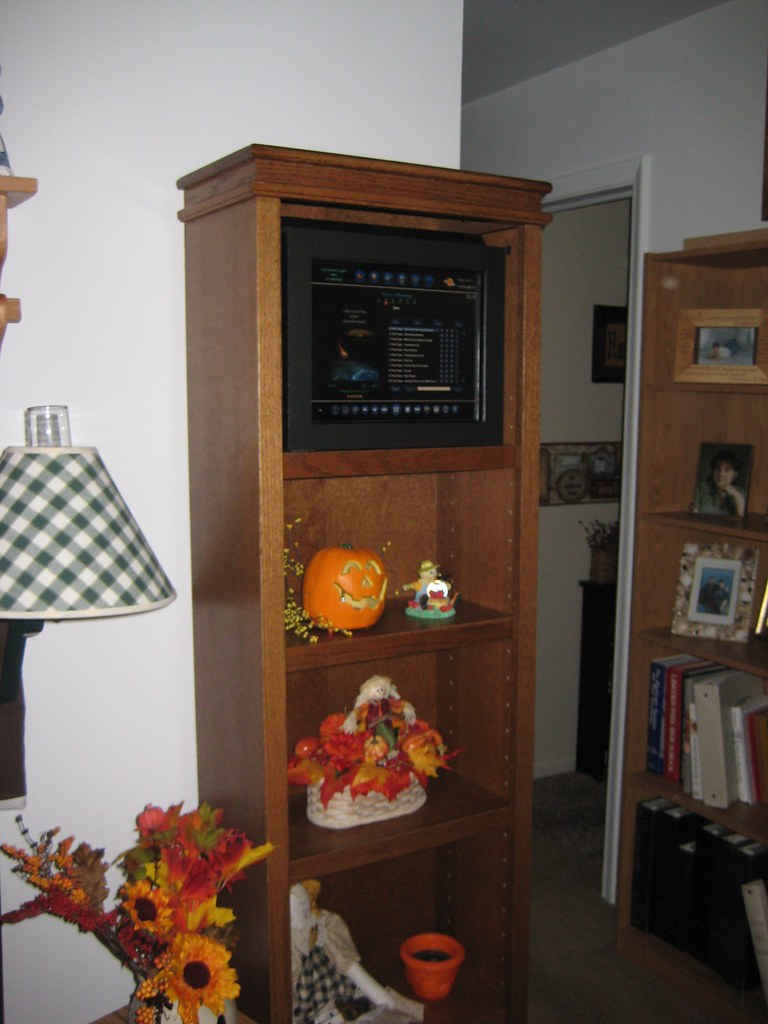
I have finished building up my ELO 15" touchscreen case that will go on a new bookcase we purchased for the living room. It was design to sit on the shelf and resemble a fish tank and will be running the Serene Screen-saver when not being used with Now Playing 2009.
There is a button on the Now Playing skin that will tell Girder to place the PC used for the ELO into standby using the 'psshutdown.exe' command. I could have done it all locally only but I also wanted to be able to suspend via Girder with scheduled events or an email to Girder. I have the ELO touchscreen system setup to Wake on Mouse so a simple touch to the ELO screen will wake it up.
Here are a couple snapshots before I moved it to the bookcase. The frame is made with wood and for the finish I used a 'hammered look' spray paint.
It has passed the WAF test.....
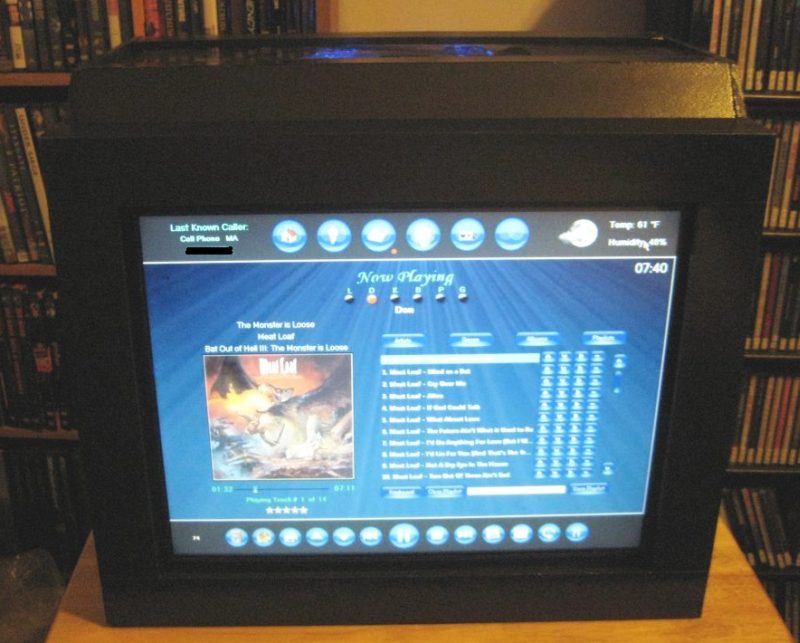
Fish tank without the smell or mess...hehehe
Audio Controls
I have been asked how I control the volume and power for my zones. Since I am using separate receivers which also have built in tuners I quickly decided not to use the volume control on the media server's sound devices as that would not allow me to control the tuners volume. So I use an IR command for volume up and down. The general method behind the Netremote skin is to have Girder events for each IR command sent to Girder and let Girder send the IR with the Ocelot and the Ocelet plugin (free plugin).
When a zone is selected to view and control via this screen:
two things happen. One is that Netremote sets which zone is being 'viewed' from JRMC (minimum version 11). This is independent of any other Netremote client so if you had several clients each could be viewing and controlling a separate zone. The other thing that happens is that a variable is set that is used as part of the event sending action for all the buttons on the main screen panel. This allows the front panel to send the correct events to Girder used for the current view. It sounds more complicated than it really is. The nice part of doing this is that on the Netremote side the IR commands are not really known at all thus making it completely generic. If a different receiver is swapped out only the Ocelot IR commands need to be changed.
Here are the main screen audio controls (All Zone Control Panel, Power On, Power Off, Volume Up, Volume Down):

You can also access and control any of the six zones audio settings by clicking the button on the far left. It will bring up a popup panel as shown below:
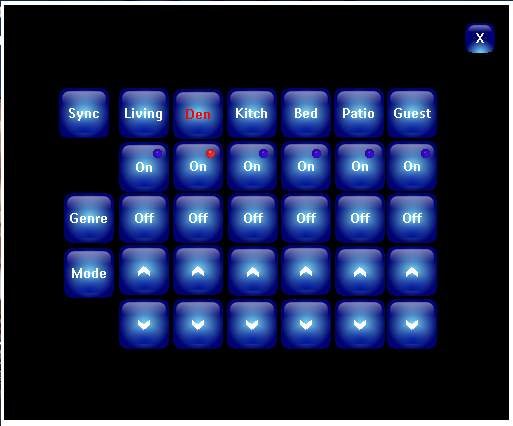
From here any receiver's power can be turned on and off as well as setting the volume. Also from this screen you can select which zones are hardware sync'd with the master zone allowing any of the five auxiliary zones to play the same track with no time difference. Another nice thing is that only the receiver for any zone that is being used is powered up so it is very green. I have a hardware power status circuit I designed that is monitored via the Ocelot so that the power status LED's on the Netremote screens reflect the true power status. I used to use a persistent variable to keep track of this but as with any software tracking method it was not 100%.
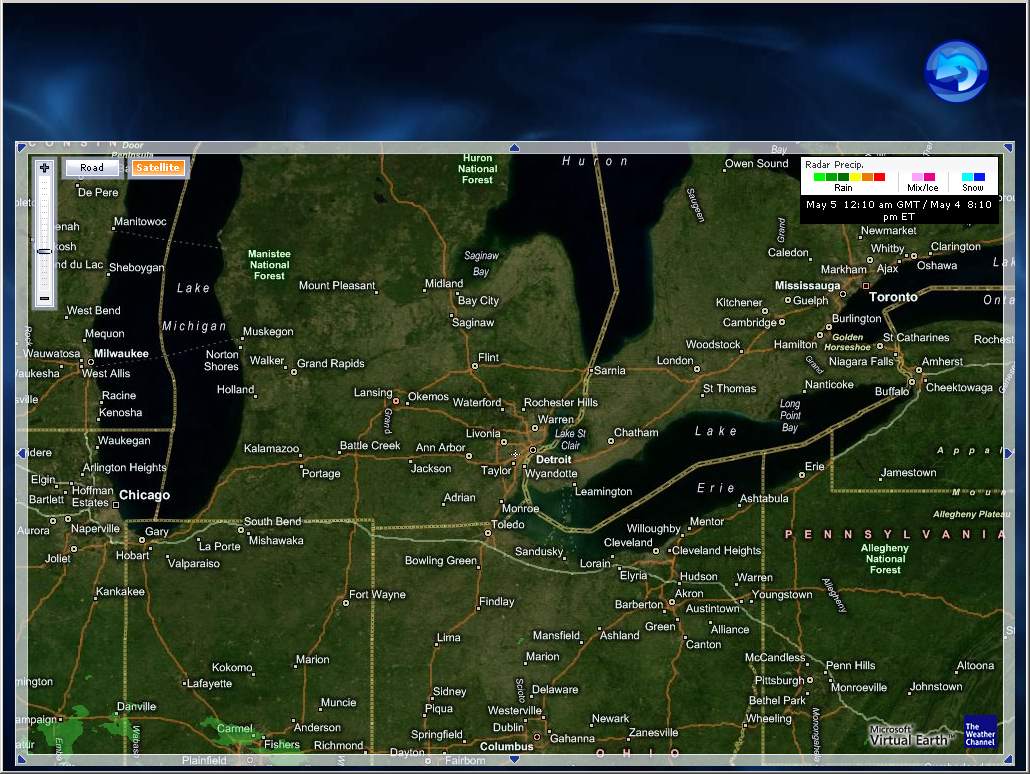
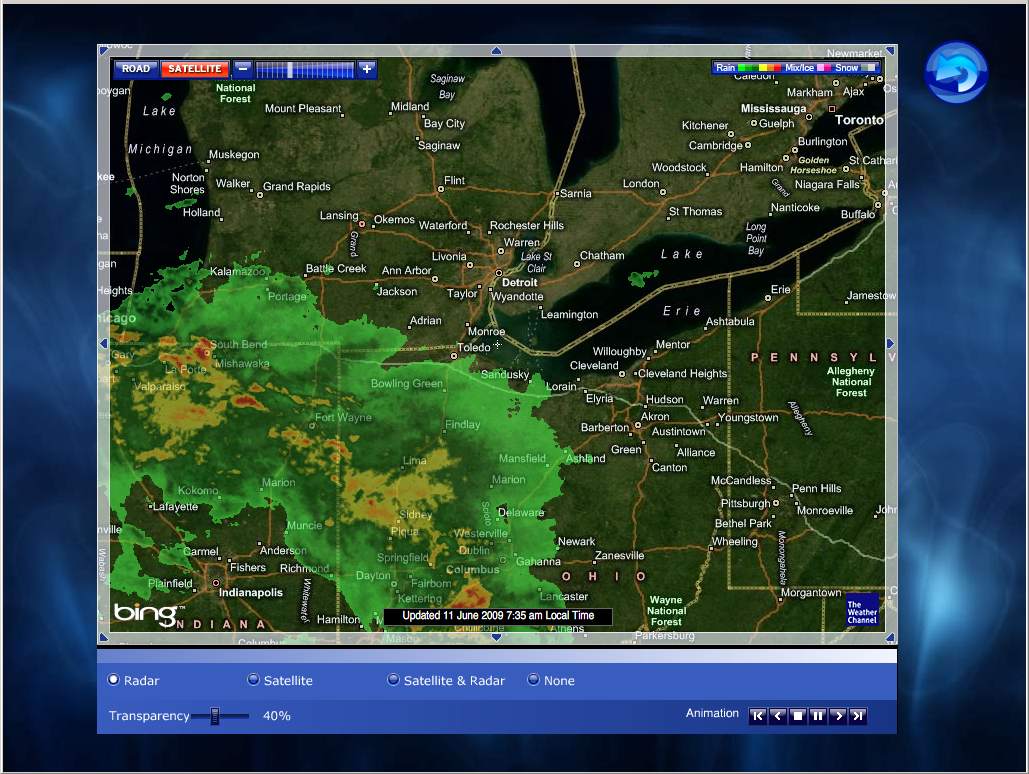
Microsoft Visual Earth Interactive Radar
Thanks to harleydude and JohnWB I now have the MS Visual Earth Interactive radar screen. It operates very well as a flash object on Netremote. Looking forward to adding other flash objects down the road.
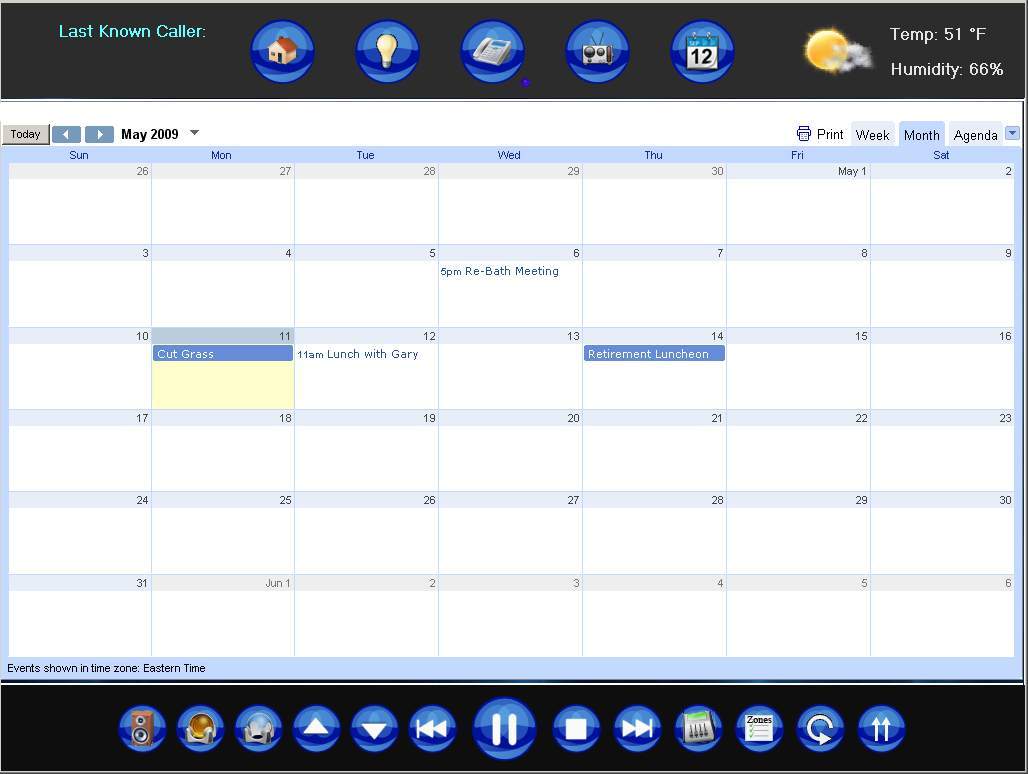
Nowplaying Google Calendar
I have been working on getting Google Calendar as part of Nowplaying. The first step was to get a 'view' of my calendar in a popup panel. The next phase will be to add events. For now I found a cool application called GCALDaemon that will let you sync Rainlendar to your Google Calendar. Anything I add to Rainlender will automatically show up on Google Calendar and the Nowplaying view.
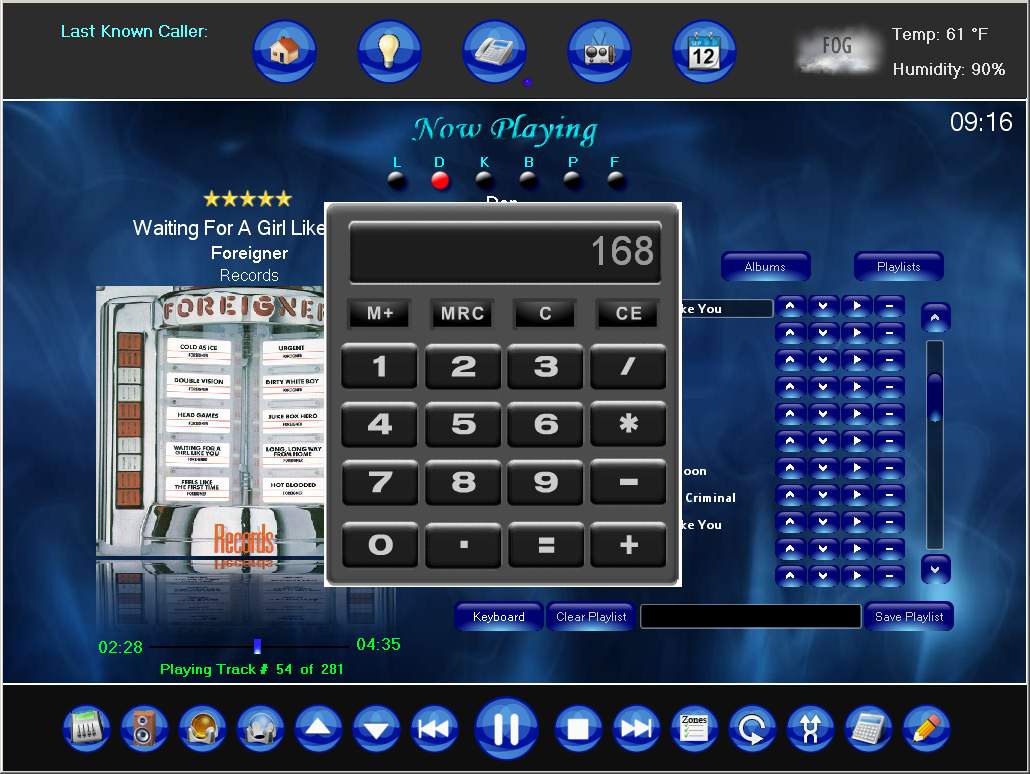
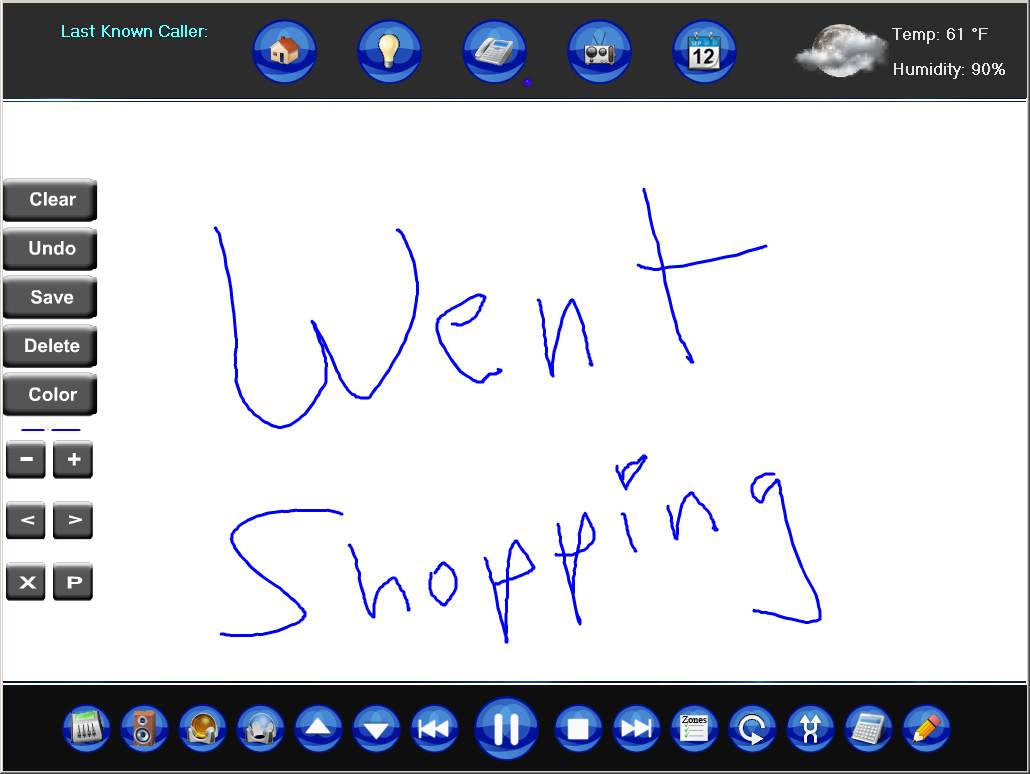
Nowplaying Calculator and Drawing Pad
I have added a popup flash calculator and drawing pad to my skin. Seems like they will come in handy at time. It will take awhile for me to get better at drawing freehand to leave notes.
Interactive Weather Radar
Thanks to some posts on the forum and Jonathan on the CQC forum for figuring out the flash object link I spent 15 minutes this morning and added it to Nowplaying. Works very well.
This thread is not open. If you wish to respond, please respond using the original blog entry link. View the original blog entry
Newest changes:
Updated picture of my rack with the new Cyberpower UPS and Sony ES receiver removed.
History and block diagram
Real name: John Wilson
Nowplaying is my home automation and whole house music system.
List of equipment
PC's :
3.0 Ghz P4 W/ 1.5 GB Ram automation/music Server running XP, JRMC 11, Girder 5, Netremote Media Bridge and Elk M1EZ8
750GB total storage for 800+ CD's Ripped with APE lossless audio format.
1 - ELO 15" Touchscreen with a dedicated 1.6GHZ system
1 - Nokia 770 touch pad: Running RDP into a server
Dell Axim X5 running Netremote Pro
Hardware User Interfaces:
GUI Interface "Now Playing" for Netremote on the Touchscreens
Automation Hardware:
Elk M1EZ8 with Elk-M1XRF2G wireless receiver and PSC05 X10 interface
Ocelot 16 idependant IR zones
W800 Receiver
Various X10 Modules and Switches
Hobby-boards 1-Wire Master Hub
Other Hardware:
WinXP Pro running SageTV for timeshifting running a 3800+ X2 w/7600GS for HD playback at 1080p
Buffalo WHR-G54S flashed with DD-WRT
16 Port 10/100 Hub
A/V Hardware:
Onkyo TX-SR707 7.1 Home Theater Receiver
4x Technics SA-EX140 200Watt RMS Stereo receivers
1 - Sherwood RX-4109 (for the IR controlled A/B speaker)
Audio Distributed amp via Xantech AV-61.
M-Audio Delta 410 10 Channel Sound Card
Xitel PRO HIFI USB Sound Device used for TOS Output and Zone Synchronization
Xitel HIFI Link USB Sound Device added for 6th zone
Samsung 56" DLP HDTV
Polk Monitor 50 Speakers
Various speakers for the auxilary zones like the BIC in-wall speakers
Also newly added is my CyberPower Intelligent LCD Series CP1500AVRLCD UPS 1500VA
Software:
Girder 5 w/Elk plugin
Netremote 2.0 Pro
Jriver media center V11
Some Applications:
6 independent zone touch screen controlled whole house audio system sourced by 800+ CD's and independent tuners
Announce all caller id and reminders over independent audio distribution system.
Announce end of washer and dryer cycles
Popup for caller id with monitor wakeup and scrolling caller log
Light control popup panels for touch screens
Weather details page for touch screens
Elk Security Panel control
ZoneMinder with 4 IR cameras for remote monitoring and motion capture
Description:
Well here is a short history as to how my whole house audio has evolved in its design. I originally started with the idea of having a single amp and use LPADS in each room. What I came up with was as cheap and offered much more features and felt it was the best solution for the money long term. The problem with using a single receiver to drive multiple speakers are numerous. First you will have to have a way of impedance matching the speakers to your receiver. I seriously looked at devices like the HACS AB8SS but those cost quite a bit more money and you still will have to have some way of adjusting the volume in each room that you have your speakers in. For that you could use a manual or IR controlled LPAD mounted in the wall. Remember that this LPAD has to dissipate the wattage your driving so plan on it getting HOT. In researching LPADS I have read of many horror stories of people having them melt down in the walls. I also would be faced with all the work of mounting them and running the wires. A decent LPAD can run you $50-$100 each for manual control and double that for IR control.
I had no doubt that the 220 watt RMS receiver I currently had would drive all the speakers so power was not on issue. My original idea back several years ago would share a single 400 disc CD changer over multiple zones so again using a single receiver would work quite well. Again what had a big impact on my decision was the cost of the LPADS that I would need to purchase.
After weighing all those ideas (and trust me I was planning on going that route at first) I decided to take a different approach. First I live in a home that has wet plaster walls and its a real pain to mount anything in the walls so I was not looking forward to LPADS in each room anyways. I also wanted IR control so that I could use a touch screen and Homeseer (now Girder 5) to control it down the road. That meant spending big bucks on the speaker switcher/impedance matcher and all the IR controlled LPADS.
What I came up with ended up costing much less and really being much less work. I decided to purchase a Technics 200 watt stereo receivers for each additional room that I wanted to put a 'zone' in. So keeping my home theater system as the main 'zone' I purchased 4 extra receivers. Each receiver is IR controllable from Girder 5 and can be powered off separately. I centrally located all the receivers in a rack.
Each zone then has its own volume, power, mute, bass & treble controls. Since the wiring came down to running speaker wires from the 4 aux zones to each of the rooms it was much easier as I had no LPADS to buy or install. Each room has its own 200 watts RMS so there is no chance of a melt down. Once I chose the Technics SA-EX140 200Watt RMS Stereo receivers I looked on Ebay and bought 4 at an average cost of $50 each. Thats less than the 4 manual LPADS I would have had to buy. All four receivers are close to my home automation server and are totally out of site. No need to have them visible when you can control them remotely with IR control via the touchscreen interface.
Now with separate receivers it opened up a few options. Each zone had its own tuner so that was a bonus. When I first did this I shared a 400 Disc CD changer for all zones. I have since went to a hard drive solution that enabled me to really indulge by having 5 distinct zones. Using the M-Audio 410 PCI Sound Cards that has 10 channels I am able to have a multizone setup with audiophile specifications. I use the built in sound card for my TTS voices and everything works well together. All the receivers are controlled via my 'Now Playing' GUI interface done using Netremote/JRMC/Girder 5/Ocelot. I use the SECU-16IR module for IR control as it has independant IR zones. The IR zones need to be indepenant due to the fact that I am using the same receiver for all the axillary 'zones'.
Every day I sit down at my PC in the den and use my Now Playing GUI front end I have access to over 800+ CD's,
internet radio stations, and 10 preset FM local stations. My wife can play what she likes in the living room,
bedroom or kitchen and I play what I like. With 1500 Watts RMS available I have no worries about heat or clipping
the amplifiers and destroying the speakers. I also have to say it all sounds quite nice.
I originally used Homeseer but have since migrated to Girder 5 as the home automation solution. I find it more stable and integrates better with Netremote.
I also have added an Elk to my setup and use the Elk plugin for Girder 5.
The system design has a hardware based syncing option that lets you play the same CD in more than one zone. This allows the track to be in complete sync unlike most software based syncing solutions I have heard.
I recently upgraded my Sony ES to an Onkyo TX-SR707 receiver for my new LG BD-370 Blu Ray player to get the 7.1 lossless audio formats off Blu Ray discs. I am impressed with it. It has been integrated into the Now Playing project nicely.
More screenshots and information coming
Nowplaying Skin Intro and Mainscreen
I have always loved listening to music and started my record collection (those black vinyl things) when I was fairly young. I jumped into CD's pretty early on and have collected over 800 discs. When I first started down this path I was always frustrated as it seemed that my music library was under utilized. After all having hundreds of CD on racks around the house made finding and selecting a CD time consuming at the very least. Purchasing a 400 CD changer was a step in the right direction. I quickly placed 400 of my favorite CD's into it and with the Sony advanced remote that came with it, I now had some of my library at my finger tips.
I then purchased a Slink-e interface that connected the changer to a PC and with the development of larger hard drives (a whopping huge 300MB) I was able to rip the remaining CD library to disc and merge it with the changers application called CDJ which acted like the database and mp3 player.
Over the years I have always wanted a touchscreen interface. I started playing with my first design when I purchased an Audrey. It was HTML based and it worked somewhat. This first Nowplaying project interfaced with CDJ to allow remote access and control from my desktop and small touchscreens around the house. What I really wanted was a dedicated client side interface. My next stab at this type of interface was actually written in Labview and looked quite nice for its day.
I came across an application called Netremote. It was based off the Pronto system but ran on Windows 32 and Windows Mobile operating systems. I was immediately hooked on it as it was extremely flexible and ran well on slower touchscreens. Editing skins was pretty difficult using a program called Tonto. However Netremote has since matured over the years and now has a very nice GUI designer application. Also the the company merged with the developer of Girder and a tight integration between the two applications developed. Girder has matured and with the latest version it has become a powerful home automation application. I have since migrated from Homeseer to Girder 5 and redesigned Nowplaying to take advantage of all the new features now available.
Many of you have seen the screen shots over the years of my Nowplaying skins. I have recently spent time tweaking the latest version and will post some of the newest screen shots here.
This first screen shot is my main page. Now Playing has six independent zones and from this screen you can pick which zone to control as well as edit the current playlist.
Album Browser
Below is my album browser screen. With Netremote you can create GAC's which originated as 'Grab Album Covers' but has since been greatly embellished. You can think of it as a graphical for-next loop display. With it you can organize objects to view. I have posted these type of screen shots in the past but realized I have never explained their functionality.
The screens main section will display information such as 'albums', 'artist/album', 'genres' and 'playlist'. There is a scroll bar on the right to access the entire list. Any 'view scheme' you want to design in JRMC can be sorted and displayed in this 'GAC'. The buttons along the top will go fetch the information asked for from JRMC and display it. The keypad on the left side allows you to quickly jump to the letter/number of the currently displayed list. There is a 'Search' function as well that will display any results in the 'GAC'. There is a small 'icon' that looks like a man near the top left of the 'GAC'. When this is clicked all the CD's from the artist that is currently being playing are displayed in the 'GAC'.
With any of the returned information displayed in these 'GAC' you can 'drill' down into the data. For instance if you click on one of the albums listed in the list it will switch to display the individual tracks on that album. The same goes if the list is displaying the 'artists'. It will drill down showing all CD's by that artist. There is a small button that appears above the scroll bar that will let you return to the parent list. At the right of each entry in the list being displayed there is a small > and >+ symbol. Clicking the > symbol will tell JRMC to play that track/album/playlist (and all child content). Clicking the >+ will add that item to the currently playing playlist.
As this interface is designed to be used with touchscreens there is an onscreen keyboard that can be brought up to provide the means to enter the search text.
Here is the network configuration showing the client/server relationship of Nowplaying
Nowplaying Security and Lighting Control
Below is my Security and Lighting control panel. I can control the lights and arm/disarm the Elk security system. Also from this screen I can view the status of several things including:
Every light in my house
Doors and Windows security status
Audio amplifier power status for each zone (true power status through hardware detection) *
Motion detector status *
Humidity levels
Temperatures from 1-wire as well as Elk keypad
Garage door status
Washing Machine Status *
Dryer Status *
LED indicator for phone hook status
LED indicator if there has been a phone call *
* Animated GIF files used
Another feature added with high WAF (wife acceptance factor) is my phone on/off hook status done using the Elk. The music gets paused by an incoming call via the CallerID handler but now when the phone gets hung up the music will resume.
Also there is a phone line in use icon to see if the phone is being used.
Well at the request of my wife I wrote an Elk routine that makes it possible to pause the music in all zones by picking up the phone and hitting the flash button once. When the phone is hung up the music will resume.
Weather
Nowplaying displays the current weather conditions at the top right of the most screens. It also has a more detailed weather screen that also displays the 5 day forcast and moonphases.
You can also display several animated radar images by selecting the buttons along the left and right sides.
Tuner Control
Well one advantage to using inexpensive receivers for the multiple zones is that each one has its own tuner. So I have all 6 receivers programmed to 10 presets that can be selected from Nowplaying.
Caller ID Database Updater
Here is my new Caller ID Database Updater. When a new call comes in that is not in the database I can use this popup screen to add it with a new name, number and text to speech announcement.
Nowplaying Hardware
I decided to take a couple pictures of my hardware setup for Now Playing. This picture shows my 3 PC's. The far left one is for my HTPC running SAGETV. The middle one runs Linux with Zoneminder for my security cameras. The far right one is my Now Playing server running Girder 5, JRMC and hosting over 850 CD's ripped using APE lossless format. Below them are the receivers used for the five auxiliary zones (as well as a spare receiver). My main Onkyo receiver was moved to my home theater stand to have HDMI pass through for the Bluray audio formats. Also new to the right of the Dell is my new Cyberpower UPS.
Also shown is the Elk, Edgeport USB and the Netcaller ID boxes.
The backside shows my Ocelot, SECU-16, SECU-16I and SECU-16IR along with my 1 wire interface
This box hooks up to me SECU-16 and has 6 opto-coupled inputs that will monitor the power status for all six receivers for my whole house audio system. Instead of using current sensors I decided a few months back to use some very cheap wall-warts I found and plug each into the switched outlet of each receiver. This came out to be a cheap as well as functionally neat way of handling it. Also in the box are 4 10AMP mini relays that will be used for such things as my Ocelot watchdog that will monitor my servers.
The finished box mounted. The small switch on top is a watchdog override.
I have finished building up my ELO 15" touchscreen case that will go on a new bookcase we purchased for the living room. It was design to sit on the shelf and resemble a fish tank and will be running the Serene Screen-saver when not being used with Now Playing 2009.
There is a button on the Now Playing skin that will tell Girder to place the PC used for the ELO into standby using the 'psshutdown.exe' command. I could have done it all locally only but I also wanted to be able to suspend via Girder with scheduled events or an email to Girder. I have the ELO touchscreen system setup to Wake on Mouse so a simple touch to the ELO screen will wake it up.
Here are a couple snapshots before I moved it to the bookcase. The frame is made with wood and for the finish I used a 'hammered look' spray paint.
It has passed the WAF test.....
Fish tank without the smell or mess...hehehe
Audio Controls
I have been asked how I control the volume and power for my zones. Since I am using separate receivers which also have built in tuners I quickly decided not to use the volume control on the media server's sound devices as that would not allow me to control the tuners volume. So I use an IR command for volume up and down. The general method behind the Netremote skin is to have Girder events for each IR command sent to Girder and let Girder send the IR with the Ocelot and the Ocelet plugin (free plugin).
When a zone is selected to view and control via this screen:
two things happen. One is that Netremote sets which zone is being 'viewed' from JRMC (minimum version 11). This is independent of any other Netremote client so if you had several clients each could be viewing and controlling a separate zone. The other thing that happens is that a variable is set that is used as part of the event sending action for all the buttons on the main screen panel. This allows the front panel to send the correct events to Girder used for the current view. It sounds more complicated than it really is. The nice part of doing this is that on the Netremote side the IR commands are not really known at all thus making it completely generic. If a different receiver is swapped out only the Ocelot IR commands need to be changed.
Here are the main screen audio controls (All Zone Control Panel, Power On, Power Off, Volume Up, Volume Down):
You can also access and control any of the six zones audio settings by clicking the button on the far left. It will bring up a popup panel as shown below:
From here any receiver's power can be turned on and off as well as setting the volume. Also from this screen you can select which zones are hardware sync'd with the master zone allowing any of the five auxiliary zones to play the same track with no time difference. Another nice thing is that only the receiver for any zone that is being used is powered up so it is very green. I have a hardware power status circuit I designed that is monitored via the Ocelot so that the power status LED's on the Netremote screens reflect the true power status. I used to use a persistent variable to keep track of this but as with any software tracking method it was not 100%.
Microsoft Visual Earth Interactive Radar
Thanks to harleydude and JohnWB I now have the MS Visual Earth Interactive radar screen. It operates very well as a flash object on Netremote. Looking forward to adding other flash objects down the road.
Nowplaying Google Calendar
I have been working on getting Google Calendar as part of Nowplaying. The first step was to get a 'view' of my calendar in a popup panel. The next phase will be to add events. For now I found a cool application called GCALDaemon that will let you sync Rainlendar to your Google Calendar. Anything I add to Rainlender will automatically show up on Google Calendar and the Nowplaying view.
Nowplaying Calculator and Drawing Pad
I have added a popup flash calculator and drawing pad to my skin. Seems like they will come in handy at time. It will take awhile for me to get better at drawing freehand to leave notes.
Interactive Weather Radar
Thanks to some posts on the forum and Jonathan on the CQC forum for figuring out the flash object link I spent 15 minutes this morning and added it to Nowplaying. Works very well.
This thread is not open. If you wish to respond, please respond using the original blog entry link. View the original blog entry