You are using an out of date browser. It may not display this or other websites correctly.
You should upgrade or use an alternative browser.
You should upgrade or use an alternative browser.
DJK New Construction
- Thread starter DJK
- Start date
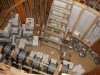
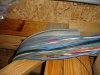
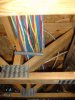

Enjoy the pictures
With respect to your rough-in, I am speachless. Amazing work. From the work on my house, I know how time consuming it is to route the wires properly, and your work just looks perfect.
Is a wall curved in one area? Is that a stair hall? Nice. Very nice. Do you have some conduits for future proofing your house too?
Thanks for the nice compliments.
CORT,
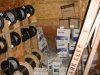
Yes, the Home Automation room is going to be below the curve staircase. The house is like a square donut with a courtyard in the middle, so the stairwell was centrally located near on corner. If I were to do it over again, I would have been doing prep work such as selecting and marking where the cable would run while the electricians were working (aka, when it was warmer!)
Only half the runs are in, so I'll be sure to update the pictures once all the wiring is in place.
CORT,
Yes, the Home Automation room is going to be below the curve staircase. The house is like a square donut with a courtyard in the middle, so the stairwell was centrally located near on corner. If I were to do it over again, I would have been doing prep work such as selecting and marking where the cable would run while the electricians were working (aka, when it was warmer!)
Only half the runs are in, so I'll be sure to update the pictures once all the wiring is in place.
Thanks for the nice compliments.
CORT,
Yes, the Home Automation room is going to be below the curve staircase. The house is like a square donut with a courtyard in the middle, so the stairwell was centrally located near on corner. If I were to do it over again, I would have been doing prep work such as selecting and marking where the cable would run while the electricians were working (aka, when it was warmer!)
Only half the runs are in, so I'll be sure to update the pictures once all the wiring is in place.
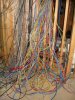
Only half? What a big job. I am sure you have already thought about this, but it is very helpful to snap pictures of everything before the sheetrock goes up. Ideally one should have a series of digital pictures that depict every square inch of wall and ceiling before the walls are sealed. I took about 50 pictures of my house and missed a few key areas. I wish I had taken more pictures. Interestingly, I refer to these pictures often. For instance, I installed a baby gate, and if I hadn't reviewed the pictures from this location, I might have lagged into a PVC condensation drainage pipe. Plus I realized that I needed another conduit from the basement to the attic. With the help of my construction pictures, I was able to choose a spot to install the conduit where there is no fire blocking.
Thank you for sharing the photos. Post more when you can.
Pictures are a great way to document your wiring. When I built my last house 15 years ago, I choose to video tape it. I did nearly 2 hours of video complete with commentary. Each subsystem in the house was captured and special situations were documented in the commentary.
The only reason I bring this up is that the commentary turned out to be important as the ability to see what was behind the drywall when trying to figure out what was done.
I'm sure this could be done today with a digital camera and plenty of notes, but having it all on one video was helpful.
The only reason I bring this up is that the commentary turned out to be important as the ability to see what was behind the drywall when trying to figure out what was done.
I'm sure this could be done today with a digital camera and plenty of notes, but having it all on one video was helpful.
Great suggestions on the documentation. I heard that it is difficult for your eyes to stay focused on a single room with bare studs exposed, so I was planning on hanging a tarp on the back of each wall before pictures. Video is a great suggestion.
Yeah, 1/2 way as far as pulls go but since the long pulls were done first, more than half way by cable distance. What a job this was/is. I can't wait to do the "I'm done" posting that bezelrob just did")
Although I'm pulling to a single location, there are 4 smaller boxes for the lighting that I plan to have extra cat5e running to just in case. Conduit to each drop, between the enclosures and attics as well since we all might be running fiber or cat7 in 10 years...
which may work out well, cause it's going to take 10 years to forget the pain involved to want to do it again.
Yeah, 1/2 way as far as pulls go but since the long pulls were done first, more than half way by cable distance. What a job this was/is. I can't wait to do the "I'm done" posting that bezelrob just did
Although I'm pulling to a single location, there are 4 smaller boxes for the lighting that I plan to have extra cat5e running to just in case. Conduit to each drop, between the enclosures and attics as well since we all might be running fiber or cat7 in 10 years...
which may work out well, cause it's going to take 10 years to forget the pain involved to want to do it again.
beelzerob
Senior Member
Yeah, 1/2 way as far as pulls go but since the long pulls were done first, more than half way by cable distance. What a job this was/is. I can't wait to do the "I'm done" posting that bezelrob just did
Heh..not to disappoint you too much, but I was about 80% done with the pulls after the first week. The remaining 20% took up the next 2 or so weeks (though they weren't full weeks like the first had been). You end up with all this little stuff that you know needs doing.
I highly recommend you start or keep a list of things that you know need doing, especially as you think of them, or you will for sure forget something. When we first started, I didn't have a list because the wire was items 1 - 100 on the list....but as we kicked out pulling wire, the little details started becoming more important (conduit to here or there, mudrings installed, window wired sensors installed, attic cable support, etc).
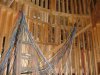
I also thoroughy recommend pics and/or video....we kinda screwed it in this, because we didn't take pics until after we had installed the sound dampening insulation, and I didn't feel like ripping it out. You can still see what enters a stud cavity from the top, but it's still not as complete as I'd have liked.
Yeah, I actually started with the list where wiring was AFTER placing mud rings, running conduit, etc.
I'm glad to announce that I finished pulling the last runs yesterday.
Will post more pictures after I get the wiring straightened out.
I'm glad to announce that I finished pulling the last runs yesterday.
Will post more pictures after I get the wiring straightened out.
Yeah, 1/2 way as far as pulls go but since the long pulls were done first, more than half way by cable distance. What a job this was/is. I can't wait to do the "I'm done" posting that bezelrob just did
Heh..not to disappoint you too much, but I was about 80% done with the pulls after the first week. The remaining 20% took up the next 2 or so weeks (though they weren't full weeks like the first had been). You end up with all this little stuff that you know needs doing.
I highly recommend you start or keep a list of things that you know need doing, especially as you think of them, or you will for sure forget something. When we first started, I didn't have a list because the wire was items 1 - 100 on the list....but as we kicked out pulling wire, the little details started becoming more important (conduit to here or there, mudrings installed, window wired sensors installed, attic cable support, etc).
I also thoroughy recommend pics and/or video....we kinda screwed it in this, because we didn't take pics until after we had installed the sound dampening insulation, and I didn't feel like ripping it out. You can still see what enters a stud cavity from the top, but it's still not as complete as I'd have liked.
beelzerob
Senior Member
I'm glad to announce that I finished pulling the last runs yesterday.
Oh, those famous last words.....
Last weekend found my wife and I running a last handful of wires to the 2 places they hadn't hung sheetrock yet.
felixrosbergen
Senior Member
DJK,
The project looks like a pile of fun. Out of curiousity why don't I see anyone use dim rail termination blocks that are used in the Commercial automation industry. I have used some of the Euroblocks, they are cheap but don't have flexibility in terms of jumpers and grounding. During the design and implementation of a commercial control system last fall, i gained and great deal of respect for the easy of terminating and control wiring on the DIN rails. These were used mostly for terminating 18awg wires however but keep the following terminator modules in mind on your next project. They could come in handy for certain things, also i really like the ability to have different colors.
Rated for 26-12 awg @ 600v depending on the item.
3 circuit block Automation Direct - triple level termination block
single level termination block - Automation direct - termination blocks pdf
I too have some experience in industrial automation and like these terminal blocks....anybode have any figures on how much they would cost? The labelling features and jumping features (handy for power distro to PIR, etc) are very nice. If the price is right i will consider this for my install. The blocks are quite large but then again most of what i have seen is for 110v or 380v 3 phase wiring..i assume they have smaller ones availabel for 12v/14v.
Mounting the DIN rails in the cans should end up looking really nice and clean. It will probably take up much more space than a 66 or 110 block. Can 66/110 blocks be used with stranded wire? The terminal blocks above could certainly be used with stranded.
Next step is industrial DIN rail mounted 12v power supplies <_< . I need to keep back in touch with my contacts at Siemens for a good deal.
felixrosbergen
Senior Member
I just did some some research on these DIN rail terminations.
So if one wanted full flexibility and assuming an ELK install one woudl want 5 terminals per zone i think:
- Zone Input (each homerunned to the ELK
- Zone NEG my understanding is that this is different from the regular NEG, but could be jumper with all Zone NEGS's on the board, so one could just daisy chain them on the terminal strip)
- +SAUX switched AUX power (daisy chained on terminal strip)
- VAUX non siwtched AUX power (daisy chained on terminal strip)
- NEG for AUX power (can the same NEG be used for switched an unswitched AUX poweer???) If not then 6 terminals per zone would be required.
With the above setup a lot of the power distribution can be done by daisychaining at the powerstrip and thus dramatically reduce the wiring mess in the can. For 16 zones you would only run 20 wires (16 zone inputs, common zone NEG, +SAUX, +AUX and NEG-AUX) from the terminal strip to the ELK.
Essentially the 5 (or 6) terminal can accomodate any type of zone wiring and one could change a zone by just changing the 'field' side of the terminal strip. To me this seems highly organized, structured and flexible.
Each terminal is about 5mm wide. So at 5 per zone this is 25mm (1"). With a horizontal strip and leaving space along side for wireways you could probably get 8 zones wired on a row.
Whats the thoughts on this from those who have done this before? I know the terminal blocks are not cheap (100 blocks for $37.50).