Hanover Cocoon
Over the next series of posts, I hope to introduce you to my Cocoon project. I will be taking a slightly different approach – I plan on writing this almost as a beginners guide. Why? Because I’m hoping it helps someone else just getting started (these forums have been a great help to me and I hope this helps someone else), plus it allows me to share some things I’m doing which might be cool (that nobody else doing) or that might be wrong (and someone can stop me!).
Introduction
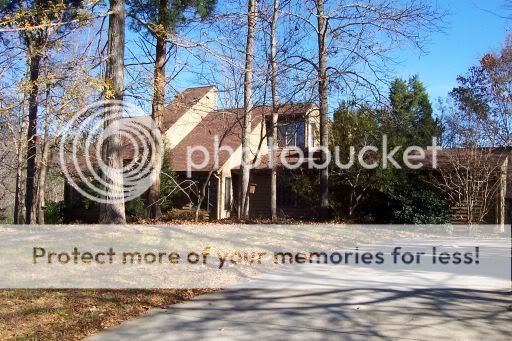
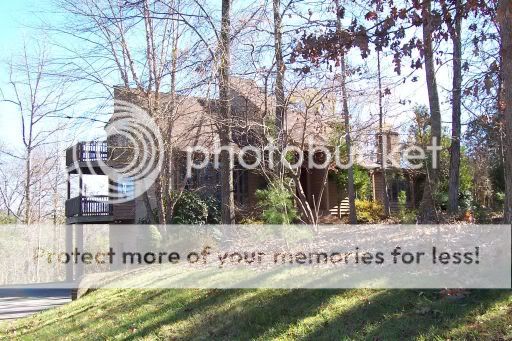
My family purchased this existing house about 18 months ago. It is approximately 4500 square feet if you add in the basement, and has two garages.
Because of the size and nature of the house, we knew we wanted to automate it. I semi-automated our previous house and knew we wanted more.
Systems Overview
Over the next several posts (probably take me a couple weeks), I plan on covering the following systems:
- Automation Controller (HomeVision Pro)
- Security (Caddx NX-8E)
- Lighting (UPB)
- HVAC ((3) RCS TR-16s with Master-Trol Zone Controller)
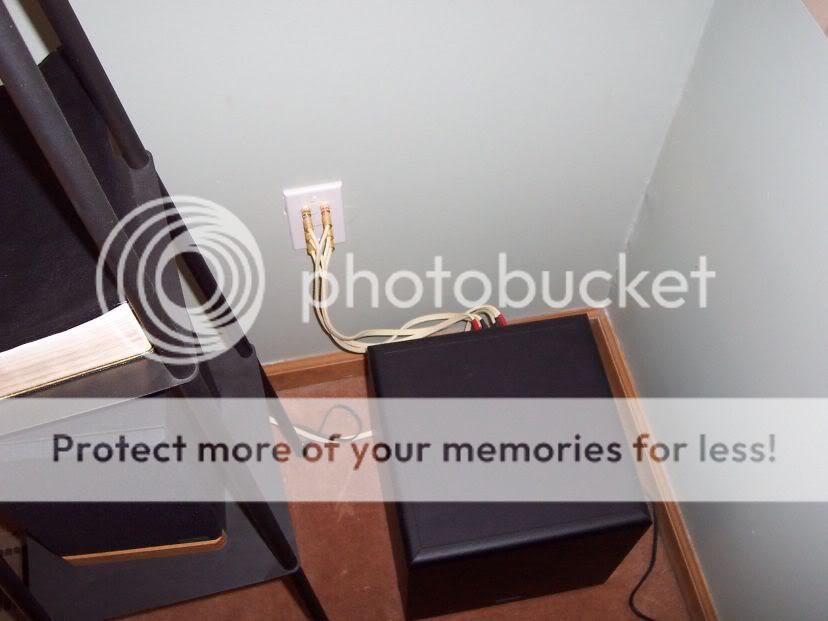
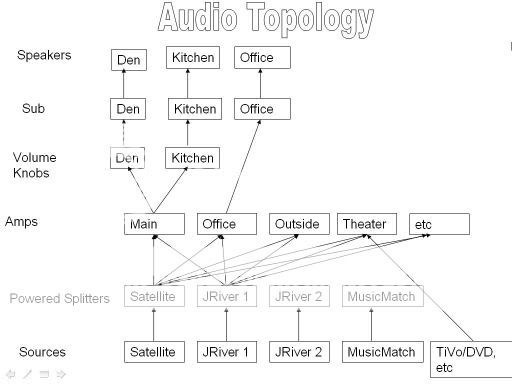
- Audio/Video
- InfraRed
- Networking, gaming, miscellaneous
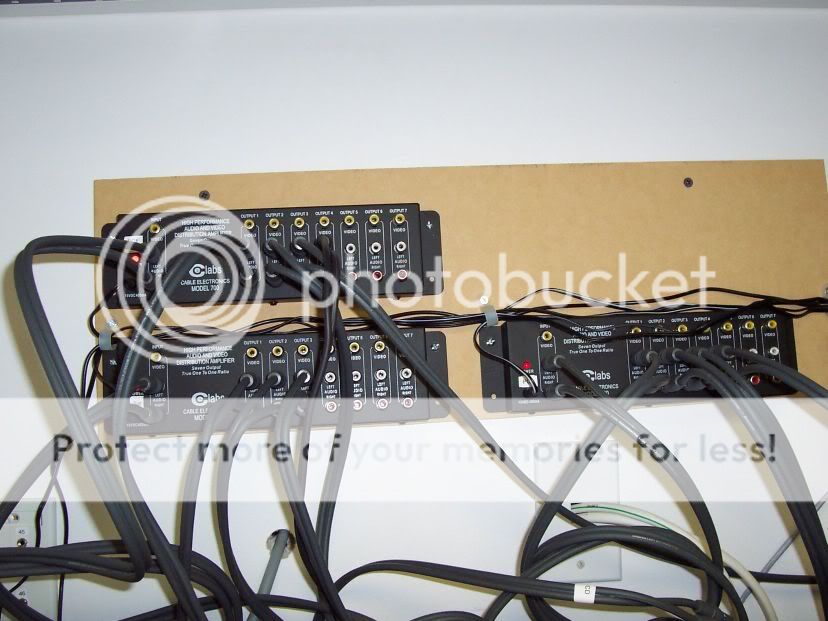
This is my automation closet. On the left is most of my networking and AV equipment.
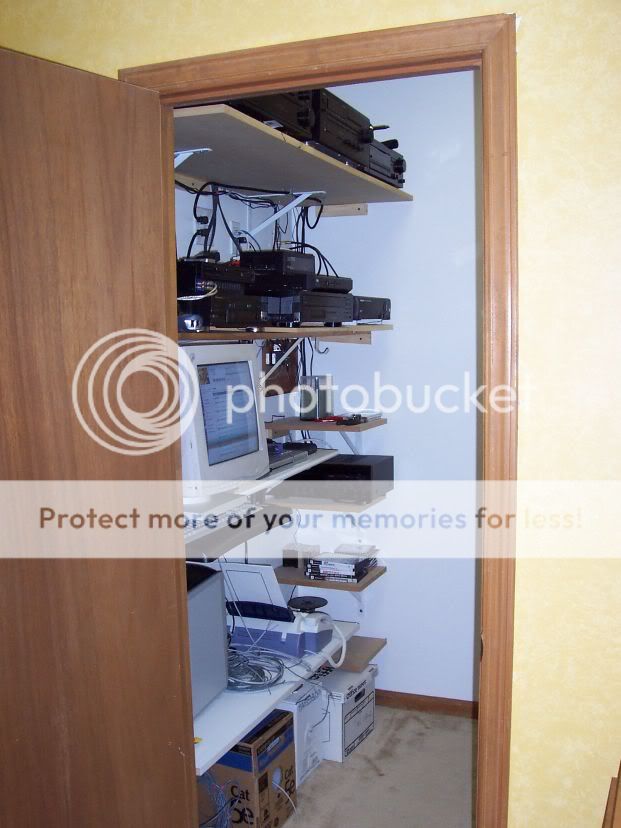
On the right is my automation equipment (you can see two of the three HVAC thermostats (I haven’t installed the third yet), my HVPro and Caddx security enclosure).
Favorite Tools
I have learned to love a couple very inexpensive tools that I felt compelled to share.
Labels - I use simple peel/stick labels that I run through my printer. I number all the wires and keep a spreadsheet listing each wire, length (helpful for the next run that might be close, I can get an idea how long to pre-load), use, etc. If I was to do this over again, I would probably have gone with a better labeling system that labels the wire’s use on the wire itself (I think Electron is doing it this way). My approach isn’t bad, but the other would probably be a little easier to troubleshoot in the distant future (wouldn’t require looking at my spreadsheet to know a wire’s use).
Yellow 110 punch - I bought this for $2.99 at Automated Outlet.
(http://www.automatedoutlet.com/product.php?productid=317&cat=118&page=1) The 110 punch is nothing special, but I love how it strips Cat5 wires. In the past, I struggled with this… my wire strippers didn’t do a good job and would occasionally nick an interior wire. Since I’ve switched to this tool – no more nicked wires! I can’t tell you how happy this $2.99 tool has made me!
¾†Conduit Bracket - I can’t say enough about these – I use them everywhere. I try to run all my wiring through these – it keeps them neat, and is easy to install. I buy them in bulk bags from Lowes/Home Depot.
Yellow Telephone Splices – put in two wires, squeeze with pliers and they are locked in and connected. There is a gel inside which also helps with keeping moisture out. These are excellent when working with a security system (EOL resistors).
Blue Conduit – as you can see here, I started out pulling my wires individually down the wall (these go to my security panel). I later realized what a pain this was and decided it was much easier to slide down several blue conduits to the opening in the wall. Now I can just slide new wires down the conduit – no fishing wires needed.
Automation Controller
I purchased a HomeVision Pro (http://www.csi3.com/HV_Pro.HTM) for my automation needs. I evaluated several options on the market and selected this one for a few reasons:
- ELK M1 was not available
- I wanted something that could manage my IR. Stargate can too, but I would have had to purchase another add-on box (cost was an issue since we just moved into a new house)
- I wanted to be able to control via TV screens (built-in)
- I wanted it to integrate to my security system (Caddx)
- I wanted 1 powerful box that was dedicated to HA. It is both an event controller (reacts to certain events) as well as time based (time or periods).
- I wanted built-in web capability (I use web pages to control the system locally or via the internet)
- I wanted native UPB support
- I did not want a system that was reliant upon a PC (up-time reliability), but could interact with a PC for additional functionality (programming, controlling music, logging events, etc)
This device has lived up to my expectations and I have been very happy with it. At this time, I am not using all of the capabilities (I’m not using any analog inputs or relay outputs (yet)).

Some Key Functions of my HA Controller:
- Monitors IR. It keeps track of which TVs or Stereos are on. It receives IR to turn on/off lights, set house modes, and to control my Media PC for playlists, etc. We have multiple Audio zones and HVPro keeps track of which playlists are playing in each zone, volume levels, etc. The user does not need to know the status of anything (Amp power, etc) – they just type in a playlist number into any IR remote and HA takes care of the rest.
- Integrates with Security. I have a Caddx NX-8E security system that monitors doors/windows/motion. It can arm the system as needed, but also watches these security zones for information (such as occupancy, lighting, etc.)
- Adjust HVAC. Based on occupancy or house modes – it adjusts HVAC system (so it doesn’t heat the Theater when we’re upstairs, etc). When we leave the house, it turns back the heat. As soon as the upstairs garage door opens, it turns up the heat so it’s already running when we walk in the door.
- Pager notification. If a security alert happens, or a garage door opens without turning off the security within 5 minutes – it will page my phone.
- House Modes – I have modes for Home, Away, Goodnight, Theater, Babysitter, Family, and Friends. Most are self explanatory, with a couple unique features. Theater disables the Theater glass break, adjusts the heat, dims the rest of the houses lights, etc. Babysitter automatically adjusts any TVs to satellite inputs (not our TiVo). It also monitors lighting (babysitters have a habit of leaving lights on all over the house). Family mode also adjusts TVs for satellite, and also reduces the amount of overnight status checking (lights, security, etc) because of their different habits/schedules. Friends mode is more party oriented.
- Web Pages – I currently have simple web pages to manage the automation system. I am in the process of enhancing these pages to make it easier and prettier.
- Alerts – anytime an alert condition occurs, it is stored in a queue. If it is serious, it pages me. If it is not serious, but “nice to knowâ€, it displays a message on the TV screen. The user can then press a button and remove the alert from the queue. When any TV is turned on and an alert is in the queue, it displays it.
- Lighting Controls – I use UPB for my lighting throughout the house (I’m not done yet, about 50%). At sunset, it dimly lights some key areas. At sunrise, it turns these lights off. In theater or friends mode, if DVD Pause or TiVo Pause are pushed, it lights a pathway to the bathrooms and kitchen. If motion is detected during the night, it dimly turns up nearby lights for 5 minutes.
- Overnight checkups – overnight it checks up on the status of the house: garage doors closed, HVAC set properly, security set, lights on/off properly, Amps turned off, etc. This is nice if someone forgets to do one of these events or if I have to get up very early for work or something like that. I know the system will make sure the house is set properly. It starts these checks based on telling the house we’re going to bed – or automatically based on conditions (motion, TV status, time, etc).
Future Plans:
- Manage phone calls and caller ID. Mute music when calls placed or received.
- HA Announcements – caller ID announcements, vocal alert notification, etc.
- Integration with weather. Not sure yet, either METAR system or a home weather station. Turn on sunset lights earlier if raining out, etc.
======================================================
Security
This post will focus on adding security. This was my first priority in the new house and I installed this before any other automation.
Since I chose to use HomeVision Pro as my main controller, I needed a separate security system. After a little research, I realized the best system for me was the Caddx NX-8E.
- HVPro seamlessly communicates with it – so the Security system appears to be part of the controller itself. All doors/windows/motion sensors can be used as inputs to the HVPro through a simple serial cable. Also, I didn’t require a fancy keypad for it since HVPro provides this functionality for me.
- Hardware is readily available
- Many people are familiar with it so there were people I could turn to if I got stuck.
I had never installed a security system before, and once I received the package – I was immediately intimidated. The manual was very complicated and did not make sense to me. However, I knew wiring the system could not be that hard so I got started.
My priorities were to secure the perimeter (all doors/windows), install glass break sensors anywhere there were large panes of glass, and interior motion sensors at all choke points. My plan was to use wired sensors everywhere possible, and wireless when I had no other choice (for both financial and reliability reasons). Many windows are side by side (sometimes as many as 14!) so I wanted to wire them in series so they would look like 1 window to the security system. Finally, I wanted to “hide†the system as much as possible.
Installing the security system was very laborious. Thankfully, my house is built on a basement which has a dropped ceiling – so I could move ceiling tiles out of the way to pull wires and drill holes. Every window/door required some creative wiring. In fact, each door/window was its own little project – sometimes requiring an entire day or weekend to complete.
SENSORS
Doors:
I used a combination of sensors for my doors. Where possible, I would install plunger switches (as the door closes, it pushes the switch in).
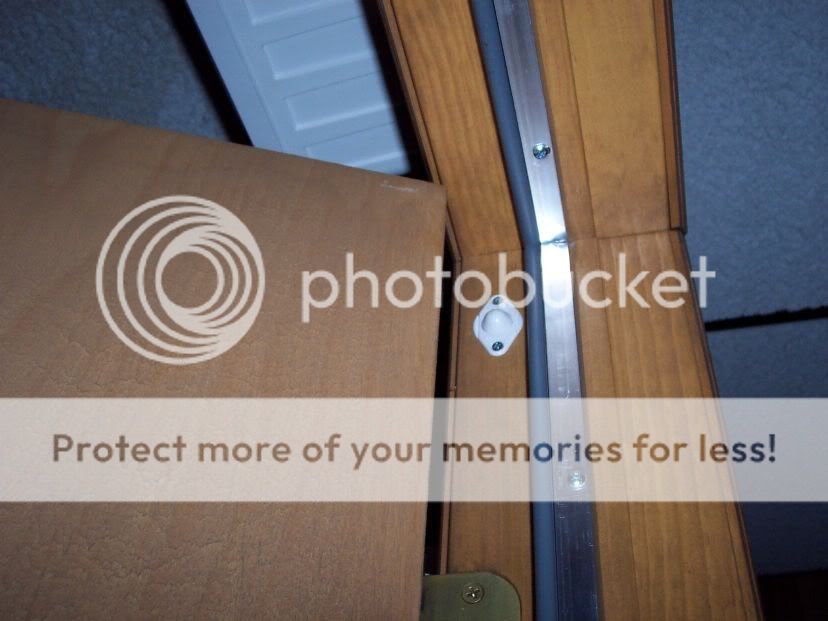
Some doors I needed to install a sensor in the frame (top or bottom) and one in the door. When the door closed, it makes contact. (The little circle is the wired sensor in the frame. There is a simple magnet installed in the door itself)

Windows:
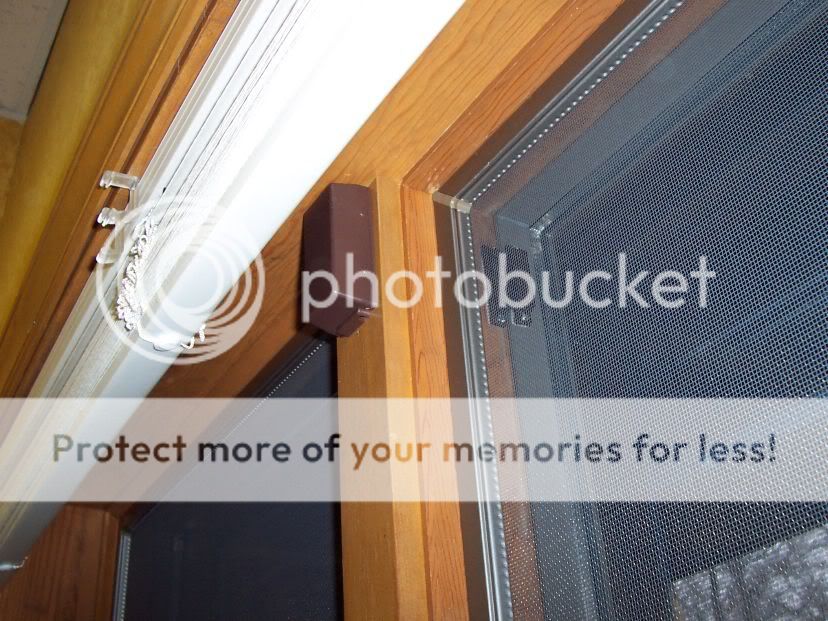
When possible, I would use traditional wired window contacts. Behind the screen, you could hardly see them. Based on the location of the window, sometimes they would be on top of the window, other times bottom.
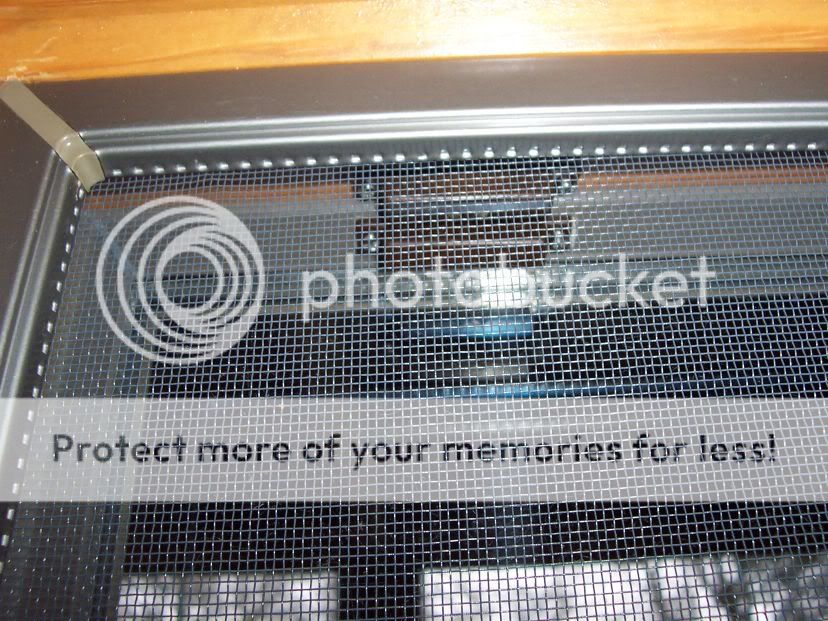
There were a handful of windows I could not wire – so I used wireless for these windows. I chose a long-life wireless sensor (10 years) primarily because you could wire external contacts to it. In this example, there are two side by side windows wired to the 1 transmitter.
To wire multiple windows in series – you just wire from the alarm panel, into one sensor, out of that sensor into another, and so on. Once you finish all the windows, you put an EOL (End of Line resistor) in and connect it to the “return wire†of the panel. This picture is dark (sorry), but the right wire is the panel wire. The panel wire (right) goes into Window 1 (middle wire), Window 1 goes into Window 2 (left wire), out of Window 2 into EOL which goes back into the panel wire. I would then wrap electrical tape around this whole package and stuff it into the wall or behind the window molding.

In the above picture, you can see one of my many mistakes. Because of the height of the window, I needed to cut a hole in the wall between the window and the basement. I cut it at the same height as the electrical outlet, but cut it too close to the outlet – the sheetrock between the two holes collapsed and I ended up with a bigger hole than desired.
WIRING THE PANEL
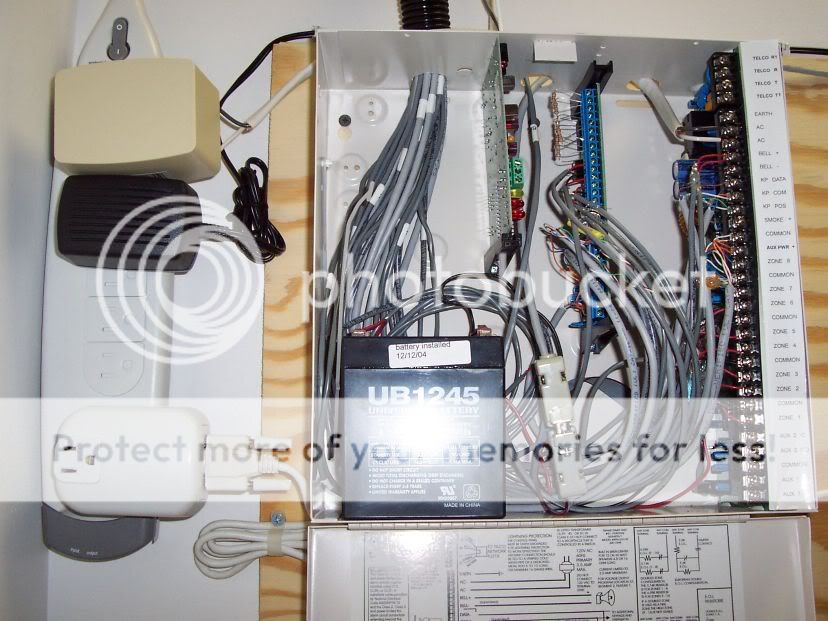
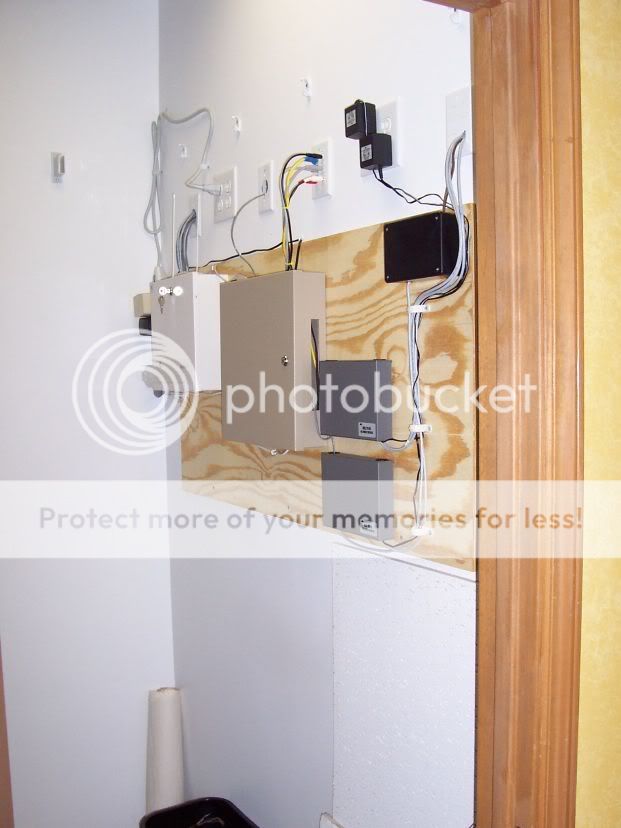
You can see by this picture that I have a nice mess of wires . I have 24 wired zones (using all but 2 (this picture is a little old)) and 16 wireless zones (using only 8). You’ll notice the wired zones that I’m not using required some simple EOL resistors (in the panel). You can also see the serial communications cable which goes out to my HVPro. (You can also see my UPB PIM at the bottom of the surge protector)
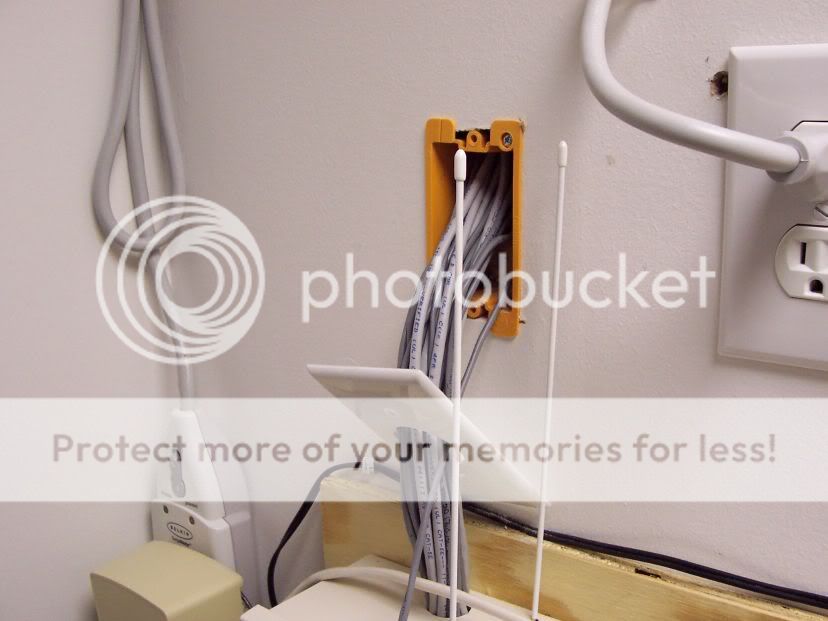
Another mistake I made is that I cut the hole for the wires above the box (rather than behind the box). All my security wires come down from a hole above the box (see picture below). I cover these wires with flexible wire conduit which hides them and keeps it looking neat.
TOOLS
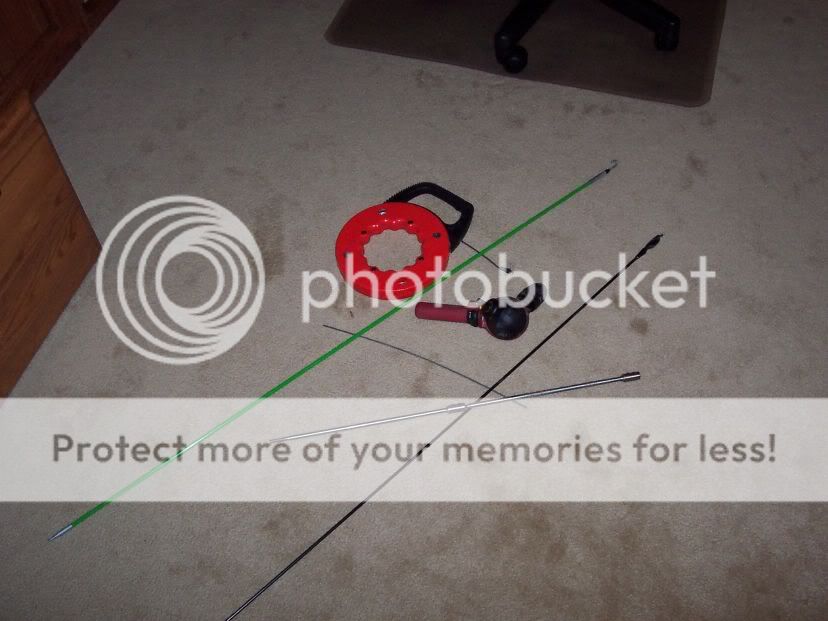
I found several indespensible tools that I needed to complete this project. I purchased all of these tools at Lowes or Home Depot.
Starting at the top is the Red fishwire. This is a thin fairly rigid piece of flat wire that slides through holes to pull wires. Because it coils, it has a nature bend to it that you can use to keep it against the wall, etc.
The green pole is a fishhook. There are actually 2 more pieces that can screw together to make it longer. This fiberglass pole is quite stiff and allows you to pass wires between floors. It has different tips that can be installed on it depending on your needs.
The burgundy tool is an angeled drilling device. It allows you to drill at a different angle than the drill is – for example at a right angle.
A long drill bit. Not as handy as you would expect. It would “torque†when drilling and bind in the wood.
Drill extensions were very helpful. The downside is you needed to drill a hole big enough to allow the extensions to pass through.
The thin short wire is a insulation support. It works very good for most installations since it’s very rigid and very thin. It works much better than a coat hanger (although it’s shorter).
Over the next series of posts, I hope to introduce you to my Cocoon project. I will be taking a slightly different approach – I plan on writing this almost as a beginners guide. Why? Because I’m hoping it helps someone else just getting started (these forums have been a great help to me and I hope this helps someone else), plus it allows me to share some things I’m doing which might be cool (that nobody else doing) or that might be wrong (and someone can stop me!).
Introduction
My family purchased this existing house about 18 months ago. It is approximately 4500 square feet if you add in the basement, and has two garages.
Because of the size and nature of the house, we knew we wanted to automate it. I semi-automated our previous house and knew we wanted more.
Systems Overview
Over the next several posts (probably take me a couple weeks), I plan on covering the following systems:
- Automation Controller (HomeVision Pro)
- Security (Caddx NX-8E)
- Lighting (UPB)
- HVAC ((3) RCS TR-16s with Master-Trol Zone Controller)
- Audio/Video
- InfraRed
- Networking, gaming, miscellaneous
This is my automation closet. On the left is most of my networking and AV equipment.
On the right is my automation equipment (you can see two of the three HVAC thermostats (I haven’t installed the third yet), my HVPro and Caddx security enclosure).
Favorite Tools
I have learned to love a couple very inexpensive tools that I felt compelled to share.
Labels - I use simple peel/stick labels that I run through my printer. I number all the wires and keep a spreadsheet listing each wire, length (helpful for the next run that might be close, I can get an idea how long to pre-load), use, etc. If I was to do this over again, I would probably have gone with a better labeling system that labels the wire’s use on the wire itself (I think Electron is doing it this way). My approach isn’t bad, but the other would probably be a little easier to troubleshoot in the distant future (wouldn’t require looking at my spreadsheet to know a wire’s use).
Yellow 110 punch - I bought this for $2.99 at Automated Outlet.
(http://www.automatedoutlet.com/product.php?productid=317&cat=118&page=1) The 110 punch is nothing special, but I love how it strips Cat5 wires. In the past, I struggled with this… my wire strippers didn’t do a good job and would occasionally nick an interior wire. Since I’ve switched to this tool – no more nicked wires! I can’t tell you how happy this $2.99 tool has made me!
¾†Conduit Bracket - I can’t say enough about these – I use them everywhere. I try to run all my wiring through these – it keeps them neat, and is easy to install. I buy them in bulk bags from Lowes/Home Depot.
Yellow Telephone Splices – put in two wires, squeeze with pliers and they are locked in and connected. There is a gel inside which also helps with keeping moisture out. These are excellent when working with a security system (EOL resistors).
Blue Conduit – as you can see here, I started out pulling my wires individually down the wall (these go to my security panel). I later realized what a pain this was and decided it was much easier to slide down several blue conduits to the opening in the wall. Now I can just slide new wires down the conduit – no fishing wires needed.
Automation Controller
I purchased a HomeVision Pro (http://www.csi3.com/HV_Pro.HTM) for my automation needs. I evaluated several options on the market and selected this one for a few reasons:
- ELK M1 was not available
- I wanted something that could manage my IR. Stargate can too, but I would have had to purchase another add-on box (cost was an issue since we just moved into a new house)
- I wanted to be able to control via TV screens (built-in)
- I wanted it to integrate to my security system (Caddx)
- I wanted 1 powerful box that was dedicated to HA. It is both an event controller (reacts to certain events) as well as time based (time or periods).
- I wanted built-in web capability (I use web pages to control the system locally or via the internet)
- I wanted native UPB support
- I did not want a system that was reliant upon a PC (up-time reliability), but could interact with a PC for additional functionality (programming, controlling music, logging events, etc)
This device has lived up to my expectations and I have been very happy with it. At this time, I am not using all of the capabilities (I’m not using any analog inputs or relay outputs (yet)).
Some Key Functions of my HA Controller:
- Monitors IR. It keeps track of which TVs or Stereos are on. It receives IR to turn on/off lights, set house modes, and to control my Media PC for playlists, etc. We have multiple Audio zones and HVPro keeps track of which playlists are playing in each zone, volume levels, etc. The user does not need to know the status of anything (Amp power, etc) – they just type in a playlist number into any IR remote and HA takes care of the rest.
- Integrates with Security. I have a Caddx NX-8E security system that monitors doors/windows/motion. It can arm the system as needed, but also watches these security zones for information (such as occupancy, lighting, etc.)
- Adjust HVAC. Based on occupancy or house modes – it adjusts HVAC system (so it doesn’t heat the Theater when we’re upstairs, etc). When we leave the house, it turns back the heat. As soon as the upstairs garage door opens, it turns up the heat so it’s already running when we walk in the door.
- Pager notification. If a security alert happens, or a garage door opens without turning off the security within 5 minutes – it will page my phone.
- House Modes – I have modes for Home, Away, Goodnight, Theater, Babysitter, Family, and Friends. Most are self explanatory, with a couple unique features. Theater disables the Theater glass break, adjusts the heat, dims the rest of the houses lights, etc. Babysitter automatically adjusts any TVs to satellite inputs (not our TiVo). It also monitors lighting (babysitters have a habit of leaving lights on all over the house). Family mode also adjusts TVs for satellite, and also reduces the amount of overnight status checking (lights, security, etc) because of their different habits/schedules. Friends mode is more party oriented.
- Web Pages – I currently have simple web pages to manage the automation system. I am in the process of enhancing these pages to make it easier and prettier.
- Alerts – anytime an alert condition occurs, it is stored in a queue. If it is serious, it pages me. If it is not serious, but “nice to knowâ€, it displays a message on the TV screen. The user can then press a button and remove the alert from the queue. When any TV is turned on and an alert is in the queue, it displays it.
- Lighting Controls – I use UPB for my lighting throughout the house (I’m not done yet, about 50%). At sunset, it dimly lights some key areas. At sunrise, it turns these lights off. In theater or friends mode, if DVD Pause or TiVo Pause are pushed, it lights a pathway to the bathrooms and kitchen. If motion is detected during the night, it dimly turns up nearby lights for 5 minutes.
- Overnight checkups – overnight it checks up on the status of the house: garage doors closed, HVAC set properly, security set, lights on/off properly, Amps turned off, etc. This is nice if someone forgets to do one of these events or if I have to get up very early for work or something like that. I know the system will make sure the house is set properly. It starts these checks based on telling the house we’re going to bed – or automatically based on conditions (motion, TV status, time, etc).
Future Plans:
- Manage phone calls and caller ID. Mute music when calls placed or received.
- HA Announcements – caller ID announcements, vocal alert notification, etc.
- Integration with weather. Not sure yet, either METAR system or a home weather station. Turn on sunset lights earlier if raining out, etc.
======================================================
Security
This post will focus on adding security. This was my first priority in the new house and I installed this before any other automation.
Since I chose to use HomeVision Pro as my main controller, I needed a separate security system. After a little research, I realized the best system for me was the Caddx NX-8E.
- HVPro seamlessly communicates with it – so the Security system appears to be part of the controller itself. All doors/windows/motion sensors can be used as inputs to the HVPro through a simple serial cable. Also, I didn’t require a fancy keypad for it since HVPro provides this functionality for me.
- Hardware is readily available
- Many people are familiar with it so there were people I could turn to if I got stuck.
I had never installed a security system before, and once I received the package – I was immediately intimidated. The manual was very complicated and did not make sense to me. However, I knew wiring the system could not be that hard so I got started.
My priorities were to secure the perimeter (all doors/windows), install glass break sensors anywhere there were large panes of glass, and interior motion sensors at all choke points. My plan was to use wired sensors everywhere possible, and wireless when I had no other choice (for both financial and reliability reasons). Many windows are side by side (sometimes as many as 14!) so I wanted to wire them in series so they would look like 1 window to the security system. Finally, I wanted to “hide†the system as much as possible.
Installing the security system was very laborious. Thankfully, my house is built on a basement which has a dropped ceiling – so I could move ceiling tiles out of the way to pull wires and drill holes. Every window/door required some creative wiring. In fact, each door/window was its own little project – sometimes requiring an entire day or weekend to complete.
SENSORS
Doors:
I used a combination of sensors for my doors. Where possible, I would install plunger switches (as the door closes, it pushes the switch in).
Some doors I needed to install a sensor in the frame (top or bottom) and one in the door. When the door closed, it makes contact. (The little circle is the wired sensor in the frame. There is a simple magnet installed in the door itself)
Windows:
When possible, I would use traditional wired window contacts. Behind the screen, you could hardly see them. Based on the location of the window, sometimes they would be on top of the window, other times bottom.
There were a handful of windows I could not wire – so I used wireless for these windows. I chose a long-life wireless sensor (10 years) primarily because you could wire external contacts to it. In this example, there are two side by side windows wired to the 1 transmitter.
To wire multiple windows in series – you just wire from the alarm panel, into one sensor, out of that sensor into another, and so on. Once you finish all the windows, you put an EOL (End of Line resistor) in and connect it to the “return wire†of the panel. This picture is dark (sorry), but the right wire is the panel wire. The panel wire (right) goes into Window 1 (middle wire), Window 1 goes into Window 2 (left wire), out of Window 2 into EOL which goes back into the panel wire. I would then wrap electrical tape around this whole package and stuff it into the wall or behind the window molding.
In the above picture, you can see one of my many mistakes. Because of the height of the window, I needed to cut a hole in the wall between the window and the basement. I cut it at the same height as the electrical outlet, but cut it too close to the outlet – the sheetrock between the two holes collapsed and I ended up with a bigger hole than desired.
WIRING THE PANEL
You can see by this picture that I have a nice mess of wires . I have 24 wired zones (using all but 2 (this picture is a little old)) and 16 wireless zones (using only 8). You’ll notice the wired zones that I’m not using required some simple EOL resistors (in the panel). You can also see the serial communications cable which goes out to my HVPro. (You can also see my UPB PIM at the bottom of the surge protector)
Another mistake I made is that I cut the hole for the wires above the box (rather than behind the box). All my security wires come down from a hole above the box (see picture below). I cover these wires with flexible wire conduit which hides them and keeps it looking neat.
TOOLS
I found several indespensible tools that I needed to complete this project. I purchased all of these tools at Lowes or Home Depot.
Starting at the top is the Red fishwire. This is a thin fairly rigid piece of flat wire that slides through holes to pull wires. Because it coils, it has a nature bend to it that you can use to keep it against the wall, etc.
The green pole is a fishhook. There are actually 2 more pieces that can screw together to make it longer. This fiberglass pole is quite stiff and allows you to pass wires between floors. It has different tips that can be installed on it depending on your needs.
The burgundy tool is an angeled drilling device. It allows you to drill at a different angle than the drill is – for example at a right angle.
A long drill bit. Not as handy as you would expect. It would “torque†when drilling and bind in the wood.
Drill extensions were very helpful. The downside is you needed to drill a hole big enough to allow the extensions to pass through.
The thin short wire is a insulation support. It works very good for most installations since it’s very rigid and very thin. It works much better than a coat hanger (although it’s shorter).
")