You are using an out of date browser. It may not display this or other websites correctly.
You should upgrade or use an alternative browser.
You should upgrade or use an alternative browser.
4 Wire PIR to OmniPro ii
- Thread starter abernut
- Start date
I am going to be complexly honest...I don't know.
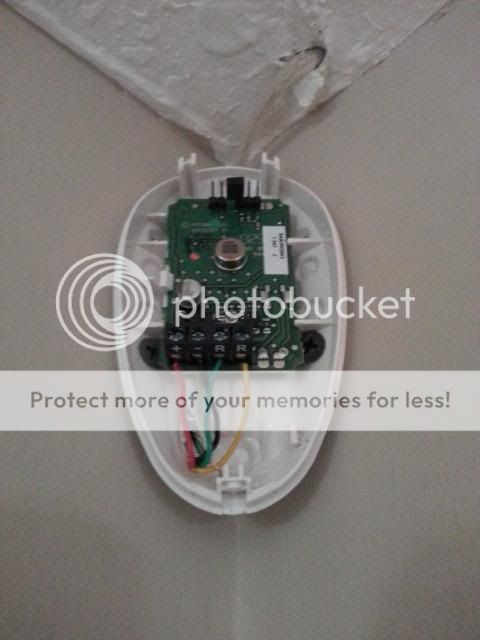
Originally I had one PIR wired directly to the panel with about a foot of 22/4. I did this so I wouldn't have to climb up and down a ladder if my wiring was wrong. This is when it was not working. I figured I would go ahead mount the PIRs in their places and troubleshoot later. I wired it exactly as I had it at the panel. When I was getting ready to leave the house the key pad said "System OK". I walked back into the living room, the PIR LED turned red and the Key Pad showed "Motion Living RM" Not ready. I held still, the PIR LED turned off, and the key pad showed "System OK". I don't even have a resistor wired in place.
The only thing not working right now, probably a setting in the system, is that if I arm the system away and trip the motions, it does nothing.
Pete can you help me out . I have a brinks system that is no longer in use in my home and I want to use the wiring for a diy system.pete_c said:That is also what I have done here. I did solder the EOL resistor at the end of the wire such that the other side of the resistor is connected to the terminal. I used one of those little mini propane torches or soldering device.
I then put the heat shrink tubing over the end with the EOL resistor wire coming out.
pete_c
Guru
Really you just have to take your time doing one set of cables (2/4 wire) at a time with your Brinks system. There (in FL) I had the alarm stuff prewired and re homed to a new closet as the contractor wanted to put all of the cabling to the master bedroom. The cables were labeled and there no zones that included multiple switches. I also did the neighbors set up but it was very old and did have a bunch of zones with multiple switches.
I just made a project of each set of wires. It was a PITA. I did one set at a time and wanted to physically see the ends of the wires.
In the neighbors home I replaced all of the very old stuff which originally was installed in the 1970's except for the cabling. There were autonomous zones with one set of wires for all of the windows, another set for the PIRs and doors and keypads. It was all home runed to one bedroom closet. The electrical was very willy nilly done so redid that too. She wasn't around such that I had her remove everything in the closet prior to me doing this stuff and she gave me the keys to her home. It took me about 3 days to rewire everything spending about 8 hours a day.
Even though it was labeled I wanted to check anyways. I used a multimeter (with a beep sound that I could hear as I did this by myself) and a toner.
Before using / installing any EOL's (for the panels) you want to check the cabling and probably remove any of the old EOLs. Most important is that you want to make sure the old wires (infrastructure) is sound and mostly it probably will be. Sometimes the wires might be split up in the attic space or in areas you cannot get to. Just figure out what wire going where and take advantage of what is there. Baby steps; take your time with your multimeter and toner.
An original alarm wiring obi wan will have done a good job hiding all of the wires with some structure; a mickey mouse alarm wiring person will have done just that with a hodge podge of wiring that works but has no logic to the installation.
The issues I had with the older home was just that the trim had been painted over a few times and I had to dig a bit without damaging trim or drywall which I was able to do going very slowly with this stuff. If you have configured whole rooms with multiple switches; just use those instead of running new cable. Personally if you can replace the old switches with new. That said the old stuff was made well so it probably works fine. The newer stuff (switches / PIRs et al) is larger. In the 1970's here had little boxes with PIRs built in to the walls by the stair cases. I would get false positives from dust and spiders inside of these old motion boxes.
One more thing is that it was more common to use solid core cabling (a bit stiff and brittle if you bend it too much) rather than stranded cable. IE: if you pull on it and its taped or just twisted together and not soldered you will probably pull the connections apart so be wary of that stuff. You don't want to do that if the connections are buried in a ceiling or behind a wall.
I have the same problem with abernut. My PIR is working perfectly for the motion control. However if I use it for alarm only one area is working the rest wont sound the alarm even i set it at AWAY,NIGHT and etc., I noticed the only one working is the only AREA i used 1 PIR the rest is using two to three PIR in one Zone. I did not use end resistor but I set the controller to "no resistor". Need anyone help..
pete_c
Guru
Welcome to the Cocoontech forum Htik.
It has been a while here that I used the controller "no resistor" mode. I do recall it was all or nothing where you could not set any individual zones to be in "no resistor" mode. I initially started this way and ended up at using EOL's for each zone..
How do you have your 2-3 PIR's wired to one zone? Can you show us with a light drawing?
Similar threads
- Replies
- 2
- Views
- 162
- Replies
- 13
- Views
- 521
- Replies
- 0
- Views
- 126
- Replies
- 53
- Views
- 2K