Looking for small, small outdoor ip camera

I'm looking for the smallest possible wired, outdoor, IP based camera to be mounted in a stone column at the edge of driveway.  
 
I'm building this box that will contain a mailbox insert too, so it's hollow and have access on the inside.  I've run Ethernet, some 18-7, and low voltage 16-2 for the IP camera, a motion detector, a door sensor on the mailbox, and a light.  What I'm visualizing for the camera is drilling a hole in the stone and inserting the camera in the hole.
 
All the Bullet ones I've found are like 2" in diameter and think would just look ugly on something that's only about 21" x 50" tall.  I did find this AXIS P1214E which is perfect, less than an 1" in diameter, more like a pinhole.  Was just curious if anyone knows of any competitive models to this.
 
http://www.axis.com/products/cam_p1214e/index.htm
 
Thanks,
 
Just FYI you can use multiple runs of a smaller gauge wire to yield the equivalent of a larger gauge wire. As a rule of thumb two runs of gauge X equals one run of gauge X-3. So two runs of 18 gauge equal one run of 15 gauge. In your case I noticed you ran 18/7 and 16/2. Four runs of the 18 (18/4) would yield 15/2.
 
For future reference.
 
I would be interested in similiar.  There is another piece to the Axis pinhole camera with probably wouldn't fit inside of a single gang box.
 
index.php

 
I am seeing smaller IP HD domes which would work. 
 
This is what I am doing today which is too big but works better than a bullet camera. 
 
You could also put in a small single gang box (plastic) and do a DIY of an HD IP camera with a wide angle lens.
 
I did a plastic box insert while constructing the mail box.  Easier during the build than afterwards. 
 
The original analog camera had a 3.6 mm lens and was tiny at maybe 2" in diameter and some 3 inches deep.
 
Here I ran a separate 12/2 from the landscaping runs, 120VAC switched and non switched, multiple catXX which one I use for a POE camera today, siamese + RG6 for the original camera  I also have 12VDC running on one of the other cat5XX cables.
 
For my case, I was planning to stick the camera in the stone and then running the cable down to the bottom of my structure, where I have an area under the bottom of the chute where the conduit stubs up are and have that receiver piece sit down there.  
 
Basically, there's a rear door to access the bottom of the chute with a shelf that can slide out to access this space.
 
I was playing inside of my mailbox a couple of weeks ago and did notice that it was kind of musty smelling inside.  That said no metal inside was rusted and none of the automation pieces I have in the open have shown any wear and tear.
 
The plastic box insert I have is kind of sealed on the inside part and the inside pieces are still sealed from the plastic box.
 
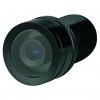
The very first analog camera I put in place in the mailboxwas a cylinder type automotive rear camera.
I still have it and checked it out. It's a bit more than an inch in diameter.
You could maybe get a decent camera lens on it a feed it to an HD IP encoder?
Attached is a picture of my DIY HD IP camera inside the Speco Dome. The Speco dome is all metal. Inside the plastic mounting has become a bit brittle from just sitting on a shelf in the original box wrapped in plastic / foam. This is an IP67 dome. It does get weather and almost direct spray with the sprinkler system. It is a bit large though. I have seen now smaller maybe 1/2 the size of what you see domes outdoors all plastic with a rating of IP65. I am going to give one of those a try (been waiting on my order) in the back yard. For the front camera in the mailbox I have switched now to IP HD. That said the old ones were with IR illumination and without. Really didn't matter much though as all of the exterior lighting goes on anyways. I have just really seen a coyote at night maybe once or twice.
 
The bottom right is an add from the mailbox to a nearby berm/tree for a 12VDC always on LED remote controlled powered that I have yet to install.
 
index.php
 

Attachments

  • Car_Rear_Camera.jpg
    Car_Rear_Camera.jpg
    24.1 KB · Views: 16
I mounted the Axis P1214-E camera in my brick mailbox.  I removed a brick behind my street address plate, drilled a hole in the plate and mounted the camera and the box part in the space where the brick would normally go.  I also did everything I could to make the area as dry as possible using some styrofoam for the back and filling and holes to the rest of the mailbox with Great Stuff.  I also used sylicone grease for the RJ-12 and RJ-45 connections just to be extra cautious about keeping moisture out.  I also used plumbers putty at the top/back of the address plate so any rain just flows off the sides into the street and doesn't get inside where the camera components are at.  I did have to shorten the included cable by a quite a bit since I have the camera and the Axis box right there together.  (There are instructions with the camara on how to shorten the cable.)  I am using POE for the power to the camera over a 300' Ethernet run to my mailbox.  Anyway, it's working well.  I've attached a photo from it as well as a couple of photos of the installation..  one even includes my cat in the picture.  :)
 
Sean Dudley

[sharedmedia=gallery:images:647]
[sharedmedia=gallery:images:648]
[sharedmedia=gallery:images:649]
 
 
Thanks for the first hand info.  I like how you buried it in the address plate, unfortunately for me, the plate will be on the opposite side of the camera.
 
One thing I couldn't get a straight answer from Axis was using that circular mounting plate that the camera can lock into.  I'm trying to find out how thick the "wall" surface can be and that back side anchor plate will still work.  For me, my stone piece might be a 1/2" to 1" thick.  Plus there's also the 1/2" durock board behind the stone, although I could always have a larger hole in that which will accommodate the backer plate so it would sit flush against the back side of the stone.  The picture in the instructions looks like they were thinking drywall so not sure maybe only like a 1/2" or 5/8" range on the installation?
 
Very nice Sean!
 
Welcome the Cocoontech forum.  I have the same/similiar address plate on the one side of my mailbox. 
 
I am still working on my blog here on the forum; need to take pictures of all four sides of the mailbox structure.
 
Are you going to add any LV wiring to the mailbox for sensor to your alarm panel?
 
Here playing with my mailbox door sensor to tell me when the mail comes.  Waiting on more sensors to test though.
 
I recently installed a vibration sensor for an automobile/motorcycle on the back piece of the mail slot / mailbox insert.
 
It is connected to a debounce and timing circuit which works but is a bit more sensitive that previously utilize motion sensor.
 
I am trying to keep from putting any sensors / wires inside of the box. 
 
Most interesting last night we had a thunderstorm with much lighting.  The lighting did trigger outdoor sensors. 
 
That said sometime during the storm I received a called from the central alarm company responding to an alarm stating something about a disconnect of my consoles / keypads.  I didn't get a beep or anything similar and they appeared to function fine. 
 
Thinking out loud I just realized that I do have a zone connection to the battery / power stuff on the touchscreen hub.  The interconnect to the HAI OPII panel wire is some maybe 30 feet or so.
 
seandudley - very nice!  I may borrow that idea someday!
 
If your address plate isn't on the right side, one could still adapt that idea by using some sort of dark colored decorative item or decoration uniformly on each side and bury a camera on each one.  I could see some value in putting one on almost every side if you felt like recording that much data.
 
archstenton said:
For my case, I was planning to stick the camera in the stone and then running the cable down to the bottom of my structure, where I have an area under the bottom of the chute where the conduit stubs up are and have that receiver piece sit down there.  
 
Basically, there's a rear door to access the bottom of the chute with a shelf that can slide out to access this space.
 
I would be very leery of doing this. Knowing that cameras don't last an eternity (usually not much longer than 5 yrs)... how easy will it be to replace once it has failed?
 
Relating to my analog cam(s) installed in my mailbox insert I over the last 10 years replace the analog camera some 3 times.  Mostly replacing cams though to get better.  Never spent more than $100 on any of the cameras I used.
 
Deterioration was mostly due to weathering effects of rain, sprinkler system, direct sunlight exposure, salt spray, tree sap et al.  
 
My original analog camera though was a bullet type made for automobile next to license plate mounting.  It was a simple all metal cylinder made to be impervious to weather installed some 10 years ago.  It was cheap at some $40 at the time.  It had a BNC cable and power cable connected to it.  It never did deteriorate though in the couple of years it was mounted into the mailbox.
 
Current IPHD camera lens and board cost around $100.  Footprint though inside of the IP67 dome though is large. 
 
The technology is changing so fast that most likely a self contained tiny footprint all metal bullet cam is around the corner.
 
I'm guessing too same said (future) small bullet camera will only have one POE connection to it and nothing else most likely which would work for me.  It would most likely though be a single cable with an RJ-45 POE connection.  (similiar to the last small footprint with LEDs dome I just purchased for some $106 USD).
 
Today that simple outdoor for rear license plate cam can be purchased for some $12 USD which is less than I paid for it some 10 years ago.  Personally I would prefer an HDIP mini bullet rear camera backup camera versus the analog ones that I have configured today on two of my vehicles. (thinking its an age thing to want to see a bit more granularity sometimes).  The current cams do have an overlay providing some distance measurements which is nice.
 

Attachments

  • pic-1.jpg
    pic-1.jpg
    58.5 KB · Views: 11
  • pic-2.jpg
    pic-2.jpg
    60.9 KB · Views: 9
Back
Top