I obtained a PlungerG and MicraG wireless sensors from Russ Devanter at http://www.alarmprofessor.net/ with the intent of testing them using the ELK wireless receiver M1XRF2G. Russ's price on the sensors is $26 each. If you consider the amount of time and effort it takes to run wire for doors and windows, this is well worth the money. The MicraG and PlungerG are supposed to be GE compatible. But the documentation doesn't say if they are CADDX or not. I still cannot find anything that would indicate whether or not they are CADDX. Non-CADDX GE compatible sensors will work with the M1, but they are supposedly not as reliable because their frequency isn't as tightly controlled. I didn't experience any reliability problems with these, so I'm assuming they are CADDX devices.
ION Security (http://www.ion-digital.com) is the actual manufacturer of the devices, and I didn't follow up with them to see if they were CADDX or not.
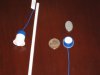
In any case, both devices are small. You drill a 3/4" hole, and just pop the sensor in.
Micra
The Micra is 11/32" deep, and has a 1/16" flange that protrudes above the mounting surface. It comes with a magnet that needs to be mounted to the door or window. The magnet it comes with is oval shaped and DIAMETRICALLY magnetized. If you choose NOT to use their magnet, you must use one that is diametrically magnetized, and the poles must match up with the flat edges of the sensor. I did some testing with axial magnetized neodymium magnets, and they were not reliable. I didn't take the unit apart to see how the switch worked, but it really does need a diametrically magnetized magnet. If you don't know what this means, check out this page:
http://www.kjmagnetics.com/magdir.asp
The only reason I wouldn't use their magnet is because it's oval. And if I needed to recess the magnet into a door, there's no easy way to use a forstner bit to drill an oval hole. You could certainly drill a round one, but if you were concerned about aesthetics, then it might look funny to you. If you're mounting the sensors at the top of the doors, then this probably makes no difference as no one is going to be looking down from above at your magnet install.
The Micra appears to be designed for windows that have a hollow area on the sides. The antenna wire is supposed to hang down inside this hollow area, and actually comes out to the side from the bottom edge. You could probably jam it into a non-hollow area (you'd still have to drill a hole for the antenna). But, I would take the blue base off the bottom and make a tiny hole in the bottom of it so the antenna doesn't get damaged when you push the sensor into the hole.
Plunger
The plunger also requires a 3/4" hole, but it's much deeper at 1" (actually 63/64ths). It also has a 1/16" flange on it. You might have to recess these if you are putting them on tight fitting doors or windows. The antenna on this one comes straight out of the back of it, so you don't have to worry about crushing the antenna wire.
The plunger activates with 9/64 of travel. The total possible travel of the plunger is 1/4". This means your maximum gap is going to be 7/64" plus 1/16" for the height of the flange, which works out to 11/64".
Provisioning/Enrollment
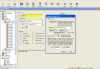
There are two ways to enroll the sensor into the ELK M1. You can use the menu on your keypad to go into the wireless enrollment screen (Menu 9->14->3) and then you put the battery into the sensor and actuate it. I found that to be kind of a pain in the butt. The other option is manual enrollment. I did the manual enrollment through the ElkRP software. You basically click on the zone input you want the sensor to be for, and click the "Wireless Setup" button that appears next to the description in your wireless zone inputs. I've posted a screenshot below. Basically, in the TxID field in the bottom, you manually enter the ID of the sensor and then check the "Enabled" box. Make sure you enter the ID before you enable it. On the antenna of each MicraG and PlungerG is a tag with the ID of the sensor. If the sensor ID was A43B93, then you would put a "0" in front of it (e.g. 0A43B93). The second field there will automatically fill in. That's pretty much it, now you just treat it as any other wireless sensor or inputs you have set up.
Response Time
Maybe Response Time isn't the right word for this. But I wanted to test how quickly I could go from secure->not secure->secure again without the unit alerting the ELK. A rough guess is about as accurate as I can get, but if it's more than 200ms, then the ELK will be alerted. Less than 200ms, and the ELK most likely will not get notified. Interestingly enough, that going from Not Secure->Secure->Not Secure actually had a much higher tolerance, 1/2 second in some cases. In any case, this probably doesn't matter too much, but there is a potential, however small, that an intruder could figure out where the sensor was and either slip his own magnet in quickly or get the plunger pushed back down. 200ms isn't a lot of time, and these sensors would be hidden from the outside unless they were on a door that opened outwards.
Range
To test the range, I set up an automation rule to speak the zone name when the sensors went secure or insecure, then I dialed into the system on my cellphone to hear the voice alerts.
My receiver is mounted in my garage, which has concrete most of the way around it, a commercial freezer from 1972 that almost certainly generates interference, and it's mounted about 10 feet from one side of my house so it's not even close to the center of everything. The house is 48 feet deep, and 75 feet wide. The sensors worked reliably *everywhere* in the house. In addition, they worked outside the house 250-350 feet in every direction depending on where I was in relation to the garage. However, when I went below a hill about 100 feet from the house so I no longer had direct line of sight, they no longer worked. Of course, I doubt I'll be mounting one to a tree in the woods anytime soon, so this isn't really an issue.
One of the thing I read about these is that people only have problems if the antenna gets bunched up and isn't fully extended. I went the far end of the house, balled the antenna up in the palm of my hand, and actuated the sensor. No workie. The antenna absolutely must be extended for these to be reliable. They come with a plastic drinking straw looking thing to keep it straight as you insert it into the wall, door frame, window frame, or whatever. Use it. The antenna is 11" long. The way I would install is to use a forstner bit to drill a hole for the sensor, and then take my 1/4" bit which is 16" long and drill to a depth of a foot or so if I couldn't hang the wire down the back of the door/window frame or in a hollow channel. Then I would insert the antenna into the straw and push the whole mess in at once.
Overall Impressions
These things are awesome. And, at $26, you can't go wrong. If it takes me an hour to run a single wire to a door or window to install a sensor, then these things are cheaper in the end. My time is worth more than $26/hr to me since I'm so busy all of the time. Other people might have different views on this, but to me, it's worth it.
The only two things I don't like about them:
- The antenna on the Micra comes out the side, not the back. This is easily fixed.
- The 1/16" flange on them might be too high for some door installations and require a bit of woodwork to recess them. If *I* were to redesign these, I would ditch the flange in favor of a slightly flared rim to make it really hard to insert it too far. Then I would put a small hole on the front of it that someone could put a screw in to pull it out in the case of a battery replacement.
Other than that, I think these things are great. I'm going to put one inside one of my gun safes, which are fairly thick steel. I don't have high hopes because of all of the metal, but I'll post the results once I test it out. If it doesn't work, I'll just unbolt it from the floor, put a plungerG on the wall behind the gun safe, and then push the safe back up to the wall and bolt it back down. Then if someone does manage to pry it from the floor, it's going to set off the alarm. Of course, I have no idea how they would avoid all of the other sensors.
I am definitely going to get more of these. I have a total of 55 windows to do, and there is NO way I'm going to wire each one, especially since that portion of the house is finished.
ION Security (http://www.ion-digital.com) is the actual manufacturer of the devices, and I didn't follow up with them to see if they were CADDX or not.
In any case, both devices are small. You drill a 3/4" hole, and just pop the sensor in.
Micra
The Micra is 11/32" deep, and has a 1/16" flange that protrudes above the mounting surface. It comes with a magnet that needs to be mounted to the door or window. The magnet it comes with is oval shaped and DIAMETRICALLY magnetized. If you choose NOT to use their magnet, you must use one that is diametrically magnetized, and the poles must match up with the flat edges of the sensor. I did some testing with axial magnetized neodymium magnets, and they were not reliable. I didn't take the unit apart to see how the switch worked, but it really does need a diametrically magnetized magnet. If you don't know what this means, check out this page:
http://www.kjmagnetics.com/magdir.asp
The only reason I wouldn't use their magnet is because it's oval. And if I needed to recess the magnet into a door, there's no easy way to use a forstner bit to drill an oval hole. You could certainly drill a round one, but if you were concerned about aesthetics, then it might look funny to you. If you're mounting the sensors at the top of the doors, then this probably makes no difference as no one is going to be looking down from above at your magnet install.
The Micra appears to be designed for windows that have a hollow area on the sides. The antenna wire is supposed to hang down inside this hollow area, and actually comes out to the side from the bottom edge. You could probably jam it into a non-hollow area (you'd still have to drill a hole for the antenna). But, I would take the blue base off the bottom and make a tiny hole in the bottom of it so the antenna doesn't get damaged when you push the sensor into the hole.
Plunger
The plunger also requires a 3/4" hole, but it's much deeper at 1" (actually 63/64ths). It also has a 1/16" flange on it. You might have to recess these if you are putting them on tight fitting doors or windows. The antenna on this one comes straight out of the back of it, so you don't have to worry about crushing the antenna wire.
The plunger activates with 9/64 of travel. The total possible travel of the plunger is 1/4". This means your maximum gap is going to be 7/64" plus 1/16" for the height of the flange, which works out to 11/64".
Provisioning/Enrollment
There are two ways to enroll the sensor into the ELK M1. You can use the menu on your keypad to go into the wireless enrollment screen (Menu 9->14->3) and then you put the battery into the sensor and actuate it. I found that to be kind of a pain in the butt. The other option is manual enrollment. I did the manual enrollment through the ElkRP software. You basically click on the zone input you want the sensor to be for, and click the "Wireless Setup" button that appears next to the description in your wireless zone inputs. I've posted a screenshot below. Basically, in the TxID field in the bottom, you manually enter the ID of the sensor and then check the "Enabled" box. Make sure you enter the ID before you enable it. On the antenna of each MicraG and PlungerG is a tag with the ID of the sensor. If the sensor ID was A43B93, then you would put a "0" in front of it (e.g. 0A43B93). The second field there will automatically fill in. That's pretty much it, now you just treat it as any other wireless sensor or inputs you have set up.
Response Time
Maybe Response Time isn't the right word for this. But I wanted to test how quickly I could go from secure->not secure->secure again without the unit alerting the ELK. A rough guess is about as accurate as I can get, but if it's more than 200ms, then the ELK will be alerted. Less than 200ms, and the ELK most likely will not get notified. Interestingly enough, that going from Not Secure->Secure->Not Secure actually had a much higher tolerance, 1/2 second in some cases. In any case, this probably doesn't matter too much, but there is a potential, however small, that an intruder could figure out where the sensor was and either slip his own magnet in quickly or get the plunger pushed back down. 200ms isn't a lot of time, and these sensors would be hidden from the outside unless they were on a door that opened outwards.
Range
To test the range, I set up an automation rule to speak the zone name when the sensors went secure or insecure, then I dialed into the system on my cellphone to hear the voice alerts.
My receiver is mounted in my garage, which has concrete most of the way around it, a commercial freezer from 1972 that almost certainly generates interference, and it's mounted about 10 feet from one side of my house so it's not even close to the center of everything. The house is 48 feet deep, and 75 feet wide. The sensors worked reliably *everywhere* in the house. In addition, they worked outside the house 250-350 feet in every direction depending on where I was in relation to the garage. However, when I went below a hill about 100 feet from the house so I no longer had direct line of sight, they no longer worked. Of course, I doubt I'll be mounting one to a tree in the woods anytime soon, so this isn't really an issue.
One of the thing I read about these is that people only have problems if the antenna gets bunched up and isn't fully extended. I went the far end of the house, balled the antenna up in the palm of my hand, and actuated the sensor. No workie. The antenna absolutely must be extended for these to be reliable. They come with a plastic drinking straw looking thing to keep it straight as you insert it into the wall, door frame, window frame, or whatever. Use it. The antenna is 11" long. The way I would install is to use a forstner bit to drill a hole for the sensor, and then take my 1/4" bit which is 16" long and drill to a depth of a foot or so if I couldn't hang the wire down the back of the door/window frame or in a hollow channel. Then I would insert the antenna into the straw and push the whole mess in at once.
Overall Impressions
These things are awesome. And, at $26, you can't go wrong. If it takes me an hour to run a single wire to a door or window to install a sensor, then these things are cheaper in the end. My time is worth more than $26/hr to me since I'm so busy all of the time. Other people might have different views on this, but to me, it's worth it.
The only two things I don't like about them:
- The antenna on the Micra comes out the side, not the back. This is easily fixed.
- The 1/16" flange on them might be too high for some door installations and require a bit of woodwork to recess them. If *I* were to redesign these, I would ditch the flange in favor of a slightly flared rim to make it really hard to insert it too far. Then I would put a small hole on the front of it that someone could put a screw in to pull it out in the case of a battery replacement.
Other than that, I think these things are great. I'm going to put one inside one of my gun safes, which are fairly thick steel. I don't have high hopes because of all of the metal, but I'll post the results once I test it out. If it doesn't work, I'll just unbolt it from the floor, put a plungerG on the wall behind the gun safe, and then push the safe back up to the wall and bolt it back down. Then if someone does manage to pry it from the floor, it's going to set off the alarm. Of course, I have no idea how they would avoid all of the other sensors.
I am definitely going to get more of these. I have a total of 55 windows to do, and there is NO way I'm going to wire each one, especially since that portion of the house is finished.

") I'm assuming you are using the blunder instead of the magnet?
I'm assuming you are using the blunder instead of the magnet?