You are using an out of date browser. It may not display this or other websites correctly.
You should upgrade or use an alternative browser.
You should upgrade or use an alternative browser.
Powering smokes just outside can?
- Thread starter IVB
- Start date
IVB
Senior Member
DELInstallations said:Pick yourself up a 4" square and extension ring. It'll make life easier. A 1/2" or 3/4" offset nipple also.
4" junction box, to mount on?
sda
Active Member
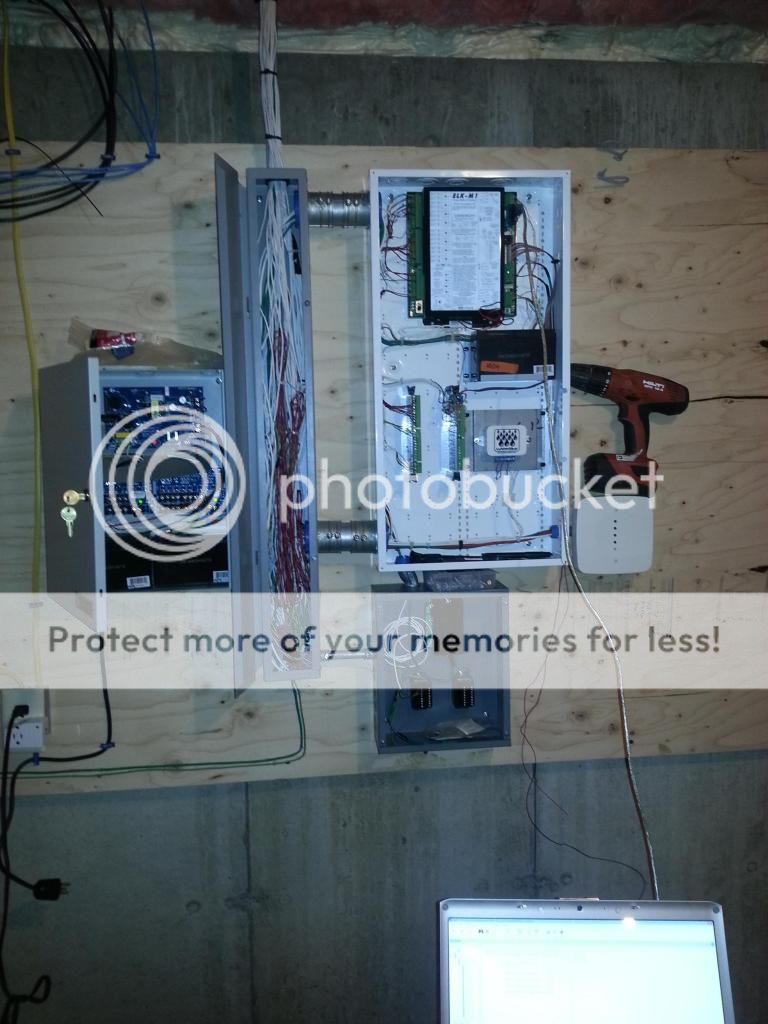
What are you asking? If your panel is surface mounted, the jbox mounts on the wall. A pic would help determine your course of action.IVB said:4" junction box, to mount on?
sda
Active Member
Whether your panel is surface or flush mounted, whether your cables come into the panel from the top or back, how you're going to route cables to the new jbox ... it all makes slight differences in where and how you put the new box and what you need.
To get an idea of what you're looking for, go to lowes.com and lookup these item numbers
72466 - 4" square junction box - this is for surface mount and has rounded corners
19851 - 4" extension ring
55761 - 4" blank cover
54740 - 1/2" offset nipple
If you want a bit more finished look, add a shallow mud ring and a standard 2 gang blank cover in place of the plain metal cover.
72448 - 4" mud ring, raised 1/2" (there's also 1/4" raised and flat)
You'll also need some 1/2" lock rings for the nipple, and something to protect the cables if you bring them directly into the top or back of the new box.
54735 - 3/4 chase nipple and a lock ring.
There's a knockout in the upper left of the 14" Elk enclosure. You can possibly connect the new box there.
IVB
Senior Member
sda said:Whether your panel is surface or flush mounted, whether your cables come into the panel from the top or back, how you're going to route cables to the new jbox ... it all makes slight differences in where and how you put the new box and what you need.
To get an idea of what you're looking for, go to lowes.com and lookup these item numbers
72466 - 4" square junction box - this is for surface mount and has rounded corners
19851 - 4" extension ring
55761 - 4" blank cover
54740 - 1/2" offset nipple
If you want a bit more finished look, add a shallow mud ring and a standard 2 gang blank cover in place of the plain metal cover.
72448 - 4" mud ring, raised 1/2" (there's also 1/4" raised and flat)
You'll also need some 1/2" lock rings for the nipple, and something to protect the cables if you bring them directly into the top or back of the new box.
54735 - 3/4 chase nipple and a lock ring.
There's a knockout in the upper left of the 14" Elk enclosure. You can possibly connect the new box there.
awesome thanks!
Must have been some mixup on automatedoulet. I paid extra for 2 day shipping, ordered on Wed morning. Got half my order (alas the Elk wireless sensors and M1XRFTW) but not the smokes. No idea where they are, but not at my house. I guess I'll finish up other stuff, just bought a full ubiquiti setup (router & UAP Pro) so that just got moved up the list.
Taking Mon & Tue off, so hopefully this gets here Monday. Thx.
No plate needed.sda said:Whether your panel is surface or flush mounted, whether your cables come into the panel from the top or back, how you're going to route cables to the new jbox ... it all makes slight differences in where and how you put the new box and what you need.
To get an idea of what you're looking for, go to lowes.com and lookup these item numbers
72466 - 4" square junction box - this is for surface mount and has rounded corners
19851 - 4" extension ring
55761 - 4" blank cover
54740 - 1/2" offset nipple
If you want a bit more finished look, add a shallow mud ring and a standard 2 gang blank cover in place of the plain metal cover.
72448 - 4" mud ring, raised 1/2" (there's also 1/4" raised and flat)
You'll also need some 1/2" lock rings for the nipple, and something to protect the cables if you bring them directly into the top or back of the new box.
54735 - 3/4 chase nipple and a lock ring.
There's a knockout in the upper left of the 14" Elk enclosure. You can possibly connect the new box there.
Only parts that will be needed are a 4" square, extension ring and 1/2 or more preferably, 3/4" offset nipple. Locknuts should be a given. Any other parts listed would be superfluous and unnecessary.
Trust. This is what I do for a living.
sda
Active Member
DELInstallations said:Only parts that will be needed are a 4" square, extension ring and 1/2 or more preferably, 3/4" offset nipple. Locknuts should be a given. Any other parts listed would be superfluous and unnecessary.
So you'd leave the box open without a cover and the splices exposed?
Whatever.
So you'd feed the incoming cables directly into the box through a bare knockout hole?
Maybe you're visualizing it differently, but I see the smoke cables going into the box, spliced, and a single cable going into the Elk enclosure through the chase nipple. IVB is trying to eliminate clutter in the Elk enclosure. Going from 7 cables to 1 helps.
You really have zero idea of the install and how it's all going to be put together in this case. Trade vs. tinkering here.sda said:So you'd leave the box open without a cover and the splices exposed?
Whatever.
So you'd feed the incoming cables directly into the box through a bare knockout hole?
Maybe you're visualizing it differently, but I see the smoke cables going into the box, spliced, and a single cable going into the Elk enclosure through the chase nipple. IVB is trying to eliminate clutter in the Elk enclosure. Going from 7 cables to 1 helps.
Let me connect the dots and provide a compliant and clean install for you, as you don't get it based on the hardware and bill of material. Step by step if you will.
First, the OP states the cables come in via the top box in the closet or whatever is there.
1. Mount the 4" square over the existing mud ring. Actually, in this case, I'll amend my BOM to be 2 extension rings and no box, just to appease you with the lack of a bushed opening.
2. The 4" gets nippled to the M1 enclosure, preferably via a 3/4" offset.
3. Make up the daisy chain in the existing box and extended box (#5 4/18 would equal 4 junctions or 8 wire nuts in this case for that daisy) and I'd recommend crimping the EOLR to the last pair and not use nuts. I would put the RRS in the 4" square with the loop daisy chain in this case, junction as needed (ok, now we're up to 10 total wire nuts here, either blue or orange) Either way, TONS of space in both the recessed box in the wall and the 4" and extension for all the hardware here. Fold conductors into box as typical.
4. From the 4" the OP will need 9 conductors of FPL. 2 pieces of 18/4 and a single conductor stripped out.
5. The 2WMOD gets wired to the panel the same as a 4 wire smoke. Land cables on module as in directions.
6. The power for the reversing relay gets wired from where the OP chooses (usually the host panel) but NOT switched
7. The relay gets triggered via OUT3 and grabs a + trigger via a jumper off the panel AUX (this is only a signal and really doesn't draw anything off the panel for calcs).
8. The pair from the MOD for maintenance/freeze gets wired to any panel zone and programmed appropriately. Resistors for both panel IDC's get wired at the MOD.
9. Mount the module on the 4" and install it's provided faceplate. Zero exposed splices, uncovered junction or unbushed knockout.
End result is from 20 conductors entering into the panel, or enclosure there's now officially ZERO splices made in the panel and the wiring is actually quite simple. The fire loop now provides a maintenance signal to the panel (clean me) for the smokes and can also report a freeze trouble, provides a compliant tandem ring (temp-3) at ALL system smokes irregardless of the panel, allows the "smart walk test" feature to be used on the I3 smokes and furthermore, the fire loop appears as a 4 wire loop to the M1, negating ANY incompatibility that may be perceived as the reason to install 4 wire detectors in the first place.
I'm now counting 2 cables and a single trigger wire going through the nipple.
Also provides (if module swapped and smokes changed) a migration path to install I4 detectors on the same loop and provide CO on the same IDC with only the addition of another pair of signal wires from the box to the M1.
Furthermore, if the OP wanted to clean up the wiring further, I would run the panel AC wiring and any power wiring that is going to the second "level" out via a NM connector or knockout bushing (cat's ass) on the side of the 4" and call it a day.
Let me know if you don't understand any of the reasons, methodology, trade terms, or workmanship questions SDA.
Google the white page for the schematic of the 2WMOD and RRS together. Pretty cut and dry.IVB said:wow, outstanding writeup, thanks! I'll make sure to go slow and follow all those steps, much appreciated.
From that point, you'll need to program OUT 3 (or what have you) appropriately, make sure the dips on the RRS are set for a + trigger and then modify the zone response time on the M1.
Make sure any heat detectors are NOT connected to the loop with the reversing relay. = Dead short when they're in alarm vs. a smoke detector.
Same method used in my panel (not proud of the install, conversion from another platform and this was in-process).


IVB
Senior Member
DEL (or anyone else who knows) a few questions if you wouldn't mind. My 2WMOD is lost in USPS somewhere so I can't physically look at it but i'm hoping to get the daisy chain & other wiring done now so I can just plug it in.
1) What value EOLR should I use? I have 2200 Ohm as I was using 4 wire. The Elk manual says 820 Ohm for 2 wire but you say "The 2WMOD gets wired to the panel the same as a 4 wire smoke."
You say "I'm now counting 2 cables and a single trigger wire going through the nipple".
2) For 2 cables, do you mean 1 pair for power, 1 pair for signal (going to zone 16 I presume)? Can I just use a 4 wire FPL so its a single cable?
You say "The power for the reversing relay gets wired from where the OP chooses (usually the host panel) but NOT switched"
3) To confirm, I run to VAUX and *not* SAUX then, right?
4) I think I read the directions as run the purple trigger wire to output 3 common, run NO from Elk output 3 to the Elk VAUX. Is that right?
Similar threads
- Replies
- 7
- Views
- 985
- Replies
- 9
- Views
- 713
- Replies
- 19
- Views
- 1K
- Replies
- 1
- Views
- 880

