You are using an out of date browser. It may not display this or other websites correctly.
You should upgrade or use an alternative browser.
You should upgrade or use an alternative browser.
Setting up stunnel on dd-wrt
- Thread starter SIMKO
- Start date
123
Senior Member
Wuench,
Yup; no joy. I executed /opt/sbin/stunnel& then ran "telnet localhost 5000" and confirmed it connected to Gmail. Seven stunnel processes were active. I logged out, logged back in, and then there were two stunnel sessions and I could no longer telnet to Gmail. Once again, something appears to have died after I logged out.
Treo650,
I need to get stunnel autostarted after a reboot and see if that makes any difference. I'm going to try starting stunnel immediately after the USB drive is mounted. I'm going to put it in Tomato's "Run after mounting" section but, if it works. I'll move it to an ".autorun" file on the USB drive itself (as per the link you posted). However, I need to wait awhile because my wife is on the phone and the router-reboot will drop the VOIP call! I'm glad I remembered (this time)!
I already read everything posted about stunnel on the Tomato forum (and there's not much) and my gut tells me the timeout stuff is a red herring.
123
Senior Member
More progress to report.
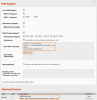
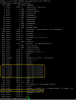
The attached image shows how I chose to autostart the stunnel service. In Tomato's "Run after mounting" section, I added "/opt/etc/init.d/S86stunnel". After rebooting the router, "ps" shows seven instances of the stunnel process owned by "nobody" (see attached image; I've accepted the multiple instances and owner as "normal"). I can login, logout, login and all seven processes remain intact. I can successfully telnet to Gmail by using "telnet MyRouterIPAddress 5000". My ELK M1, containing a rule to send email every 30 minutes, just transmitted an email at 3:00 PM. So far, so good. I'll let everyone know if it continues to work or does a face-plant.
The only thing I dislike is the technique I've employed to mount the USB flash drive. Tomato's "Automount" feature detects the USB drive and mounts it as /tmp/mnt/sda1. It must be mounted as /opt so I put in three lines of shell script to unmount, remount, and wait 2 seconds (see attached image; derived from this blog post). That seems clumsy to me and there must be a cleaner way.
The "Set Tomato to work with your drive" section of the "Optware for Noobs" tutorial indicates all you need to do is add a line to /etc/fstab, commit it to nvram, and reboot. I tried that and Tomato still mounts the USB drive in /tmp/mnt/sda1. There must be a cleaner way.
Attachments
123
Senior Member
I've received an email from my M1 every half-hour since 3:00 PM yesterday (18 hours) so I think it is safe to say it is working.
The "Run after mounting" configuration I listed in my previous post does the trick but I still plan to move it to an ".autorun" file on the USB drive.
The "Run after mounting" configuration I listed in my previous post does the trick but I still plan to move it to an ".autorun" file on the USB drive.
123
Senior Member
Thanks! Can you let me know who owns the stunnel processes? It is "nobody" on my router. Stunnel is the first optware service I've installed and so it is the first service running on my router that is not owned by "root". I don't know if that is normal or the result of a configuration mistake. I did a quick review and it seems like all of stunnel's files are owned by root. Beyond that, I don't know why the process is owned by user "nobody" (I assume it is equivalent to "guest").... I also have 7 stunnel processes, so I guess that is normal and not the source of your issue....
123
Senior Member
Here's what I posted in the Tomato forum on LinksysInfo.org (where not a soul posted a single reply).
To automatically mount the USB flash drive as "/opt":
I chose to use executable ".autorun" and ".autostop" scripts located in the root of the USB flash drive.
"00-mount.autorun" contains:
"00-umount.autostop" contains:
To automatically mount the USB flash drive as "/opt":
- I added a label, "optware", to the single partition on the USB flash drive.
- In Administration > Scripts > Init, I added the following line:
echo "LABEL=optware /opt ext2 rw,noatime 1 1" >> /etc/fstab
I chose to use executable ".autorun" and ".autostop" scripts located in the root of the USB flash drive.
"00-mount.autorun" contains:
#!/bin/sh
/opt/etc/init.d/S68stunnel
"00-umount.autostop" contains:
#!/bin/sh
logger -p user.info -t 00-umount.autostop "killall stunnel"
killall stunnel 2>/dev/null
- Plug in in the USB flash drive and it automatically mounts as /opt and starts the stunnel daemon.
- Using USB and NAS > USB Support > Attached Devices to unmount the flash drive will log the event and kill all stunnel processes.
- Seven stunnel processes appear to be the normal number when stunnel is started.
- The stunnel processes are owned by user "nobody" (I'm not sure this is normal; all other processes are owned by root).
- Starting S68stunnel from an .autorun file, or from USB and NAS > USB Support > Run after mounting, results in stable performance. Starting the script during a telnet session, and then logging out, causes several of the seven stunnel processes to terminate and results in a non-functional stunnel.
- I desired to have the state of the USB light, on the e3000 router, to correspond to the mount/unmount state.
- I added "led usb on" to USB and NAS > USB Support > Run after mounting
- I added "led usb off" to USB and NAS > USB Support > Run before unmounting
123
Senior Member
treo650,
I'm willing to help you but, owing to potential liability issues, I'd prefer not to tinker with your router.
You don't need to use vi to create the files. If you've formatted a USB key with an ext2 partition then I assume you have access to Linux. There are several text-editors for Linux that will allow you to easily create files.
FWIW, I used an old version of Puppy Linux. It boots from a CD and includes GParted, a well-known disk partitioning/formatting tool. It also includes Leafpad which is similar to Windows' Notepad.
General installation instructions:
You are not obliged to create .autorun and .autostop files. You can simply put the commands in Tomato's GUI ("Run after mounting" and "Run before unmounting"). If you do wish to use the "auto" files, you have three choices to create them:
Finally, change the permissions of the two files so that they are executable by root. While logged in to the router, enter the following commands:
Reboot the router. The USB key will be automatically mounted and stunnel will start. Log into the router, run "ps", and confirm stunnel is displayed in the list (should be seven instances of stunnel). A quick test is to run "telnet localhost 5000" and you should get a welcome message from Gmail's ESMTP server. Type "quit" to close the telnet connection to Gmail.
I'm willing to help you but, owing to potential liability issues, I'd prefer not to tinker with your router.
You don't need to use vi to create the files. If you've formatted a USB key with an ext2 partition then I assume you have access to Linux. There are several text-editors for Linux that will allow you to easily create files.
FWIW, I used an old version of Puppy Linux. It boots from a CD and includes GParted, a well-known disk partitioning/formatting tool. It also includes Leafpad which is similar to Windows' Notepad.
General installation instructions:
- Add the line mentioned above to the Tomato router's Init script.
- Reboot router.
- Boot PC with Puppy Linux on CDROM.
- Insert USB key.
- Click "Drives" icon. USB key is /dev/sda1 (or at least it was on my system).
- Run "Network > GParted" and format /dev/sda1 as a single partition with the "ext2" format and a label of "optware".
- Run "Drives" and unmount /dev/sda1.
- Remove the USB key and plug it into the router.
- Using Tomato's GUI, check USB and NAS > USB Support > Attached Drives and confirm the USB key is mounted as /opt.
- Proceed to install Optware (let me know if you need more help for this item).
- Use ipkg to install stunnel.
- Configure "stunnel.conf" file as per the instructions in a previous post.
You are not obliged to create .autorun and .autostop files. You can simply put the commands in Tomato's GUI ("Run after mounting" and "Run before unmounting"). If you do wish to use the "auto" files, you have three choices to create them:
- Log into the router and use vi.
- Plug the USB key back into the PC running Puppy Linux and use the Leafpad editor.
- Log into the router and use echo to append lines to the files like so:
echo "#!/bin/sh" > /opt/00-mount.autorun
echo "/opt/etc/init.d/S68stunnel" >> /opt/00-mount.autorun
echo "#!/bin/sh" > /opt/00-umount.autostop
echo "killall stunnel 2>/dev/null" >> /opt/00-umount.autostop
Finally, change the permissions of the two files so that they are executable by root. While logged in to the router, enter the following commands:
cd /opt
chmod 0755 00-mount.autorun
chmod 0755 00-umount.autostop
Reboot the router. The USB key will be automatically mounted and stunnel will start. Log into the router, run "ps", and confirm stunnel is displayed in the list (should be seven instances of stunnel). A quick test is to run "telnet localhost 5000" and you should get a welcome message from Gmail's ESMTP server. Type "quit" to close the telnet connection to Gmail.
treo650
Active Member
So far, from my last trial, I have thus far:
1) Used a Linux gparted boot cd. To format the usb stick to ext2
2) mounted the drive as /opt in tomato
Can you outline the steps after this, in greater detail?
I have downloaded putty...
Starting from scratch now,
So how do I install optware (commands)
And what are the commands for ipkg install stunnel?
And finally, after the stunnel install, how do I edit stunnel.conf.?
I know it may sound elementary to you, but I'm not a Linux guy.
Thanks in advance
123
Senior Member
As with many things in life, it will all seem elementary when it is all done. I spent many hours reading whatever I could find on optware and stunnel. In the end, I cobbled together information from various sources and the end-result seems easier than anything I read in one article.
The best source of information for installing optware on Tomato is from, of course, TomatoUSB.org. The following tutorial is detailed "How to setup NAS, Optware, etc for total noobs" and provided the most information (and frustration) for me. Now that you have an ext2-formatted USB key that is automatically mounted as /opt, you are ready to install the ipkg utility. With regards to the tutorial you are at step "Installing the prerequisites for optware" where you'll find a few lines of shell script that you must run on your router.
Using putty, log in to the router and copy and paste the tutorial's shell script.
Basically it retrieves an installation script from tomatousb.org, executes it, and then updates the ipkg utility. Everything is installed in /opt.
When it has finished, proceed to run the following command:
ipkg install stunnel
Upon completion, you will need to edit /opt/etc/stunnel/stunnel.conf. I strongly suggest you use vi. I listed all the commands you need in a previous post. If you have vi-phobia, then you will need to unmount the USB key and plug it into a machine running LInux (like Puppy Linux) and use a GUI text-editor (like Leafpad). Modify stunnel.conf as per instructions in a previous post and then create the .autorun and .autostop files I described above. You might as well change the file permissions while the USB key is plugged in the Linux PC. Open a terminal emulator (rxvt in Puppy Linux) and run the following commands (assumes your USB key is seen as /dev/sda1):
cd /dev/sda1
chmod 0755 00-mount.autorun
chmod 0755 00-umount.autostop
Please note that the files can be named whatever you want as long as they end with ".autorun" and ".autostop". Unmount the USB and plug it back into the Tomato router. At this point, Tomato will automount it as /opt, execute the ".autorun" file it discovers in /opt and start stunnel. At that point, it will all seem elementary to you as well.")
The best source of information for installing optware on Tomato is from, of course, TomatoUSB.org. The following tutorial is detailed "How to setup NAS, Optware, etc for total noobs" and provided the most information (and frustration) for me. Now that you have an ext2-formatted USB key that is automatically mounted as /opt, you are ready to install the ipkg utility. With regards to the tutorial you are at step "Installing the prerequisites for optware" where you'll find a few lines of shell script that you must run on your router.
Using putty, log in to the router and copy and paste the tutorial's shell script.
Code:
wget http://tomatousb.org/local--files/tut:optware-installation/optware-install.sh -O - | tr -d '\r' > /tmp/optware-install.sh
chmod +x /tmp/optware-install.sh
sh /tmp/optware-install.sh
sleep 5
ipkg update
sleep 5When it has finished, proceed to run the following command:
ipkg install stunnel
Upon completion, you will need to edit /opt/etc/stunnel/stunnel.conf. I strongly suggest you use vi. I listed all the commands you need in a previous post. If you have vi-phobia, then you will need to unmount the USB key and plug it into a machine running LInux (like Puppy Linux) and use a GUI text-editor (like Leafpad). Modify stunnel.conf as per instructions in a previous post and then create the .autorun and .autostop files I described above. You might as well change the file permissions while the USB key is plugged in the Linux PC. Open a terminal emulator (rxvt in Puppy Linux) and run the following commands (assumes your USB key is seen as /dev/sda1):
cd /dev/sda1
chmod 0755 00-mount.autorun
chmod 0755 00-umount.autostop
Please note that the files can be named whatever you want as long as they end with ".autorun" and ".autostop". Unmount the USB and plug it back into the Tomato router. At this point, Tomato will automount it as /opt, execute the ".autorun" file it discovers in /opt and start stunnel. At that point, it will all seem elementary to you as well.
treo650
Active Member
Great, thanks for that.
I'll probably work on it this weekend, when time frees up.
Lavabit (my current setup) is solid for me for the past month, but I'm not sure about their servers or back end equipment (haven't read up on them)
I guess I trust google enterprise over Lavabit, just saying.
I'll probably work on it this weekend, when time frees up.
Lavabit (my current setup) is solid for me for the past month, but I'm not sure about their servers or back end equipment (haven't read up on them)
I guess I trust google enterprise over Lavabit, just saying.
Similar threads
- Replies
- 2
- Views
- 310
- Sticky
- Replies
- 35
- Views
- 4K