Best practices for terminating wire in new home?

I'm about to move into my new home. It is around 12,000 sq ft and has 146 HAI switches in it.

I did most of the low voltage wiring myself (uggh). I home ran everything into a cold storage room in the basement plus I have lots of empty conduit runs as well.

The LV wire I have run includes:

* CAT 6 data (computer hook ups, security panel, touch screens, thermostats, plus some extra thrown in for good measure)
* CAT6 and RG6 quad shield to "TV/media locations" for distributed satellite and ethernet for popcorn hour, PS3s, etc.
* CAT6 & RG6 runs for 13 security cameras
* Alarm wire (windows, doors, motion sensor in every room, glass break sensors)
* Water leak sensor wire
* RCA for audio sources
* Many speaker runs for whole home audio and intercom (wired for Russound Compoint)

The cold storage room I ran everything into has 4 separate power circuits (two 15 AMP, and two 20 AMP). The cold storage (in the basement) also has a 2" conduit up into the attic space.

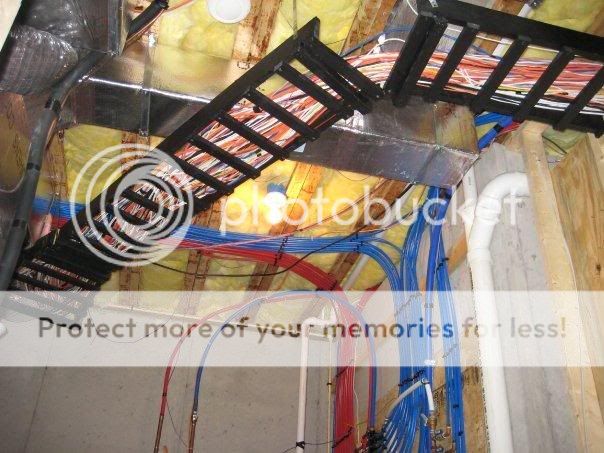
What I ended up with looks like this (the wires are mostly labeled):

CIMG0274_small.jpg

I had a small 4x6 wall framed up (no drywall) with the anticipation of mounting enclosures and panels.

How should I go about terminating all this wire?

Suggestions and tips greatly appreciated.
 
Put as much of the terminations into a rack as you can, to save on wall space (patch panels, etc.)

Because you'll prob do a lot of changing stuff around the next 20 years, I suggest you leave as much slack as possible ('service loops'), but it's hard to make them look nice.

Buy the cat6 connectors and patch panels when you need them, not all at once. They continue to drop in price.

Hang stuff on big pieces of painted plywood, or put it in enclosures - personal preference all the way. On the plywood is easier and much cheaper, but eats up space. Enclosures are a little tidier, but pricier. Lots of pics on the website.

Man, you're set. That's awesome!

I see you have 5 posts - welcome.
 
I'm at the exact same stage as you with the same amount of wiring.

Don't take my comments as reliable as I'm now watching this thread to learn more as well, but here's my personal view point.....

- I'm going to terminate everything and leave it tidy. If I ever move out I want to have things easily cataloged for the owners.
- It's almost impossible to find a patch panel for speakers, so I bought 96 banana plugs on Ebay and will slot them into a 6U high piece of ABS plastic I will drill myself to accommodate the 48 speakers. Some people say one should connect speaker cables directly to the sources/amps, but again, the sources/amps may change frequently or I may move out and want easy access and tidied cables when that happens.
- I have a choice of 2 full size racks with access front and back or a wall to terminate the cables and I have opted to terminate in the rack because I have easy access to front and back. There's no eral technical reason for me - it just seems right to have it there according to my available space and thoughts about future space needs.
- I spent a lot of time on labeling with a Rhino 5000 and coming up with a naming system that makes sense.
- I probably have about 100 CAT5 cables destined for the Elk M1, but I'm still going to terminate those separately in a patch panel - just in case I change the Elk or someone else wants to.
- This is personal preference, but I see HA as a fad I'm going thru and in a few years I don't want to be a slave to the system, so I'm designing and wiring my system to be accessible to others in the future.
 
I'm strongly considering a rail-mount terminal block system for patching my speaker cables, $150 for top of the line Wago double tier, 2 potential, using ~40 blocks. That's too much money, so I'm exploring cheaper terminal block options.
 
If it were me, I'd leave the cable long and only terminate each cable in its corresponding box. It looks like you could use a piece of cable tray at the top, near where the cables come in. Run each cable down the tray then drop into its proper box. I'm quite sure you will have separate boxes for audio/video, security, cable, internet, telephone, cameras, etc. I would anyway.

If you cant get ahold of a piece of tray, you could probably make some homemade tray from lumber.
 
12,000 square ft house and you're DIY on low voltage wiring????? Anyone else thinking WTF?

I just got done building a 2900 ft house with 6000 ft of cat 5 and I know what it cost me. I can't even imagine what that would cost.
 
If you cant get ahold of a piece of tray, you could probably make some homemade tray from lumber.

I'm cheap. Some 1 X 2, 1 X 3, screws, and black paint, and I'm happy.

cabletrays.jpg
 
Ya, I should probably get that showcase going at some point...but believe me, there are very few aspects of my HA install that are picture worthy....unless as an example of what NOT to do.

I didn't take any pics of the tray assembly, but it's really pretty simple...everything you need is at Lowes.

1 X 3 X 8ft (or 1 X 4 if you want deeper trays)
1 X 2 X 8 ft
2 X 2 X 8 ft
Metal strap (plumbing aisle)
Wood glue
1 1/2" drywall screws


Cut the 1X3 to the length of section you want, then lay them side-by-side on the floor.
Cut the 1X2 into 12" lengths, or however wide you want the tray to be.
Glue, then drywall screw the 1X2 onto the 1X3's. You may want to drill a pilot hole for the screw, as it's REALLY easy to split that thin wood.
Cut the 2X2 into 12" (same width as the 1X2)

Attach the metal strap to both ends of the 2X2 with screws (and kinda wrap it around the bottom). Then attach the straps to your ceiling. The 2X2 just fits under the tray inbetween the slats. You can see them near the end of the trays. You can put as many of those as you want per tray, depending on length and how many wires it holds.

These were born out of a desire to organize and support the cables, but not pay the ridiculous $$$/ft of actual cable trays.
 
12,000 square ft house and you're DIY on low voltage wiring????? Anyone else thinking WTF?

I just got done building a 2900 ft house with 6000 ft of cat 5 and I know what it cost me. I can't even imagine what that would cost.

It ended up being more DIY work than I initially imagined (with several "WTF am I doing" moments), but it worked out. My career started out doing Adds/Moves/Changes on a Harris 20/20 phone system along with IT system administration work so pulling wire and using a punch down tool are something I'm comfortable with. I wanted a home automation system that I could 100% manage myself and be as simple or as complex as I wanted. It should work intuitively and fail gracefully.

The biggest stress was getting it done fast enough so that I didn't delay the insulator sub and then the drywallers.

If I remember right, I think I ended up with about 23,000 ft of LV wire (CAT6, RG6 QUADSHIELD, 14 gauge speaker wire, alarm wire, etc) . This home has quite a few other "big numbers" associated with it (425 yards of concrete, 100 squares of shingles, 18 HVAC zones, 20,000 ft of radiant heat pex pipe (including the heated 310' driveway), 240 recessed can light fixtures, 1,100 ft crown molding, etc, etc). I'm sure it sets no records though.

I plan on using Linux and open source tools as much as possible. The home deserves at much, it was made possible by Linux.
 
I'm strongly considering a rail-mount terminal block system for patching my speaker cables, $150 for top of the line Wago double tier, 2 potential, using ~40 blocks. That's too much money, so I'm exploring cheaper terminal block options.


That's EXACTLY what I did and it's worked perfectly. I did a search on ebay and won a couple auctions which had dozens of double level blocks for pennies on the dollar. I used a terminal strip because I needed a way to pull all the speaker wires from the cabinet on the main floor into the attic but I couldn't pull all the individual speaker wires (remodeling as we go). So I've got all my speaker terminations in the attic in about 16" of rail.
 
Ya, I should probably get that showcase going at some point...but believe me, there are very few aspects of my HA install that are picture worthy....unless as an example of what NOT to do.

I didn't take any pics of the tray assembly, but it's really pretty simple...everything you need is at Lowes.

1 X 3 X 8ft (or 1 X 4 if you want deeper trays)
1 X 2 X 8 ft
2 X 2 X 8 ft
Metal strap (plumbing aisle)
Wood glue
1 1/2" drywall screws


Cut the 1X3 to the length of section you want, then lay them side-by-side on the floor.
Cut the 1X2 into 12" lengths, or however wide you want the tray to be.
Glue, then drywall screw the 1X2 onto the 1X3's. You may want to drill a pilot hole for the screw, as it's REALLY easy to split that thin wood.
Cut the 2X2 into 12" (same width as the 1X2)

Attach the metal strap to both ends of the 2X2 with screws (and kinda wrap it around the bottom). Then attach the straps to your ceiling. The 2X2 just fits under the tray inbetween the slats. You can see them near the end of the trays. You can put as many of those as you want per tray, depending on length and how many wires it holds.

These were born out of a desire to organize and support the cables, but not pay the ridiculous $$$/ft of actual cable trays.

Another way which I found simplier is to use some wire shelving. I installed it 'upside down' and even painted it black. If I needed a wider gap to drop the wires down, I just clipped out one of the wires at the ends.

If I recall I used a 12" shelf and 'bent' it up to make a narrower 'gutter' for one location. I just bent it longways along the wire which runs the length of the shelf. It gave me a channel which was about 6" wide with a 1-1/2" lip on the front and about a 6" lip on the back. Fasten it to the wall with the long lip on the back and it's a pretty stiff channel.
 
Ya, I looked at that shelf stuff, but was put off by the cost. I had specific length areas I needed straight runs, and each run would have required a full shelf, but then cut down, so a lot of wastage. With the wood, I could make it the specific length and width I needed (including under the HVAC chase where the tray goes from about 2' wide down to 1').

Some of us can't afford that higher-end stuff. ;)
 
Back
Top