You are using an out of date browser. It may not display this or other websites correctly.
You should upgrade or use an alternative browser.
You should upgrade or use an alternative browser.
bfisher's Cocoon
- Thread starter bfisher
- Start date
The only ones we really sell are the ELK gel filled good and plenty style. (we also sell the no-gels)
http://www.smarthomeusa.com/ShopByManufact...Item/ELK-902-2/
http://www.smarthomeusa.com/ShopByManufact...Item/ELK-902-2/
LOL - both of my kids are adopted! (now 4 and 5 year old brother/sister from Bulgaria) My wife would be the talk of the town with 2 36 year old kids in the house!!No comments except to ask if you've ever considered adopting...and if so...is a 36 yr old male too old?
About the gel connectors, I prefer them over the no-gel crimps - for some reason they just seem better to me. It's worth the tiny bit of extra money for them to know they will never have a problem due to moisture...
un-wired - I didn't know you worked at SmarthomeUSA - I bought all my security stuff (Caddx) and IR (Xantech) from you guys. Your tech support was very helpful (it was my first security system install).
HVAC System
One of my priority projects since moving into our new house to save expenses through automation(increases WAF significantly). One way to do this has been to upgrade my HVAC controls.
My house has a central system, and each floor (3) are separated into zones with dampers that open and close as needed based on thermostat conditions. The old thermostats were mechanical and not real reliable. Also, they required manual adjustments to change temperature – and it’s easy to forget it sometimes, heating the house when it was not needed.
Hardware
I chose to replace my old thermostats with RCS TR-16s (http://www.automatedoutlet.com/product.php?productid=221&cat=85&page=1) communicating via RS485 to my HomeVision Pro. Each floor required a TR-16.
The installation went relatively smoothly. I had an existing 3 zone controller (controls the dampers, etc) that made things more interesting – but never really became an obstacle.
The TR-16 is 2 components – a WDU (Wall Display Unit) and a Control Unit (TCU). Since I had three floors, I needed three devices. I chose to mount them in my automation closet, and run wires from there into my HVAC area (it was easier than mounting the TCU into the cinderblock wall of my HVAC area).
This first picture shows the WDU base. The actual thermostat interface just plugs into this base. The second (unused) set of screws are for a remote thermostat if desired. Notice I couldn’t cover the paint with these devices – more work!
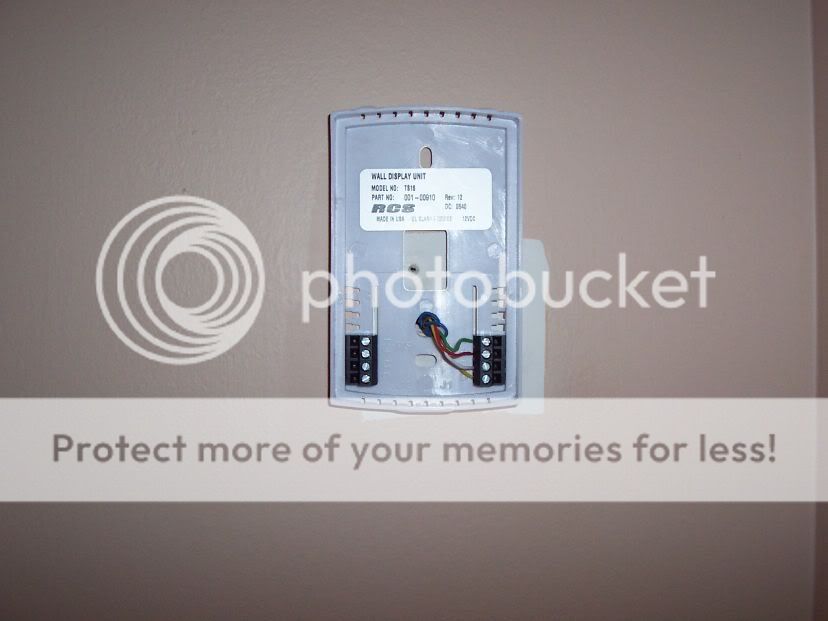
And here it is with the cover on it. Very easy to read and manually control (although we never touch them).

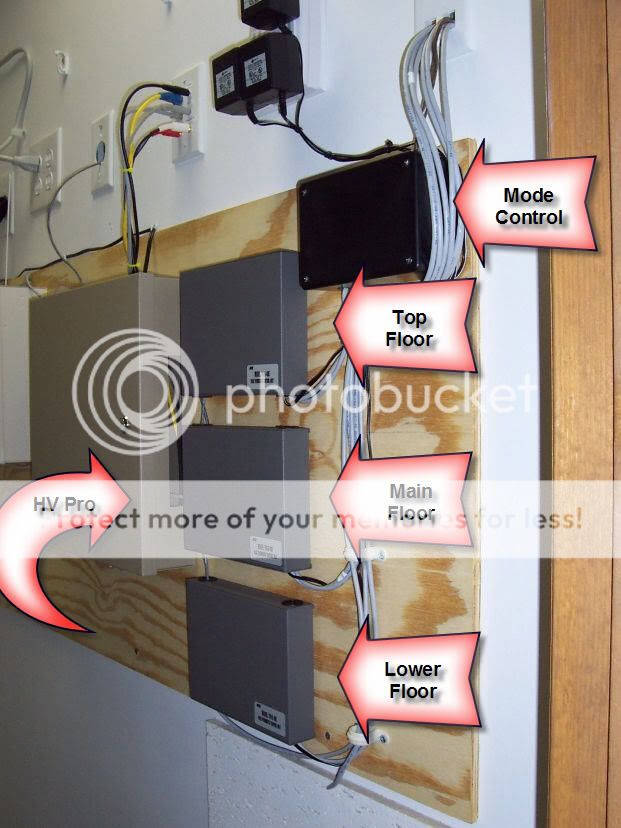
This picture shows everything wired in place. The 485 communications starts in the lower zone, goes to the middle one, to the top one, and then into my HomeVision Pro (which monitors and controls the system).
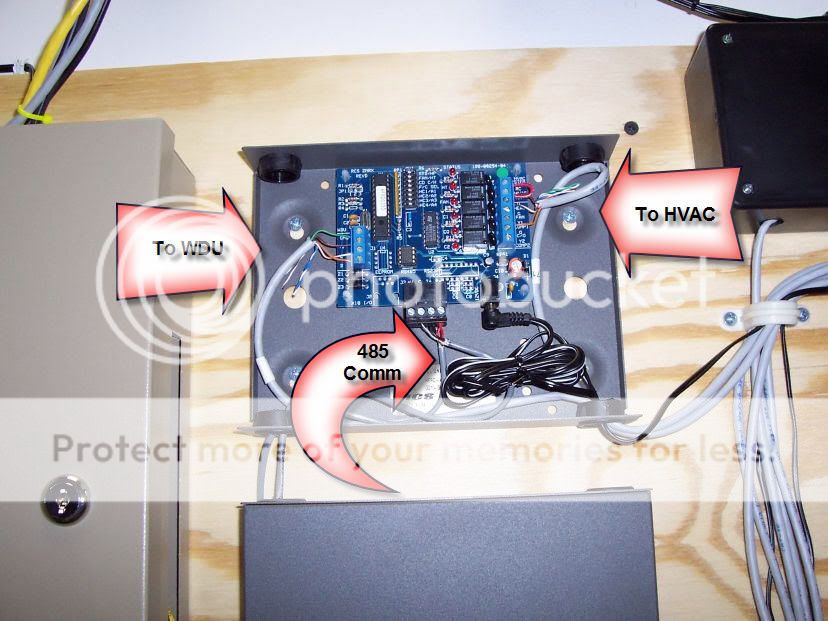
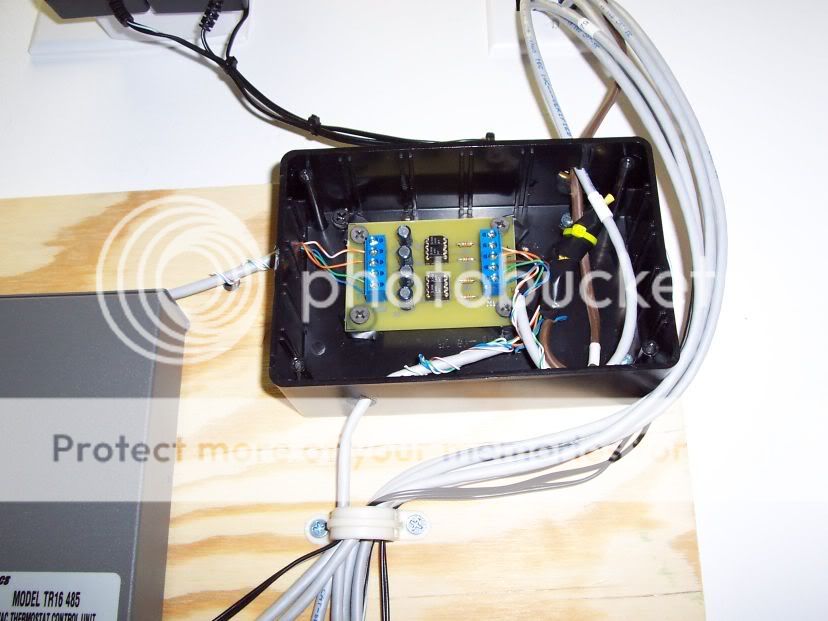
Here is the wiring inside the TCU. There are two wires for RS485 because this is my top floor unit, so it’s connected to both the main floor device, and the HVPro.
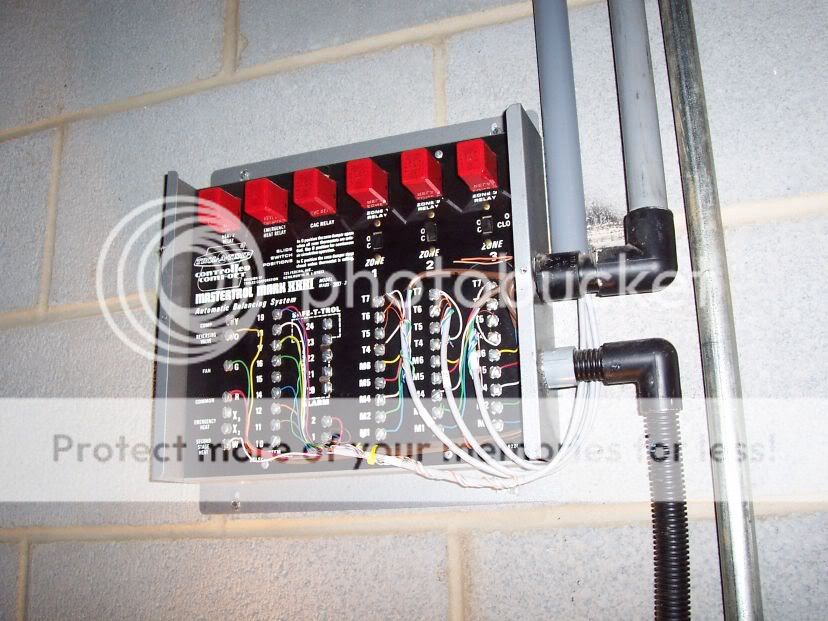
Here is the wiring into the existing 3 zone controller. Notice I had to add another conduit drop because there wasn’t room in the existing one. When the controller cover is on, you don’t even notice it.
My HVAC system has a rotary knob on the main floor (next to the kitchen) that is used to control the mode (Heat, Fan, Cool, Off, etc) and is part of the legacy HVAC controller. I didn’t want to deal with trying to eliminate it, so I decided to try to use it. With the help of another member here (JKnox), we determined that we could read the current state of this rotary knob and connect it to my HVPro. Since my HVPro knows what state the knob is in – it can update temperature and WDU settings appropriately. For example, if you switch from Heat to Fan – my HVPro sends new temperature setpoints and mode settings to each wall controller. Without this really cool function – I would have to run from floor to floor to readjust the thermostats as the knob is changed.
To use these 24VAC signals coming from the knob (to the HVAC controller), Jerry made me a custom board that converts “on†signals in VAC to ground signals (I know, I’m simplifying… but basically that’s what it’s doing) so I can instantly tell the knob position. Works great – many thanks to Jerry!
Logic
I decided that I wanted to save money (run the HVAC as little as possible) and yet make the house as comfortable as possible. This means I want to heat floors only if they are occupied. Our daily schedule changes every day (wife doesn’t work, and I work from home or a hotel (I travel a lot)) so I couldn’t just use a simple time-based scheme.
What I’ve done is any time a TV or an amplifier (most of house is wired for audio) is turned on – turn up the heat (to 70 degrees). When the device is turned off – check if it’s possible to turn down the heat.
Since we don’t always have a TV or music on when home, I also use the motion sensors to check for occupancy. When a sensor sees motion, it starts a 2 minute timer (in HVPro). In that 2 minute window – it ignores additional motion (in case we are just walking through the kitchen to get a drink, etc). After that 2 minute timer expires, it watches for the next 10 minutes to see if there is any additional motion. If there is – it turns up the heat. If there isn’t, it leaves HVAC set back. A new count-down timer is started (15 minutes) and resets to 15 anytime the sensor sees motion. If the sensor doesn’t see motion for 15 minutes, it checks the status of TVs/Music. If all are clear, it turns down the heat.
If the security system is set to away and the garage door opens – it immediately turns up the main floor heat. By the time we walk in the door – warm air is already being pumped out.
About 20 minutes before it’s time to wake up – I turn on the heat in the bedrooms (so it’s warm when getting out of bed). After 30 minutes, I turn off the bedrooms and turn on the main floor (so its warm for breakfast, etc). I have different wake times based on weekday /weekend and it can also be adjusted through the TV (or webpage) before going to sleep.
As mentioned above, if a TV or Stereo are turned off, it checks the 15 minute countdown timer. If there isn’t any motion sensed in 15 minutes (timer is ringing), it turns down the heat.
Finally, when the house is put into goodnight mode (either manually or based on specific conditions), it turns back the heat.
The Results
So was it worth the cost (money and time) to install this setup? I don’t have a lot of history yet (only finished this a month or so ago), but in my first full month using this setup – my gas bill went down over the previous year! Our gas usage dropped more than 30%! And my wife has commented how much more comfortable the house is (increasing WAF for my projects!)
If I used last year’s consumption at this year’s fuel rate, I would have saved $70 (in 1 month). I would expect in areas with higher gas prices – it would be an even greater savings. I do not yet know what the electricity savings will be in the summer. (The project cost me approximately $700 (thermostats, custom board, shipping, wiring, etc))
One of my priority projects since moving into our new house to save expenses through automation(increases WAF significantly). One way to do this has been to upgrade my HVAC controls.
My house has a central system, and each floor (3) are separated into zones with dampers that open and close as needed based on thermostat conditions. The old thermostats were mechanical and not real reliable. Also, they required manual adjustments to change temperature – and it’s easy to forget it sometimes, heating the house when it was not needed.
Hardware
I chose to replace my old thermostats with RCS TR-16s (http://www.automatedoutlet.com/product.php?productid=221&cat=85&page=1) communicating via RS485 to my HomeVision Pro. Each floor required a TR-16.
The installation went relatively smoothly. I had an existing 3 zone controller (controls the dampers, etc) that made things more interesting – but never really became an obstacle.
The TR-16 is 2 components – a WDU (Wall Display Unit) and a Control Unit (TCU). Since I had three floors, I needed three devices. I chose to mount them in my automation closet, and run wires from there into my HVAC area (it was easier than mounting the TCU into the cinderblock wall of my HVAC area).
This first picture shows the WDU base. The actual thermostat interface just plugs into this base. The second (unused) set of screws are for a remote thermostat if desired. Notice I couldn’t cover the paint with these devices – more work!
And here it is with the cover on it. Very easy to read and manually control (although we never touch them).
This picture shows everything wired in place. The 485 communications starts in the lower zone, goes to the middle one, to the top one, and then into my HomeVision Pro (which monitors and controls the system).
Here is the wiring inside the TCU. There are two wires for RS485 because this is my top floor unit, so it’s connected to both the main floor device, and the HVPro.
Here is the wiring into the existing 3 zone controller. Notice I had to add another conduit drop because there wasn’t room in the existing one. When the controller cover is on, you don’t even notice it.
My HVAC system has a rotary knob on the main floor (next to the kitchen) that is used to control the mode (Heat, Fan, Cool, Off, etc) and is part of the legacy HVAC controller. I didn’t want to deal with trying to eliminate it, so I decided to try to use it. With the help of another member here (JKnox), we determined that we could read the current state of this rotary knob and connect it to my HVPro. Since my HVPro knows what state the knob is in – it can update temperature and WDU settings appropriately. For example, if you switch from Heat to Fan – my HVPro sends new temperature setpoints and mode settings to each wall controller. Without this really cool function – I would have to run from floor to floor to readjust the thermostats as the knob is changed.
To use these 24VAC signals coming from the knob (to the HVAC controller), Jerry made me a custom board that converts “on†signals in VAC to ground signals (I know, I’m simplifying… but basically that’s what it’s doing) so I can instantly tell the knob position. Works great – many thanks to Jerry!
Logic
I decided that I wanted to save money (run the HVAC as little as possible) and yet make the house as comfortable as possible. This means I want to heat floors only if they are occupied. Our daily schedule changes every day (wife doesn’t work, and I work from home or a hotel (I travel a lot)) so I couldn’t just use a simple time-based scheme.
What I’ve done is any time a TV or an amplifier (most of house is wired for audio) is turned on – turn up the heat (to 70 degrees). When the device is turned off – check if it’s possible to turn down the heat.
Since we don’t always have a TV or music on when home, I also use the motion sensors to check for occupancy. When a sensor sees motion, it starts a 2 minute timer (in HVPro). In that 2 minute window – it ignores additional motion (in case we are just walking through the kitchen to get a drink, etc). After that 2 minute timer expires, it watches for the next 10 minutes to see if there is any additional motion. If there is – it turns up the heat. If there isn’t, it leaves HVAC set back. A new count-down timer is started (15 minutes) and resets to 15 anytime the sensor sees motion. If the sensor doesn’t see motion for 15 minutes, it checks the status of TVs/Music. If all are clear, it turns down the heat.
If the security system is set to away and the garage door opens – it immediately turns up the main floor heat. By the time we walk in the door – warm air is already being pumped out.
About 20 minutes before it’s time to wake up – I turn on the heat in the bedrooms (so it’s warm when getting out of bed). After 30 minutes, I turn off the bedrooms and turn on the main floor (so its warm for breakfast, etc). I have different wake times based on weekday /weekend and it can also be adjusted through the TV (or webpage) before going to sleep.
As mentioned above, if a TV or Stereo are turned off, it checks the 15 minute countdown timer. If there isn’t any motion sensed in 15 minutes (timer is ringing), it turns down the heat.
Finally, when the house is put into goodnight mode (either manually or based on specific conditions), it turns back the heat.
The Results
So was it worth the cost (money and time) to install this setup? I don’t have a lot of history yet (only finished this a month or so ago), but in my first full month using this setup – my gas bill went down over the previous year! Our gas usage dropped more than 30%! And my wife has commented how much more comfortable the house is (increasing WAF for my projects!)
If I used last year’s consumption at this year’s fuel rate, I would have saved $70 (in 1 month). I would expect in areas with higher gas prices – it would be an even greater savings. I do not yet know what the electricity savings will be in the summer. (The project cost me approximately $700 (thermostats, custom board, shipping, wiring, etc))
") )
)Hi Bruce
Great writeup ........
Im a Homevision user myself (standard hv) and must say i havent regretted the purchase as its most reliable and flexible.....
How are you controllling your mp3,s via Homevision pro ??? ....Im using xPL to do this via a pc (and an Exstreamer) .....Also how do you monitor appliance status ?? Using smartlinc probes ???
If thinking about using a pc for some of your HA Functions have a look at xPL ......
Gerry Duprey ( another hv user) has done a UPB Plugin and is i believe working on a program to assist in programming the UPB kit.........
Looking forward to more info on your HA adventure..........
Frank
Thanks for the HVAC posting.
I was going to do some HVAC control in my townhouse but decided to hold off until after buying a real house.
I'm now getting all geared up for moving into my new home and controlling the HVAC is one of my top priorities.
Also, thank you for noting the savings you saw after getting your HVAC control going. Very helpful.
The 30% consumption savings has been consistent so far during the winter months (using gas)... My utility bills have been the same or less than comparable months (I have 3 to compare so far) last year, even though gas prices have gone up. And my wife is happier! :lol:
I am anxious to see how it affects my AC (electric) bill in the summer.
I am anxious to see how it affects my AC (electric) bill in the summer.
bfisher said:LOL - both of my kids are adopted! (now 4 and 5 year old brother/sister from Bulgaria) My wife would be the talk of the town with 2 36 year old kids in the house!!No comments except to ask if you've ever considered adopting...and if so...is a 36 yr old male too old?
Did I mention that I vaccuum and do laundry?
Our tech support staff is absolutely the best (it's me), I can't tell you how much we value the tech staff here (actually it's me, another tech support staffer and our web department). Those guys are truly amazing, it's almost like they are more then just ordinary human, almost superhuman...they are, they are superhuman techs. We give the best technical support staff members a specific title:bfisher said:un-wired - I didn't know you worked at SmarthomeUSA - I bought all my security stuff (Caddx) and IR (Xantech) from you guys. Your tech support was very helpful (it was my first security system install).
"Technical Specialist"
Sort of the elite of tech staffers if you will (notice my job title in my sig?)
I'd really like to organize a little forum post (on our tech forum) about your install if you don't mind (and of course if Electron is ok with me stealing from here a little). I'd be really interested in having a section dedicated to installs, to show the way its done when its done properly.
I'd also invite anyone else who is interested to submit their homes (with the permission of Electron of course).
LOL - I don't mind sharing my install - but you might not want to include the part about "when it's done properly"! LOL. I've made more than my share of mistakes. The great part however is it does work - the house is more secure, more convenient and saves me money on utilities.un-wired said:I'd really like to organize a little forum post (on our tech forum) about your install if you don't mind (and of course if Electron is ok with me stealing from here a little). I'd be really interested in having a section dedicated to installs, to show the way its done when its done properly.
I'd also invite anyone else who is interested to submit their homes (with the permission of Electron of course).
Sorry Frank - I missed this posting:
My MP3s are controlled by a combination of HVPro and AutoIt on the PC. HVPro interprets the IR commands to select playlists (etc), determines if it should sync or start a new zone, etc. It then runs a series of small EXE files created in AutoIt based on the needed function.
For example, if I'm in my office listening to my playlist (zone1) and my wife wants to hear her music - HVPro determines Zone 1 is already being used, but my wife wants a different playlist. HVPro runs an EXE on the PC to switch JRiver to zone 2 (leaves Zone 1 alone). HVPro then runs another EXE to select and start my wifes playlist in JRiver.
It's very easy to write these small codes in AutoIt. However, I should take a closer look at xPL. I have a PC touchscreen that I'm using to control my system - using the built-in HVPro webserver. xPL might give me some more options... I remember looking at it quickly before and was overwhelmed by it and did nothing. A closer look is warranted.
As for monitoring my appliances - a member here (Jerry) built me a small circuit board to monitor 4 appliances... 2 via video input and 2 via current transformer. It works quite well.
As for the UPB plug-in for HVPro, already using it!
Hi Bruce
Great writeup ........
Im a Homevision user myself (standard hv) and must say i havent regretted the purchase as its most reliable and flexible.....
How are you controllling your mp3,s via Homevision pro ??? ....Im using xPL to do this via a pc (and an Exstreamer) .....Also how do you monitor appliance status ?? Using smartlinc probes ???
If thinking about using a pc for some of your HA Functions have a look at xPL ......
Gerry Duprey ( another hv user) has done a UPB Plugin and is i believe working on a program to assist in programming the UPB kit.........
Looking forward to more info on your HA adventure..........
Frank
My MP3s are controlled by a combination of HVPro and AutoIt on the PC. HVPro interprets the IR commands to select playlists (etc), determines if it should sync or start a new zone, etc. It then runs a series of small EXE files created in AutoIt based on the needed function.
For example, if I'm in my office listening to my playlist (zone1) and my wife wants to hear her music - HVPro determines Zone 1 is already being used, but my wife wants a different playlist. HVPro runs an EXE on the PC to switch JRiver to zone 2 (leaves Zone 1 alone). HVPro then runs another EXE to select and start my wifes playlist in JRiver.
It's very easy to write these small codes in AutoIt. However, I should take a closer look at xPL. I have a PC touchscreen that I'm using to control my system - using the built-in HVPro webserver. xPL might give me some more options... I remember looking at it quickly before and was overwhelmed by it and did nothing. A closer look is warranted.
As for monitoring my appliances - a member here (Jerry) built me a small circuit board to monitor 4 appliances... 2 via video input and 2 via current transformer. It works quite well.
As for the UPB plug-in for HVPro, already using it!
Similar threads
- Replies
- 18
- Views
- 599