beelzerob
Senior Member
Well, it has begun. After all the preparation of researching tools, wiring the windows, wire specs, prewiring tips, and just overall wiring strategy, we finally had our first day. It almost didn't happen because of a nice 3" of snow that fell last night...but it snowed less out at the property than it did in town, and by mid day, it had melted off most all the roads. So there were no problems getting up the road.
I'm going to keep a running log of the misadventures and lessons learned. I'll keep updating the first post so it's one stop shopping for anyone who wants to read it. I'll add pics in a couple days.
Dec 31: Rented a generator. Unfortunately, the electric company never got the power wired up to the house, so we have to rent a generator to power my drill, saw, lights, and heater. We rented it for a week, hopefully after that the electric company will get it done.
The area we're attacking is around the HVAC chase, because it goes from the attic to the basement and has tons of room around it. Unfortunately, there was also some high voltage wiring around 2 sides of it, so if I had any hope of keeping it away from it, I was much more limited where I could run the wire. I heard that putting some wood in between the high and low voltage would reduce any possible interference, so I may throw some spare 2 X 4's in there. We ended up drilling a hole big enough to run a 3" PVC pipe for future wiring needs, but for the "now" wiring, we're not going to run it in a pipe. That gives us more flexibility of where to run it in the chase. We've started off cutting a 5" square hole all the way from the basement to the attic. We'll see how that goes, and if we need to drill a bigger hole for more wire, we'll do that too.
The temps in the basement were around 40 deg. This was only a minor discomfort to us, but I was more concerned about the wire. I had read in another post that someone pulling wire at 19 deg had seen the sheathing actually crack. To try and avoid that, we bought a small electric heater to try to keep the area where the wire is sitting a little warmer.
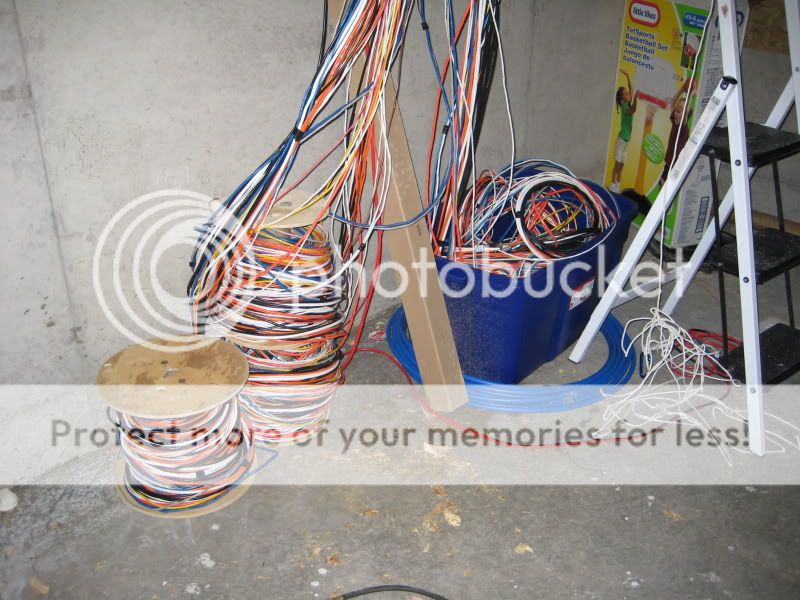
Here's what we started off with. The 22/4 is in the brown boxes.

I also marshalled all my mock carpentry skills, as well as a little dumpster diving after the framing was done, and made some spool holders. I probably spent more in tools just to make them than it would have cost to buy some, but oh well...

As we started putting together our first wire pull, though, I discovered that the problem isn't having the sheathing crack...it's that when the wire is colder and stiffer, the pull boxes really suck. I officially hate those now. All of my RG59, RG6, and Cat5e/Cat6 are in boxes. The other wire is on spools, and I wish EVERYTHING came on spools...no chance of kinking then. On several occasions now, the wire has basically stopped, and I have to open the box and feed it through. Sometimes there has been a lot of resistance, and when it finally did come out, the sheather was discolored. I don't know if it was because of kinking, or just the friction of pressing against the inner plastic feeder thing. Once, out of anger, I just yanked, and there in my Cat6 was a perfect full fledged kink. :angry: So I cut that piece right there.....hey, patch cable material, woohoo!
Anyway, I hate boxes. We should have rented one of those 45k BTU heaters, because that little 1500W space heater isn't going to make a difference on the inside temp of those boxes. Right now all the cable is sitting in the basement and the low is expected to be around 30 or lower....so it could be a tough day tomorrow. The good news at least is that once some wire has been fed out of the box, it appears to go a lot easier.
We finally started our first pull....the hardest one on the list. It's the TV to the loft. It has 5 RG59, 2 RG6, and 3 Cat5e. What I did was get a wire from each box that was a part of the pull and handed it to my wife, and then she slowly walked about across the basement as they pulled out of the boxes. Every 3 ft or so, we put a short piece of velcro across the bundle to keep it together. However, we're going to go back and use electrical tape instead, as it's just easier to use and quicker. We'll tape it every foot or so to make the bundle easier to deal with.
The idea is that if the wire is going to the same location (which is true of the TV pull), then we'll tape them together. But if wire is going to the same room, but different location, then we'll just pull them together and split them off at the room. That way those particular wires can be pulled further if needed. We'll see how that works out.
Jan 1: Happy New Year! Now, on to business..... We didn't actually start the pull yesterday...we just starting putting together the first "cable" that was going to that room. Before we started actually pulling cable, I went upstairs to start scoping the route it would take in the rafters. I love our attic! Our last house had all vaulted ceilings, and even though I was never even able to run wire there, I knew I couldn't have anyway, due to space constraints. In this house, I just climb up the ladder to the roof trusses and walk all the way across. That is SO much easier than if I'd have to use a ladder to move the wire across the attic.

I wanted to make sure that the wire could easily be routed to its destination, which in this case was the loft...the furthest place possible for us to run cable. I wanted to make sure the wire always had smooth transitions in directions, was protected from the sharp truss connector edges, and was always a good distance from the multiple high voltage runs going through the area. To accomplish this, I utilized what I had on hand (as opposed to thinking about it ahead of time) and it worked out pretty darn good. I drove a nail in 2 places, on both sides of where I wanted the wire to go, and then I used nylon twine and tied it across the opening about 2 or 3 times. So now the wire could essentially hang in air wherever I wanted it to go. I routed a kind of wire super-highway across the attic towards the loft.

Eventually, though, I realized it was just time to start pulling cable. I was done trying to think it out...it was time to start making mistakes so I could learn more. So, I went down to the basement where my wife had been creating more and more TV cable (and coming across more and more kinks in the cat5e's and cat6's...and even one in the RG6QS, good grief!). We put together all of the wires going to the room. My idea was to pull all of it at one time and get it to the edge of the room, and then finish off the lengths of individual runs. This first pull consisted of (if I recall correctly):
1) TV: 5 RG59, 2 RG6QS, 3 Cat5e
2) PC: 1 Cat6, 1 Cat5e
3) Touchpad location: 1 Cat6, 2 Cat5e
4) Speaker: 1 14/4
5) Smoke alarm: 1 22/4 firewire
6) Window contacts: 2 22/4
7) Temp sensor: 1 22/4
8) Light control: 1 Cat5e
Ok, I THINK that's all. This sucker was HEAVY. I had twine at the top of the pull (close to 20 feet vertical) and we velcroed the end of the megacable to the twine. Then, as she shoved it up from below, I slowly pulled it from above. It came up pretty easy, but it was still alot of effort. I pulled enough for it to fall through the ceiling down to the floor. Then I wanted to move the end of the cable along its route towards the loft, but as soon as I'd start to let go of it, it would slide right back down the hole. So, I used a big piece of velcro to secure the cable to the nearest nylon twine hang...that held it in place good enough so I could move the end of the cable further along. Once all the slack was moved along, I undid the velcro and pulled more up as she pushed. I'd create a big pool of slack near the attic entrance (around the HVAC chase), then walk along the roof trusses and move the slack pool along. This worked well until I had it moved pretty much all the way to its destination.
Problems became evident with this method. The TV "cable" worked really well because we had joined it all together with electrical tape about every foot. So it stayed together and acted mostly like a single large cable. However, all the other wires we had added to this single pull weren't joined together, so as soon as I created a pool of slack, it quickly became a spaghetti mess. The other issue is that when it came time to pull certain wires further to reach other parts of the room, they were all wound together. It was impossible to cleanly separate 1 wire from the "bundle" it had all become. As it turns out, as long as she was creating slack on the "feeding" end, it was still really easy to pull specific wires longer. We made it work, but we also certainly decided that the next pulls are going to be per location, not per room.
Once wires arrived at their destinations, I affixed them with zip ties, stapled to the studs. I didn't trust the stapler to not crush the wire, so I didn't directly staple the wire. In some places, I tried stapling over a nail, then remove the nail, and feed the wire through. That worked ok, but it wasn't a tight fit. I then went back along the entire wire run and pulled out the cables that had been run fully and zip tied them to whatever trusses were handy. This ended up keeping most of the wires off the nylon twine I had strung across the studs and seemed like a more permanent solution.
The wires were all run, and it was cold and dark, and it was finally time for the scariest part....cutting. I measured off enough distance to get all of the cables to the further corner of the wiring room, and then cut. I'm not sure exactly yet where the cans (when I can afford those) will go, but that should be enough cable to get to any one of them needed. Immediately after each cut, I made sure to label the wire. I used a sharpie and the cheapo Radioshack wire labels that were mentioned in the "tools" thread. They worked just fine. I didn't label every wire because the wire coloring scheme I used made it unnecessary. The combination of the wire type and the color will identify what each wire is for...the label just tells me WHERE.
Tomorrow we try to hit the bedroom that is next to the loft...it's just about as far and will use all the same wires as the loft. The fun part will be walking across the roof trusses above the first floor foyer, 20 ft below. Woohoo!
Jan 2: Man, I almost forgot to record the days activities. That's because the people we were housesitting for came home and we watched a movie with them ("Serenity"....fantastic movie, in my opinion) and it got late and we decided instead of going home to just sleep here another night so we could get an early start to the next day's efforts. The good news from all that is that they're going to watch our kids, which up to now have been our one achilles heel to getting work done. The first day we started them off in the truck watching movies, and then we brought them down to the basement hoping they'd entertain themselves so we could get work done. Well, a 4 year old and a 22 month old don't entertain themselves very well, unless it's with something dangerous. So today, we kept them in the car all day, and that worked much better. Our 4 year old knows how to work the walkie talkie, so she tells us if the toddler is crying or if the movie machine doesn't work anymore or whatever. She learned how to change DVD's out of necessity, because during the 3 months we were waiting for construction, my wife took them out to the property every day so she could cut down trees. They'd stay in the car parked a safe distance away and watch movies and occasionally take naps. I'm not particularly happy with what we've put our kids through to get work done on the house, but I keep telling myself that once the work is done we'll be better parents. There....guilt gone.
We've been getting out rather late....around 10ish or so, after our mandatory stop at Lowes to get more supplies. (staples, nails, rope and more nylon twine). The plumber was there today, which was a bummer...we'd hoped it'd be the electrician because they bring the nice heaters that warm the whole basement. Oh well. The goal for today was bedroom 2, and I was optimistic we could do bedroom 4 also because of how much faster we were going (note: You can see the floorplan of our house by clicking the wiring strategy link above....hmmm, those pics aren't loading for some reason. I think Comcast is down or something. Anyway, it should be noted that we only have a bedroom 2 and 4....there is no 3. It got converted into the loft). While my wife prepared the cable in the basement, I went up into the rafters to scope out the route. Here is where I got to string nylon twine across the 20 drop to the foyer (heck, 30' assuming I'd break right through the floor). The scariest part is just that my wife might see me doing it. She carries a "Be careful!" warning with her wherever she goes, and I think she would have run out.
Once ready, we went with our new plan....we were going to run the halloween first, then civil war, and then gobbledy gook. If for some reason that's not clear, let me 'splain: halloween is the TV cable, because the RG59's are black, the Cat5e's are orange, and the RG6's are white...civil war is the network wire, which is a blue cat6 and a grey cat5e, and gobbledy gook is all the rest....red firewire, white 22/4's, brown 22/4's, yellow cat5, white cat5 and orange 14/4. This plan differs from the first day, when we pulled ALL of that up together at once. Not only was that DANG heavy, but it was a major pain to sort it out in the end. So this time we pulled just the TV cable up first, ran it all the way to its final destination, and then same with the PC network cable, and finally all the rest. Because the remaining were all individual wires, they were much easier to manage the differing lengths as needed.
Around afternoon, we discovered our latest shortage....electrical tape. This was a crucial one. We were down to our last roll and my wife had gone sparingly, taping together the TV mega-cable only every 5 feet or so. That was WAY too sparingly. For that bundle to be manageable at all, you have to go about every foot. Same with the network cables...they had to act like a single cable to be useful. Velcro was not as useful here as I had thought it would be...it was cumbersome to cut, and it simply didn't hold as well as the tape. Now, we HAVE used it in many places for temporary purposes, but definitely not for holding the wires to each other.
So she decided to take the kids to town to get more electrical tape, as well as food. While she was gone, what I did was move the remaining gobbledy gook cables into place. What we do is feed a lot of slack to the room, and then once the end is in place, we take the slack back all the way down to the basement. In this case, for some reason, we fed up WAY too much slack. I had cables draped all the way down to the foyer floor 20' below and back up. For final destinations, what I would do is figure out where in the room it was (I keep a copy of the plan in my back pocket), determine how big a hole it would need, check for any interfering high voltage wires, then drill the hole (going a corded drill here was definitely the right choice...some mean power there). Then I go up the rafters, take the wire end and feed it down until it hits the bottom of the wall...then I go back to the floor and secure the wire. The method we're going with is to staple a small zip tie to the stud, then zip tie the wire to it. In some places where I don't want to secure the wire, but I don't want it to flop around, what I'll do is staple a nail to the stud, remove the nail, and then slip the wire through the staple. That has all worked so far. The hard part is trying to think ahead of time to making the wire accessible in the future....I don't want to secure it too tightly if I'm going to be trying to fish it out of a small hole (like for the temp sensors).
I had one almost gotcha moment today when I was running the speaker wire. I was just about to secure it in place when I remembered my plan....run it past the room's keypad location first! Whew! So, I drilled a 1" hole, ran the speaker wire down next to the keypad wire, and then ran it back up the hole to where it had to go in the room. So I now have a loop of wire there should I need it. This issue didn't come up when we did the loft because I don't have a keypad planned for there....there's a touchpad location that will work for that. When we do our first 2-speaker room, I'll have to remember I need to run the wire to both locations.
It was amazing how much slower I went while she was gone....it was kinda strange. It's not that she was even supposed to be helping me on that particular part...I think it was just the lack of pressure to keep moving. Either that, or it was the fact that the temps really dropped in the meantime. For the first time since we've been out there, my hands were getting cold. The temps ended up in the teens. Brrrr. Thankfully there have been no breezes in the house because all the windows are in, because that wind is wicked.
She finally returned and after a quick meal that tasted a lot better than a Burger King meal should, I finished up in the room and we took up all the slack back down to the basement. I walked through the rafters securing the wire, using electrical tape to bind all the wires together and using nails and zip ties to support it off the nylon twine bridges. Then I went down the chase and taped it together and secured it to the side of the big hole so it was out of the way for the next pulls. I also taped a zip tie to the bundle just below floor level and then raised the cable up and zipped it to a nail...that basically took a lot of the weight off the wire, so the wire at the top of the vertical chase wasn't supporting the whole 30' length.
When I got down to the basement after doing all that, the wire was already laid out for cutting. What we do is hold the wire straight down from the chase so it's touching the floor. Then, since we need 32' from there to reach the back corner of the wiring room, we measured out 32' across the basement and marked it with a sharpie. So, we string the cable out that distance and then cut it. We also marked out 32' in two other directions so that we wouldn't have to drag the wire out all that distance if we didn't want to...for instance, once direction is 20' across to the other basement wall, then 12' back towards the chase. Cut then label, and we were done.
We also took the time to form some more TV mega cable and network cable, so we could get a jump on the next day (and because it's a lot easier to do that when we can string it across the entire basement without having to worry about other workers). Once we put the cable together, though, we have to wind it back up to the corner to get it out of the way in case workers show up before we do. As we wound up the Tv megacable, we had a small epiphany. We had salvaged some of the large wooden spools the electricians had tossed away, and those would be perfect for rolling up the cable for the night so that in the morning we could roll it back out and be ready to go.
Unfortunately, even though it SEEMED a lot faster, we still only got 1 room done. However, it was about the same distance as the loft, so it makes sense. Our goal for tomorrow is to complete the top floor, because bedroom 2 is much closer, and the master bedroom surrounds the chase, so it's right there. So far, I am pleased with our progress...there have been no real work stoppages, which is good because there's a LOT of work left to do!
Jan 3: Oof...I dunno why, but I'm even more tired tonight. Then again, we got a much better start...we were out at the house around 8 am...the sun hadn't even hit our place yet. As a result, we got to spend a lot of time enjoying the 17 degree temps! Brrrrrr. It was just a flat out cold day. The only good news is that the plumbers showed up to work, and they turned on the electrician's 110k BTU heater in the basement. That didn't do me much good up in the rafters, but it kept the wire nice and pliable.
Our goal for the day was to finish the upstairs....at least as far as the major items and all bedrooms. There's little minor stuff other than that...a light switch here, a smoke alarm there, a water sensor in the laundry room, etc. So first up we pulled to bedroom 2. (By the way, comcast finally fixed themselves, so the linked post above now does show the floorplan, for reference). It went pretty quickly, given how close to the chase it was. No real difficulties noted. However, I'm going to put the whole "interference" thing to the test. The place for the room audio control keypad is on the other side of a stud from a 120v run, and shares the same stud cavity as a 220v run (for the dryer). And best of all, my speaker wire loops into there. So, if I hear buzzing or static in that room, especially when the dryer is running, then I guess it'll be confirmed. Worst case if that happens, then I'll just snip the speaker loop in the cavity and connect it directly from wiring room to speakers.

After finishing bedroom 4 and talking to our well contractor for a while, it was time to hit the master bedroom. Like all the other rooms, it had a big TV and a PC pull. But the "gobbledy gook" pull contained a lot more. 2 more window wires, another speaker, another PC, and a touchpad pull (1 Cat6 and 1 Cat5e....the power for these touchpads comes from an outlet in the attic above). That made it quite a bit more involved, so that room, went pretty slow, even though it was directly around the chase. Like always, we pulled a lot of wire up, then ran each wire to where it had to go, and secured it from its end. Then once they were all connected, we slowly fed the slack back down the chase and secured the wire as we went. It worked like a charm.
There were some lessons learned today, though. First is that we were smart (after all!) to do the longest runs first. The main reason being that I was discovering as we ran more and more wire, it became harder to navigate the attic trusses. Once we had done the master bedroom and bath, it was REALLY tough, as they were criss-crossing all over the place. I also learned that I seem to always put the wire at just the wrong height when I secure it....too high to easily step over, and too low to go under. I'm more focused on keeping it away from the high voltage wires, so I don't usually pay attention to having to get over or under it.
The final lesson we had today was a little epiphany. We had scrounged up some spools the electrician left, and we were going to use them to roll up the wire we had laid out for the next days pull, just to get it out of the way. Well, in the meantime, the wire we had already pulled sat very messily in a big pile of boxes which they filled to overflowing. So we suddenly figured...hey, why not use the spools on the already-pulled wire, to keep them out of the way!
We're much happier with that result.
Tomorrow we have to do some minor pulls across the attic, just wrapping up stuff, but we're essentially done with the 2nd floor. We're really expecting the first floor to go much faster. It'll take some more thinking, as to routing....but no more heavy 30' high wire pulls!
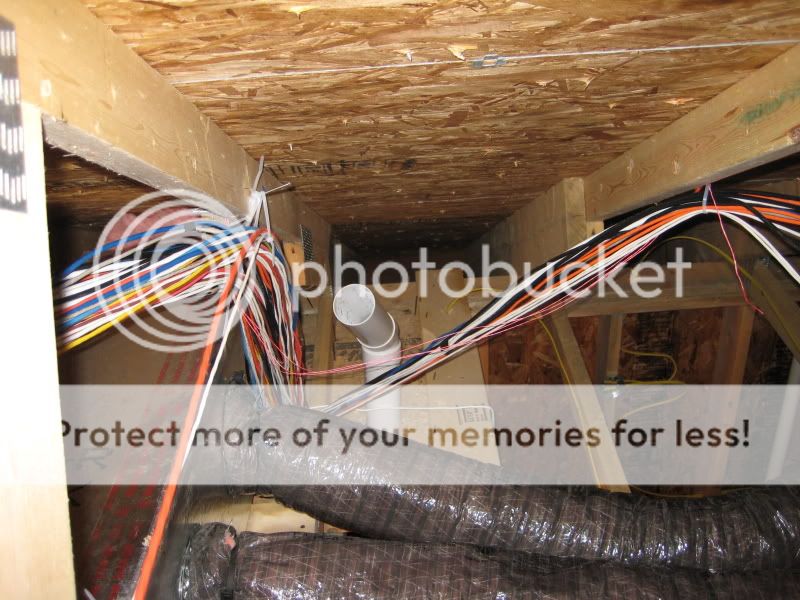
The results of 3 days efforts, from the top of the chase in the attic...
Jan 4: There's a certain almost surreal feeling about working in the house. We've never been able to have this much access to any house that was being built for us, and it's really great feeling like we're actually making a difference. I enjoy walking in the attic and thinking how helpful it will be to be familiar with it already, should the need arise to traverse it post construction.
We didn't make as much progress as I'd hoped today, but I am still pretty optimistic. We pulled some additional wires up the chase....kinda a potluck of stuff we'd not bothered with before, or things we couldn't pull up because the one box of yellow cat5 was already being used in a previous pull...something like that. So, we pulled up a half dozen wires to various places, and then I said that it was time to do the first floor. I wanted a break from the attic, and to see just how quickly we could do the downstairs. I really thought it should go much faster than the upstairs.
Well, I was right and I was wrong. It has all the potential of going faster, but it seems to require a lot more planning. Without the freedom of the attic to navigate to a room, we have to traverse the maze of floor joists and high voltage runs and cold air returns instead. So you have to walk around and try to find a joist channel you can use that isn't already busy...then you go to the first floor and try to find what wall you'll come up...and then once you find that wall, you have to go back downstairs and make sure nothing is below where you want to drill, etc. So again, it takes more planning. By the way, I've decided that speaker wire is the only stuff that might really be negatively affected by high voltage runs, and that they can basically touch if at 90 deg crossing, and if they're parallel, that 18" apart is ok. I hope that's all true, because in the labyrinth that is the basement ceiling, that's about all you can hope for.
What I had planned to do was to have everything meet up in the floor (the basement ceiling) before it made it's trip down to the wiring room. So in other words, all the wires would first travel across the floor in the floor joist channels to a single "highway" that would then head directly for the wiring room. I definitely was not going to try and run wires directly towards the wiring room, as that would mean drilling through each floor joist for each wire. Instead, I'd just drill some large holes in one area and send all the wire through those. Basically, the floor joists run from the front to the back of the house, so running wire in that direction is trivial. But going from side to side means going through a floor joist every 18 inches (I think). The floor joists are those OSB type with a 2 X 2 glued to the top and bottom...so they're kind of like a wooden I-beam. Appearantly they're really strong and straight. Well, every 2 feet, they have pre-drilled knockouts about 1 1/2" across just for running stuff through. I was pretty sure that those knockouts weren't going to be enough to handle everything coming towards the wiring room. The TV bundle itself was more than 1 1/2" thick. So I confirmed with the builder that I could drill additional holes....well, 1 additional hole, 1", between the knockouts. So that gave me 3 holes to try and run stuff through.
I think that MIGHT have been ok...but then while I did other stuff, I set my wife to actually knocking out the knockouts and drilling the extra hole, and it was T-D-OUS! It's not just OSB, it has fiber meshed in there too, and the knockouts weren't at ALL easily knockoutable...you had to bang on it hard with a hammer for a while on one side, then bang on the other side, until it eventually just kind of crumbled, and even then it didn't make a clean hole. And from where she was starting, it was at LEAST 20-30 floor joists to get through in order to get to the wiring room.
The other issue was going to be just running the wire. We had two options. Since the spools and boxes were all sitting in the wiring room area, we could feed it through the floor joist holes as we went until it was finally in place and then cut it.....or we could just drag it across the basement floor until we were under where it was going, run it to location, measure out the wire, cut it, and then feed it from that location down to the wiring room. Either scenario involved a lot of feeding slack from one joist to another until it was finally where it needed to be. It was going to eat up all of our time. We considered just leaving the wire below the floor joists instead of feeding it through, and then dealing with it later...but that would have meant after insulation was put in, which wasn't a problem but just a major inconvenience having to deal with that as well. We then also considered leaving it below the floor joists forever, but then if we ever finished the basement, we'd have a long "bump" running almost the length of the basement in the ceiling.
Then my wife had the idea of the year. She said "What about the I-Beam?". I turned around, and there was the huge steel I-Beam that supported most of our house. It ran from one end of the house to almost the other end....interestingly enough it ends exactly where the wall to the wiring room will be. All of the floor joists are above it, so it has "access" to all of them. And if we ever go and finish the basement, we'll simply enclose it in sheetrock anyway. One entire side of the I-Beam was taken up with HVAC ducting (my idea, so that if we finished the ceiling, we could hide them together instead of separately), but the other side was completely open and free....longing to be filled. I called the builder just to make sure there was no reason we couldn't make use of it, and there isn't. So what we're going to do is run the wire through the floor joist channels to the I-Beam, and then down the I-Beam side to the wiring room. It's BRILLIANT! It's an incredible time saver, too!
So, while I went up and down the stairs and drilling holes in prep, my wife used the stapler and nylon twine to make a sling for the wire every 4 joists. For now we're just going to suspend our wire right next to the I-Beam until we're all done, and then well work on securing it within the I-Beam side. We didn't have the camera, or I would have taken a pic to demonstrate what I mean, so if this doesn't make sense, just wait until tomorrow!
We're poised for an explosive day tomorrow, with me drilling all the required holes for the Living and Dining room wires, and the greatroom is already started. If we can finish everything except the kitchen (sink!) tomorrow, then I'll be giddy.
Jan 5: Well, the kitchen sink and some besides wasn't done. However, after a LONG day, we did get the Living room, Dining room, and Den all done! The worst was wiring for candles. You can put up to about 5 candles on a circuit, so I figured I'd put 4....2 bottom windows on one side of the front, and the 2 windows above. What that mean was a LOT of threading wire back and forth through holes in the floor and joists, etc. Massive time sink. But it's done.
We're running out of wire now more often...we've had to swap out wires midstream sometimes because we failed to see that the spool was getting low. I haven't had to violate my wiring color rules yet, though, which makes me happy.
However, what doesn't make me happy was seeing this:
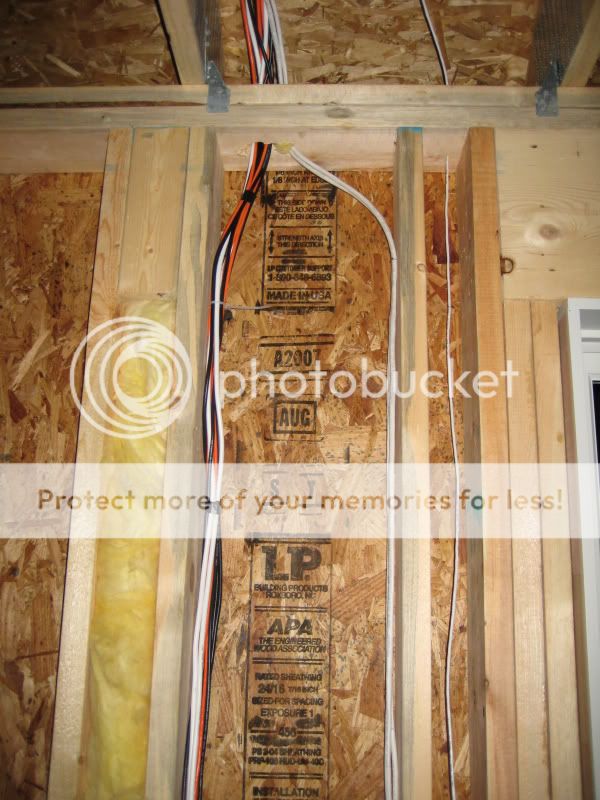
After we had gone to all the trouble to keep high voltage lines away from our lines, the electrician comes in and installs those wires on the right, heck they almost go through the same hole! Those wires feed the ceiling fan and can lights in the great room. And I had specifically told him to make sure and avoid what we had laid because I knew he wasn't done yet with his wiring.
Now before I get angry with the electrician via the builder....that bundle of wires is for television. So there's RG59's for baseband signals, RG6 for satellite/cable, and Cat5e's for future. Are those likely to experience interference from those HV wires, especially given that one is a motor? At least there's no speaker wires there.
Otherwise, we got a lot done, considering. IF we both go back out tomorrow, we're sure to get the first floor finished. I say IF because she's a little under the weather, and I just figured the kids needed a break of sitting in the car all day. I won't get it all done if I go myself, but I'll get SOMETHING done. We'll see how they feel in the morning.
I'm dead tired, so todays exploits are concise. Suffice it to say that I was right....running wire WAS much quicker, once the way had been prepared.
And here is a pic of the wire we've run for the first floor so far, next to the I-Beam it will eventually inhabit:

Jan 6: I'm tired. Just beat. It's been 7 DAYS STRAIGHT of doing this. We're not done....but we're close enough now that when I die of exhaustion tonight, my wife's next husband will be pretty pleased! Should I actually live, then we'll continue this effort next weekend. Hopefully by then the power people will have finally installed the power line, like they almost did a month ago so we won't have to rent a generator again.
Here's the funniest part (one of those "funny" things where you start off laughing and end up crying)....the temps were in the 40's or maybe even 50's today. It felt like a normal cool Seattle day, very misty and foggy. So what does that mean?? It means that the night before we started working on the house, it snowed, and then stayed cold enough for the snow to remain all week...and now the night we're done, there's no snow at all. So we pulled cable and worked in the house during the coldest week of winter so far. :lol: Oh, but here's the part where it really gets funny. You see, my well driller finally called, and wants to drill the well out there next week. Well, guess what....all last week, the ground was frozen solid, and thus was perfectly passable by the driller's 40 ton truck. Not a problem. Now this week, since it has all warmed up, the ground is pure mud, and thus he can't drive anywhere unless we lay down gravel. So last week would have been perfect for drilling and this week would have been perfect for pulling wire....but instead they were reversed at great discomfort and cost to us. If I've learned anything, it's that PA has all the weather I WANT.....just never when I want it.
Oh ya...wiring. Although we were all gung-ho today, it seemed to just go a lot slower. We were working in the great room, as well as just kicking out various other small pieces of rooms as I'd remember them. As a result, we could never cross an entire room off our list, so it felt like we were moving in slow motion. We actually did really well....we got all of the great room done, we got the foyer and front door area, and started into the mudroom, and a decent stab at the garage and kitchen. So, come next weekend, we've got the mudroom, kitchen, garage, and outdoor left to do, but the good news is that those are all immediately above the wiring room, so they're really quick when it comes to measuring and cutting and stowing the wire, which takes quite a bit of time normally. We got into a pretty good rhythm the past few days. What we'd do is I'd drill the holes, she'd run the wire over to the hole from the basement and feed it up, I'd pull up enough to take where it was needed and secure it, then go downstairs to the basement. We'd rough measure off how far the wire had to go, and then cut it. Then I'd go start drilling more holes and planning wire routes while she routed the cut wire through the floor joists and to the I-Beam, then down our J-hooks to the wiring room. So we were always busy with something, and taking care of routing wire as we went. It was a good pace.
We've run out of a lot of wire. None of it I'm really surprised about, but I've had to violate my coloring code to keep going. We ran out of white Cat5e, which was what I was using for keypads and motion sensors. But we had a ton of orange left. At first I didn't understand this, and then I remembered....I had planned to run 4 orange Cat5e with every TV install...but the morning we started, I realized I had ordered 3 1000' boxes of orange....so that would mean an extra pull for every TV to get a 4th there (I had been on the ball with the RG59, ordering 2 X 1000' and 3 X 500' so we could pull 5 at a time). I decided right then and there that 3 Cat5e's for each TV were juuuuust fine. So that's why I have so much orange left, so I'm using it instead of most everything....I can see the yellow is about to run out too.
I think I've decided I'm not going in to work tomorrow...I need a break. I'll start thinking about the house in a day or so....I'm sure I'll get a few calls from the builder by then, expressing astonishment at what we've done (and hopefully no consternation at something we messed up!). I'll update this if there's anything new to update. There's still testing and window wiring and other stuff to do.....we're far from done, but I'm amazed at how far we've come!
Jan 9: Well, the Monday day off was well deserved and totally blown doing nothing, which was exactly what we needed. I think I slept most of it. However, it wasn't long before I started thinking about what we had left to do. I had talked to our builder, to give him our normal update, and I told him that we would either finish it next weekend, or we'd work every day after that until it's done. He's eager to get on with construction, and heck, so am I! But when Tuesday rolled around, I was just in a daze. First of all because it was the first time I'd been to work since mid Dec....uggg, what a "not-going-to-work" hangover I had. It was hard to remember just how to turn on the PC. But when I got home that night, it was worse. There was just this cloud hanging over my head, this incredible weight of "there's still so much left to do".
And I realized that part of the reason it was so oppressive was because it wasn't defined. So, I got onto google docs and started a spreadsheet listing everything we had left to do...every wire that had to be pulled, all the tasks we had to accomplish, all the nailing of stuff...and it was tremendously helpful. Part of the problem was that as I went throughout the day, I'd suddenly remember something else I had to do, so it kept feeling like there was this endless list of things. But once I put it on the list, it didnt keep popping up in my head. I suddenly felt that we could actually get it done!
So today, I had to go out to the house anyway, so I had my wife meet me out there, and after borrowing my cousin's cordless drill, I just went around and drilled all the places where we still had to run wire. Sometimes making those decisions of where to drill took the longest time...you had to make sure the route was feasible, you had to avoid high voltage wires, you had to make sure nothing nasty was on the other side of that floor, like a drain pipe or something. So I'd just drill a hole that could serve multiple wires, and then put a "D" next to the items on the list that would go through that hole. After just about a half hour, most everything had a D next to it. That meant that the next day, we could meet out at the house again, and this time just start right into pulling wire through the holes. So I'm now kind of optimistic that we can get most of the wiring done even before Saturday, which is really good news. Also, because of how far along we are, we don't need to drill many holes, so my cousin's cordless drill works just fine. So, since we don't need a power drill, and it's during daytime we don't need lights, and because it's 60 out we don't need heat...that means I don't have to waste money renting a generator again!
My thoughts are turning now more towards testing, and I still haven't come upon my final solution yet. Testing the window sensors will be easy enough, but that leaves an awful lot left. We'll see what I come up with.
Jan 11: Well, I went out to the house every day for about an hour and a half around noon, met my wife there, and we got some stuff done. In fact, we got so much done that....we're basically out of wire now. :blink: I overestimated what to buy, and then rounded it up....and we're STILL out of wire. I'm out of everything except Cat6 and the orange Cat5e (just because I used less of that during the pulls than I had planned). Unfortunately, we're not quite done enough to call it quits. I know the great room media area requires more RG59's, and the garage requires a bit more 22/4. The attic would also benefit from more wiring too, for heat detectors. So, I've called around, and it looks like it'd be about 4 times as expensive to buy what wire we need locally than to get it from keystone wiring again....but then I'm going to have to deal with shipping costs as well as just waiting to get the wire. Fortunately, keystone is around Philly, so it'd only take really a day to get here. Tomorrow when we go out, I'm going to have to take stock of everything we need before I decide what to do.
But we'll still be kept plenty busy, even without wire to pull. Tomorrow we do the window and door sensors, since we've already pulled the wire to those locations in almost every case. I drilled some of the windows today just to make sure my plan for them would work...and to make sure the windows still worked after I filled them fulla holes! They still work, and it appears my plan for a sensor in the top and bottom sash will work just fine. So, we'll just work around the house...I'll drill the holes, and then my wife will follow behind and strip the 22/4 wire to reveal the 4 wires....2 will go to the top sash, 2 to the bottom sash. She'll fish them through the holes, and then I'll go back around and connect the actual sensor and put it back in. I think it'll go smoothly, but with that many windows (I bought 50 sensors), it'll probably take all day....at least, all daylight, since that's all we have because I'm not going to rent a generator again.
In good news, though, I bought a new cordless drill. I had been using my cousin's cordless Craftsman drill, and it had never failed us. Granted, we weren't putting it to near the use we had been putting my powered Hitachi when we had the generator....but his drill still did just fine, even in 1" holes through the floor. So, I checked Lowes and Sears, and Sears had a slight sale on a 14.1 volt craftsman drill, variable speed, and it came with a work light too, which made me happy because that meant a 2nd battery! So, I've now got my cousin's drill fully charged, and my new drill and a spare battery.... I think that should be enough for the very simple window drilling we'll be doing. I also plan to drill all the remaining holes needed to run the wire once we get it so we'll be ready to go.
Whether we're done by Monday or not appearantly doesn't matter....they've scheduled the inspection for then. Appearantly, you don't actually have to have everything done when the inspection happens...you just have to have everything fireproofed that is done. My wife bought a can of spray-in foam and hit all the holes in the walls we drilled (including some we were GOING to use...") ), so all we have to do is make sure by the time we leave Sunday, with whatever we've done, that the holes are all filled full of insulation, and then appearantly we're good to go!
), so all we have to do is make sure by the time we leave Sunday, with whatever we've done, that the holes are all filled full of insulation, and then appearantly we're good to go!
Jan 12: Well, one thing is for certain...we're not going to be done with everything this weekend.
Because of our low wire issues, I decided we'll just take inventory of what we have left, and then call keystone wire Monday and get it as soon as possible and then finish up the wiring. So, today I thought we'd just tackle the windows because there's a LOT of work there. Every window, we have to install 2 magnetic switches and 2 magnets. It's not trivial. So I thought we'd just see how we went today so I'd know how much more time we're going to need to get done (got to finish these before the insulator can get started, because they insulate around the windows). Well, according to today, we'll finish the windows in.....2012. We got 4 windows done, and they were the easy ones. We've got about 19 more to do, and then doors. *cry*
The good news is that we were going faster as the day went....I knew that would happen as we got into a rhythm. We also took a 1 1/2 hour or so break to visit next door, so that was time lost. And then we quit early to catch the playoff game (even worse tomorrow!). So those were all reasons we got so few done. But still, these aren't quick. Sometimes the hardest part is just threading the wire in from around the frame in through the hole drilled in that frame. We've already had to re-consider our routing plan once because the top of the window was flush with the frame of the house, so no wiring could get in there.
We'll probably get may a half dozen done tomorrow if we're lucky. And then it's back to work next week. At this rate, we're going to have to take another week to finish. Honestly, I don't think our builder cares...he knows it'll take as long as it takes me, and now he'll have to wait for us to get more wire anyway....but we're paying interest on our construction loan each month, so every week we delay things is money we're throwing away essentially, plus another week of rent.") Even still, we're still saving a ton of money by doing all this ourselves, so I'm not REALLY unhappy.
Even still, we're still saving a ton of money by doing all this ourselves, so I'm not REALLY unhappy.
What I'm STILL most unhappy about is the @#$%^ power company sitting on their fat asses and not getting our power connected. I've already decided that if they do finally get off their fat asses this week and get us power, then I'm going to take an entire day off work and stay out at the house for probably like 18 hours and get it all done. At this point, all it is is just time.
Jan 19: Geez, I've just been so busy and tired....with work, family health issues, and the house....that I've just not been able to update this like I was. So here's a summary:
The power company finally got off its fat ass, and we have power! Woot! What that means is I can now get work done every night after work. And so, since Wednesday, that's what I've been doing. In doing so, by Thursday, all of the windows and the front door were wired. I'm really pleased how it all went, but I still have yet to test all of them. I did some spot checking early on, and they worked just great. The window gets within 1/2" of closed and it signals closed. I'm ok with that tolerance...nobody can get inside a 1/2" opening, and if they open if further, we'll know.
Tanget: Ya know, one thing that I thought of....someone had mentioned that door and window sensors were pointless, because somebody is just going to break the glass to get in. And I realized that I'm actually more concerned about the person who doesn't break the window. If they break a window, they're sure no one is home, and they're just there to rob us....no big deal. But if they're trying to get in sneakily and quietly, then that means they either don't know if anybody is home, or they DO know...either way, they're being quiet for a reason, and I don't like it.
Because the power is on, I told them to schedule the insulation people for Monday...so we have our first real deadline. I'm not worried, though, because we can work all night if needed. On Wednesday the extra wire I ordered had arrived....500 ft more of 22/4 and rg59.
By Friday we were starting to hit other areas of need. That meant finishing the wiring in the garage, and starting to take care of sound-dampening insulation around bathrooms and laundry rooms, etc. We also stowed a lot of OSB boards above the garage, where we have storage trusses, so we can have those for a floor up there. We're not putting the floor in yet because we're probably going to insulate the garage later. I also ran some wires in the wall that had been in very hard to get locations, so I'd been putting them off
On Saturday (today) we just kept hitting things on the list. We did our final attic pulls....1 wire for 2 heat detectors, some RG6QS and Cat5 at the attic access, for future antennas and maybe a wireless access point, and a motion sensor pull at the end of the hallway. We also finished the garage wiring, so all doors have wire for their needs, and so I'll can tell if they're open or closed. However....can you believe it...we ran out of 22/4 again! I can't believe it. I should have gotten another 1k instead of 500 ft....guess I didn't plan it right. I think what keeps kicking my butt on that is all of the excess I leave on the end for the wiring room. I basically pull enough extra off the spool so I can wire all the way to the furtherest/lowest corner of the room. That eats up a lot right there. Oh well. The only wires we couldn't run were for the garage windows and window candles....so what I did was run 2 Cat5's to the top of the garage. Even once we move in, I'll still have complete access to the windows, so I'll just make some patch connections up there and wire them later.
We also ran out of RG59, but that wasn't as big a surprise. I used up almost 85% of it doing another component/audio run from the greatroom wall to the wiring room. I also ran RG59 to 2 locations for the subwoofer.
We've really got like 1 more half day....tomorrow I'll go out by myself and finish up, and be back in time for the football games. But I'll be honest...this was a sick amount of work. I sometimes just look at the huge bundles of wires we've pulled and I can barely seem to remember starting it. It's ridiculous what we've done, I think. I already dread the first day I realize I need to run more wire for something I hadn't thought of.....
Jan 20: It started off as a pretty wretched day, but overall I'm pleased with what got done.
I decided to go it alone today, since the kids were still kinda sickly and I didn't want to keep them in the car all day like we've been doing, and I could tell my wife needed a break. Oh, and the predicted 12 deg temps were another reason. So I took off at a reasonable time to get done the last few things before the insulators start on Monday. The first stop was Home Depot. Unfortunately, the nearest home depot is 40 miles away, so that took a while. I was hoping to find a good selection of mudrings, because I've been VERY disappointed with what Lowes had. In fact, I can safely say, I hate mudrings. Not like I hate those wretched wire pull boxes....but hate nonetheless. All I want is a very simple, cheap ring of plastic I nail to the stud to give me an opening. These things should cost like 20 cents each, for how basic they are. Instead, the only mudrings that Lowes or Home Depot carries are these ridiculous contraptions that have flanges all over, wire size gauges, wire holders...heck, I think they have GPS too. But they're also the ONLY thing that gives you a basic opening into the wall, and 1/2" out for the drywall. So I've been looking all over Lowes repeatedly, and then to Home Depot to try and find a simple mudring that costs only TWICE as much as your basic electrical enclosure box. No dice. I even considered buying some of the 46 cent electrical boxes and cutting the back off them, but I figured the cost of a hacksaw to do that would kill any cost savings.
So while on the way to the house from home depot (about 25 minutes back the way I came), I realized I didn't have the digital camera. We had brought the digital camera with us every day for the past 3 days, but never used it (because we were never really "done" with the wiring), but now was the one time I needed it and didn't have it. The insulators were starting Monday, so this was my last chance to capture at least the exterior wall wiring before it was all covered up. Since I was already near the house, I decided to just go there and get a little bit done before heading back home to get the camera. After I got my tools inside, I started searching for the nails. Then I remembered...my 2 year old had brought me the box of nails last night, at which point I went over and closed the bag she had gotten them out of. But in the process...I had left the box of nails on the desk. So, without getting anything done other than unlocking the front door and putting tools inside, I headed back home, about 30 minutes away. I picked up the camera and nails, and then headed to Lowes to pick up some of the wretched Cadillac-mudrings because I was just simply sick and tired of fighting it.
When I finally got back to the house, it was about 3 hours after I had initially left. However, in the process, I made an executive decision. It was about the mudrings. I noticed in Lowes that they old work mudrings (cut a hole in the sheetrock, insert mudrings, and screw in brackets) and they had new work mudrings (nail to the stud and they sheetrock around it). Well...the old work mudrings were exactly what I wanted. Simple....it's just a plastic rectangular hole. Not only that, but they were the only thing that came in a contractor pack, so you can buy them in bulk and save even more $$/mudring. So I decided that unless it was in the exterior wall, I was not going to put a mudring in for it. I'd wait until we've moved in, and once we decided we wanted access to something, I'll just cut a hole in the sheetrock and put in a mudring. Done! The other thing I decided was to NOT put in mudrings for the TV locations, even on exterior walls. This decision was because I realized we may not want to have external connections to the TV wires, at least not at floor level. What if we decided to buy an LCD TV and mount it on the wall? In that case, I'd want to have the opening for the wires up behind the TV, not down at outlet level. So I'm waiting on those too.
So all in all, I put in 4 mudrings.....1 at our PC network location in the loft, 2 at some subwoofer locations in the great room, and 1 in the kitchen where the touchpad will go. I'm pleased with that
I did some other various items...including running some conduit from the basement to the garage. Even thought I pulled those 2 Cat5's up there the night before, I just felt that if I CAN put 22/4 wires in there directly, then I'd rather do that. So, a short piece of conduit later, I'm all secure. I then took pics of all the exterior walls....wanted to make sure the battery was up to it before I did anything more than that. It was, so I shot the whole upstairs....every wall, and each ceiling in sections. We kinda goofed here, because we had already put in some sound dampening insulation in some walls, which covered up stuff that probably would have been good to capture. None of my wiring, but pipes and wires nonetheless. Oh well...I wasn't going to tear out insulation just for that. I also pulled the LAST WIRE....I had to hit a couple light switches I had missed before. Turns out I had drilled the hole for running the wire, just never pulled it.
Anyway, the insulators start tomorrow, and we're almost done. We have some minor items left to do before the sheetrock goes up, which could be as early as Wednesday....so a few more days and we'll be essentially done. Oh....except for wire testing....
Jan 23: Well, I'm willing to say at this point that we're DOOOOOOOOOOONE. :blink: How can I say that? Well, insulation has gone in all the exterior walls, and sheetrock has been installed in the upper floor ceiling and will continue all week until the interior is covered. So, whether we WERE done or not....we ARE now!
But I can say with confidence that we did everything we wanted to. Here's what we accomplished the past few days, as "cleanup".
Wire Testing:
Got wire testing underway. I decided to only test the window and door wires, as they were most likely to be damaged by insulation and sheetrockers, and also underwent the most manipulating. I bought a couple terminal blocks from Lowes and intended just to wire up each pair of wires to the terminal block, and that way I could easily take my handy dandy circuit tester and check the continuity on each. There were more than a few problems with this, though. First of all, each window has 2 pairs of wire...1 pair per sash. The terminal block I bought could only handle 10 pair (it had 20 connections), and I had 13 windows (so 26 pair) and 3 doors to test on the first floor alone. The other problem was the ease of testing each sash on each window for an open and close connection. The wire tester is down in the basement. It'd be unreasonable to make a trip up and down the stairs for each sash. My original plan was to use the terminal block to wire every pair, make sure all the windows were closed, then I could test all the pairs at once in the basement to check they were closed. Then go up and open all the windows and recheck the pairs to make sure they were all open. So in that way, I'd only have to make 2 trips up and down (for the first floor alone, still). However, I quickly realized I'd have to get a LOT more terminal blocks if that was going to work. So I decided to wire all of the windows in serial instead. First what I did was twist together 1 wire from each sash so that I ended up with a pair of wires per window to work with. I also did that with some rooms just to make sure they all fit on the terminal block. Then I stuck my circuit tester probe into the ends of the circuit. Woot! I got a tone, which was good because everything was closed. Now, to test them. Because the tester had a tone when the circuit was closed, what I was able to do was go upstairs, and one by one test each sash. I could just barely enough hear the tone to know when it was going and when it wasn't...so I'd open a sash, check that I couldn't hear it anymore, close it, hear it, open the other sash, not hear it, close it, hear it, go to the next window. This worked very well.
Two minor problems arose in this....first was that this method wasn't going to work with the 2nd floor, because I wouldn't be able to hear the tone all the way up there. I finally just recruited my wife to be near the tester with her cell phone and I call her and then I can hear it. If it comes down to it, I still have access to each window pair, so I could still do my all windows closed/all windows open test if I had to.
The other minor problem was discovered while I was adding windows to the terminal block. I was checking as I went, and suddenly I wasn't getting a tone anymore. At first I was concerned that a window had a problem...but then I tested that window separately and it worked fine. It didn't take long to figure out that the problem was the natural resistance in the wires....I had so much length tied together that the tester was deciding it was an open circuit instead. So, I had to split the first floor windows into 2 groups to test. Not a big deal.
The jury is out on the 2nd floor so far. Three of the upper sashes didn't test correctly, but I believe I know what the problem is. The way they were wired, the upper sash has a magnet just stuck into a small alcove on the side. There's a piece of metal there for it to stick to, but it also tends to cause the cylinder magnet to want to turn, and I think they're turning enough so the magnetic pole doesn't trip the sensor anymore. An easy fix, and hopefully that's all it is. I couldn't actually check the windows because the sheetrockers had huge stacks of sheetrock leaned up against the wall the windows were on, so I'll just wait. If it doesn't work after sheetrock, I can blame them.
Attic Walkway:
I enjoyed walking around the attic...it was pretty easy, and very spacious. However, walking through the finished attic will be a different story. Mainly, the 12 to 16" of blown in insulation will cover everything, and I won't be able to walk on the bottom of the rafters anymore. Sure, I'd be able to see where the rafter is to step on simply by following it down from above....but I wouldn't know if a wire was laying on top of it, and I'd still have to bury my foot in almost a foot of blown in insulation to step on it....so I wanted to avoid that if possible. So, I went and bought a bunch of 2 X 4's and nails. Starting at the attic access, I built a path by nailing the 2 X 4 to a line of rafters, about 2 ft high. I'd have my wife cut them as needed to fit in tighter places and nail those in. We had to stop because of time, but I managed to build a walkway 2 ft above the bottom of the rafters from the attic entrance over to above the right side of the house. We then stowed the remaining 2 X 4's up in the rafters so that when I do go up there at some point, I can build it as I go (or I'll build the rest of it if I get a chance before they blow in the insulation up there).
Wire Supports:
This was where I sought to quiet you whiny bitches. That is to say I agreed that hanging all those wires by zip ties was a good temporary solution, but wasn't a good idea for long term. So, I found some handy dandy pipe clamps at Lowes, and viola!


Not bad. I like it. I only worried about places where a lot of wire came to one place, or where an eventual zip tie break would really cause problems. And there right above the chase where it goes down 28 ft, I decided to play it safe and install 2 of the 3" clamps.
And finally, a peace-of-mind fix. Remember the wiring the electrician sabotaged with his close-comfy wiring he did? Well, I had gotten assurances from the builder that, should I find it caused a problem later, they'd "fix" it. Well, I wasn't completely satisfied with that idea, so I went back and looked at it. Turns out there actually was a free and clear stud bay right next to it.

So there ya go! There might be some more updates as time goes on...there will ALWAYS be more work to do. For now, I'm enjoying the idea of not going to the house after work anymore, and we're starting to look "forward" to the next project, which will be putting up stone work on the chimney in the great room. Wheeeee. <_<
Here's the totals:
22/4: 5500
14/4: 1500
Cat5e: 6000
Cat6: 1500
RG59: 4000
RG6: 2000
22/4 Firewire: 500
Here's the breakdown:
22/4, 3000 ft, stranded, White
22/4, 2000 ft, stranded, Brown
14/4, 1500 ft, high strand count, Orange
Cat5e, 1500 ft, solid, Yellow
Cat5e, 1000 ft, solid, White
Cat5e, 1000 ft, solid, Grey
Cat5e, 2500 ft, solid, Orange
Cat6, 1500 ft, solid, Blue
RG59, 3500 ft, solid copper core, "precision video" rated w/copper braid, Black, in 3 X 500' and 2 X 1000' boxes.
RG6QS, 2000 ft, solid copper core, 3 Ghz rated, White.
Additional ordered later:
22/4, 500 ft, stranded, orange
RG59, 500 ft, black
I ran out of everything except orange Cat5e, the RG6, and Cat6. It's kinda weird, I ended up with a LOT more Cat6 than I would have thought. I'm thinking part of the problem was I may have been counting a cat6 wire for each tv, as well as for a PC location in each room, and in most rooms I just ended up co-locating TV and PC with 1 cat6. Oh well, at least my patch cables will be high quality....
I'm going to keep a running log of the misadventures and lessons learned. I'll keep updating the first post so it's one stop shopping for anyone who wants to read it. I'll add pics in a couple days.
Dec 31: Rented a generator. Unfortunately, the electric company never got the power wired up to the house, so we have to rent a generator to power my drill, saw, lights, and heater. We rented it for a week, hopefully after that the electric company will get it done.
The area we're attacking is around the HVAC chase, because it goes from the attic to the basement and has tons of room around it. Unfortunately, there was also some high voltage wiring around 2 sides of it, so if I had any hope of keeping it away from it, I was much more limited where I could run the wire. I heard that putting some wood in between the high and low voltage would reduce any possible interference, so I may throw some spare 2 X 4's in there. We ended up drilling a hole big enough to run a 3" PVC pipe for future wiring needs, but for the "now" wiring, we're not going to run it in a pipe. That gives us more flexibility of where to run it in the chase. We've started off cutting a 5" square hole all the way from the basement to the attic. We'll see how that goes, and if we need to drill a bigger hole for more wire, we'll do that too.
The temps in the basement were around 40 deg. This was only a minor discomfort to us, but I was more concerned about the wire. I had read in another post that someone pulling wire at 19 deg had seen the sheathing actually crack. To try and avoid that, we bought a small electric heater to try to keep the area where the wire is sitting a little warmer.
Here's what we started off with. The 22/4 is in the brown boxes.
I also marshalled all my mock carpentry skills, as well as a little dumpster diving after the framing was done, and made some spool holders. I probably spent more in tools just to make them than it would have cost to buy some, but oh well...
As we started putting together our first wire pull, though, I discovered that the problem isn't having the sheathing crack...it's that when the wire is colder and stiffer, the pull boxes really suck. I officially hate those now. All of my RG59, RG6, and Cat5e/Cat6 are in boxes. The other wire is on spools, and I wish EVERYTHING came on spools...no chance of kinking then. On several occasions now, the wire has basically stopped, and I have to open the box and feed it through. Sometimes there has been a lot of resistance, and when it finally did come out, the sheather was discolored. I don't know if it was because of kinking, or just the friction of pressing against the inner plastic feeder thing. Once, out of anger, I just yanked, and there in my Cat6 was a perfect full fledged kink. :angry: So I cut that piece right there.....hey, patch cable material, woohoo!
Anyway, I hate boxes. We should have rented one of those 45k BTU heaters, because that little 1500W space heater isn't going to make a difference on the inside temp of those boxes. Right now all the cable is sitting in the basement and the low is expected to be around 30 or lower....so it could be a tough day tomorrow. The good news at least is that once some wire has been fed out of the box, it appears to go a lot easier.
We finally started our first pull....the hardest one on the list. It's the TV to the loft. It has 5 RG59, 2 RG6, and 3 Cat5e. What I did was get a wire from each box that was a part of the pull and handed it to my wife, and then she slowly walked about across the basement as they pulled out of the boxes. Every 3 ft or so, we put a short piece of velcro across the bundle to keep it together. However, we're going to go back and use electrical tape instead, as it's just easier to use and quicker. We'll tape it every foot or so to make the bundle easier to deal with.
The idea is that if the wire is going to the same location (which is true of the TV pull), then we'll tape them together. But if wire is going to the same room, but different location, then we'll just pull them together and split them off at the room. That way those particular wires can be pulled further if needed. We'll see how that works out.
Jan 1: Happy New Year! Now, on to business..... We didn't actually start the pull yesterday...we just starting putting together the first "cable" that was going to that room. Before we started actually pulling cable, I went upstairs to start scoping the route it would take in the rafters. I love our attic! Our last house had all vaulted ceilings, and even though I was never even able to run wire there, I knew I couldn't have anyway, due to space constraints. In this house, I just climb up the ladder to the roof trusses and walk all the way across. That is SO much easier than if I'd have to use a ladder to move the wire across the attic.
I wanted to make sure that the wire could easily be routed to its destination, which in this case was the loft...the furthest place possible for us to run cable. I wanted to make sure the wire always had smooth transitions in directions, was protected from the sharp truss connector edges, and was always a good distance from the multiple high voltage runs going through the area. To accomplish this, I utilized what I had on hand (as opposed to thinking about it ahead of time) and it worked out pretty darn good. I drove a nail in 2 places, on both sides of where I wanted the wire to go, and then I used nylon twine and tied it across the opening about 2 or 3 times. So now the wire could essentially hang in air wherever I wanted it to go. I routed a kind of wire super-highway across the attic towards the loft.
Eventually, though, I realized it was just time to start pulling cable. I was done trying to think it out...it was time to start making mistakes so I could learn more. So, I went down to the basement where my wife had been creating more and more TV cable (and coming across more and more kinks in the cat5e's and cat6's...and even one in the RG6QS, good grief!). We put together all of the wires going to the room. My idea was to pull all of it at one time and get it to the edge of the room, and then finish off the lengths of individual runs. This first pull consisted of (if I recall correctly):
1) TV: 5 RG59, 2 RG6QS, 3 Cat5e
2) PC: 1 Cat6, 1 Cat5e
3) Touchpad location: 1 Cat6, 2 Cat5e
4) Speaker: 1 14/4
5) Smoke alarm: 1 22/4 firewire
6) Window contacts: 2 22/4
7) Temp sensor: 1 22/4
8) Light control: 1 Cat5e
Ok, I THINK that's all. This sucker was HEAVY. I had twine at the top of the pull (close to 20 feet vertical) and we velcroed the end of the megacable to the twine. Then, as she shoved it up from below, I slowly pulled it from above. It came up pretty easy, but it was still alot of effort. I pulled enough for it to fall through the ceiling down to the floor. Then I wanted to move the end of the cable along its route towards the loft, but as soon as I'd start to let go of it, it would slide right back down the hole. So, I used a big piece of velcro to secure the cable to the nearest nylon twine hang...that held it in place good enough so I could move the end of the cable further along. Once all the slack was moved along, I undid the velcro and pulled more up as she pushed. I'd create a big pool of slack near the attic entrance (around the HVAC chase), then walk along the roof trusses and move the slack pool along. This worked well until I had it moved pretty much all the way to its destination.
Problems became evident with this method. The TV "cable" worked really well because we had joined it all together with electrical tape about every foot. So it stayed together and acted mostly like a single large cable. However, all the other wires we had added to this single pull weren't joined together, so as soon as I created a pool of slack, it quickly became a spaghetti mess. The other issue is that when it came time to pull certain wires further to reach other parts of the room, they were all wound together. It was impossible to cleanly separate 1 wire from the "bundle" it had all become. As it turns out, as long as she was creating slack on the "feeding" end, it was still really easy to pull specific wires longer. We made it work, but we also certainly decided that the next pulls are going to be per location, not per room.
Once wires arrived at their destinations, I affixed them with zip ties, stapled to the studs. I didn't trust the stapler to not crush the wire, so I didn't directly staple the wire. In some places, I tried stapling over a nail, then remove the nail, and feed the wire through. That worked ok, but it wasn't a tight fit. I then went back along the entire wire run and pulled out the cables that had been run fully and zip tied them to whatever trusses were handy. This ended up keeping most of the wires off the nylon twine I had strung across the studs and seemed like a more permanent solution.
The wires were all run, and it was cold and dark, and it was finally time for the scariest part....cutting. I measured off enough distance to get all of the cables to the further corner of the wiring room, and then cut. I'm not sure exactly yet where the cans (when I can afford those) will go, but that should be enough cable to get to any one of them needed. Immediately after each cut, I made sure to label the wire. I used a sharpie and the cheapo Radioshack wire labels that were mentioned in the "tools" thread. They worked just fine. I didn't label every wire because the wire coloring scheme I used made it unnecessary. The combination of the wire type and the color will identify what each wire is for...the label just tells me WHERE.
Tomorrow we try to hit the bedroom that is next to the loft...it's just about as far and will use all the same wires as the loft. The fun part will be walking across the roof trusses above the first floor foyer, 20 ft below. Woohoo!
Jan 2: Man, I almost forgot to record the days activities. That's because the people we were housesitting for came home and we watched a movie with them ("Serenity"....fantastic movie, in my opinion) and it got late and we decided instead of going home to just sleep here another night so we could get an early start to the next day's efforts. The good news from all that is that they're going to watch our kids, which up to now have been our one achilles heel to getting work done. The first day we started them off in the truck watching movies, and then we brought them down to the basement hoping they'd entertain themselves so we could get work done. Well, a 4 year old and a 22 month old don't entertain themselves very well, unless it's with something dangerous. So today, we kept them in the car all day, and that worked much better. Our 4 year old knows how to work the walkie talkie, so she tells us if the toddler is crying or if the movie machine doesn't work anymore or whatever. She learned how to change DVD's out of necessity, because during the 3 months we were waiting for construction, my wife took them out to the property every day so she could cut down trees. They'd stay in the car parked a safe distance away and watch movies and occasionally take naps. I'm not particularly happy with what we've put our kids through to get work done on the house, but I keep telling myself that once the work is done we'll be better parents. There....guilt gone.
We've been getting out rather late....around 10ish or so, after our mandatory stop at Lowes to get more supplies. (staples, nails, rope and more nylon twine). The plumber was there today, which was a bummer...we'd hoped it'd be the electrician because they bring the nice heaters that warm the whole basement. Oh well. The goal for today was bedroom 2, and I was optimistic we could do bedroom 4 also because of how much faster we were going (note: You can see the floorplan of our house by clicking the wiring strategy link above....hmmm, those pics aren't loading for some reason. I think Comcast is down or something. Anyway, it should be noted that we only have a bedroom 2 and 4....there is no 3. It got converted into the loft). While my wife prepared the cable in the basement, I went up into the rafters to scope out the route. Here is where I got to string nylon twine across the 20 drop to the foyer (heck, 30' assuming I'd break right through the floor). The scariest part is just that my wife might see me doing it. She carries a "Be careful!" warning with her wherever she goes, and I think she would have run out.
Once ready, we went with our new plan....we were going to run the halloween first, then civil war, and then gobbledy gook. If for some reason that's not clear, let me 'splain: halloween is the TV cable, because the RG59's are black, the Cat5e's are orange, and the RG6's are white...civil war is the network wire, which is a blue cat6 and a grey cat5e, and gobbledy gook is all the rest....red firewire, white 22/4's, brown 22/4's, yellow cat5, white cat5 and orange 14/4. This plan differs from the first day, when we pulled ALL of that up together at once. Not only was that DANG heavy, but it was a major pain to sort it out in the end. So this time we pulled just the TV cable up first, ran it all the way to its final destination, and then same with the PC network cable, and finally all the rest. Because the remaining were all individual wires, they were much easier to manage the differing lengths as needed.
Around afternoon, we discovered our latest shortage....electrical tape. This was a crucial one. We were down to our last roll and my wife had gone sparingly, taping together the TV mega-cable only every 5 feet or so. That was WAY too sparingly. For that bundle to be manageable at all, you have to go about every foot. Same with the network cables...they had to act like a single cable to be useful. Velcro was not as useful here as I had thought it would be...it was cumbersome to cut, and it simply didn't hold as well as the tape. Now, we HAVE used it in many places for temporary purposes, but definitely not for holding the wires to each other.
So she decided to take the kids to town to get more electrical tape, as well as food. While she was gone, what I did was move the remaining gobbledy gook cables into place. What we do is feed a lot of slack to the room, and then once the end is in place, we take the slack back all the way down to the basement. In this case, for some reason, we fed up WAY too much slack. I had cables draped all the way down to the foyer floor 20' below and back up. For final destinations, what I would do is figure out where in the room it was (I keep a copy of the plan in my back pocket), determine how big a hole it would need, check for any interfering high voltage wires, then drill the hole (going a corded drill here was definitely the right choice...some mean power there). Then I go up the rafters, take the wire end and feed it down until it hits the bottom of the wall...then I go back to the floor and secure the wire. The method we're going with is to staple a small zip tie to the stud, then zip tie the wire to it. In some places where I don't want to secure the wire, but I don't want it to flop around, what I'll do is staple a nail to the stud, remove the nail, and then slip the wire through the staple. That has all worked so far. The hard part is trying to think ahead of time to making the wire accessible in the future....I don't want to secure it too tightly if I'm going to be trying to fish it out of a small hole (like for the temp sensors).
I had one almost gotcha moment today when I was running the speaker wire. I was just about to secure it in place when I remembered my plan....run it past the room's keypad location first! Whew! So, I drilled a 1" hole, ran the speaker wire down next to the keypad wire, and then ran it back up the hole to where it had to go in the room. So I now have a loop of wire there should I need it. This issue didn't come up when we did the loft because I don't have a keypad planned for there....there's a touchpad location that will work for that. When we do our first 2-speaker room, I'll have to remember I need to run the wire to both locations.
It was amazing how much slower I went while she was gone....it was kinda strange. It's not that she was even supposed to be helping me on that particular part...I think it was just the lack of pressure to keep moving. Either that, or it was the fact that the temps really dropped in the meantime. For the first time since we've been out there, my hands were getting cold. The temps ended up in the teens. Brrrr. Thankfully there have been no breezes in the house because all the windows are in, because that wind is wicked.
She finally returned and after a quick meal that tasted a lot better than a Burger King meal should, I finished up in the room and we took up all the slack back down to the basement. I walked through the rafters securing the wire, using electrical tape to bind all the wires together and using nails and zip ties to support it off the nylon twine bridges. Then I went down the chase and taped it together and secured it to the side of the big hole so it was out of the way for the next pulls. I also taped a zip tie to the bundle just below floor level and then raised the cable up and zipped it to a nail...that basically took a lot of the weight off the wire, so the wire at the top of the vertical chase wasn't supporting the whole 30' length.
When I got down to the basement after doing all that, the wire was already laid out for cutting. What we do is hold the wire straight down from the chase so it's touching the floor. Then, since we need 32' from there to reach the back corner of the wiring room, we measured out 32' across the basement and marked it with a sharpie. So, we string the cable out that distance and then cut it. We also marked out 32' in two other directions so that we wouldn't have to drag the wire out all that distance if we didn't want to...for instance, once direction is 20' across to the other basement wall, then 12' back towards the chase. Cut then label, and we were done.
We also took the time to form some more TV mega cable and network cable, so we could get a jump on the next day (and because it's a lot easier to do that when we can string it across the entire basement without having to worry about other workers). Once we put the cable together, though, we have to wind it back up to the corner to get it out of the way in case workers show up before we do. As we wound up the Tv megacable, we had a small epiphany. We had salvaged some of the large wooden spools the electricians had tossed away, and those would be perfect for rolling up the cable for the night so that in the morning we could roll it back out and be ready to go.
Unfortunately, even though it SEEMED a lot faster, we still only got 1 room done. However, it was about the same distance as the loft, so it makes sense. Our goal for tomorrow is to complete the top floor, because bedroom 2 is much closer, and the master bedroom surrounds the chase, so it's right there. So far, I am pleased with our progress...there have been no real work stoppages, which is good because there's a LOT of work left to do!
Jan 3: Oof...I dunno why, but I'm even more tired tonight. Then again, we got a much better start...we were out at the house around 8 am...the sun hadn't even hit our place yet. As a result, we got to spend a lot of time enjoying the 17 degree temps! Brrrrrr. It was just a flat out cold day. The only good news is that the plumbers showed up to work, and they turned on the electrician's 110k BTU heater in the basement. That didn't do me much good up in the rafters, but it kept the wire nice and pliable.
Our goal for the day was to finish the upstairs....at least as far as the major items and all bedrooms. There's little minor stuff other than that...a light switch here, a smoke alarm there, a water sensor in the laundry room, etc. So first up we pulled to bedroom 2. (By the way, comcast finally fixed themselves, so the linked post above now does show the floorplan, for reference). It went pretty quickly, given how close to the chase it was. No real difficulties noted. However, I'm going to put the whole "interference" thing to the test. The place for the room audio control keypad is on the other side of a stud from a 120v run, and shares the same stud cavity as a 220v run (for the dryer). And best of all, my speaker wire loops into there. So, if I hear buzzing or static in that room, especially when the dryer is running, then I guess it'll be confirmed. Worst case if that happens, then I'll just snip the speaker loop in the cavity and connect it directly from wiring room to speakers.
After finishing bedroom 4 and talking to our well contractor for a while, it was time to hit the master bedroom. Like all the other rooms, it had a big TV and a PC pull. But the "gobbledy gook" pull contained a lot more. 2 more window wires, another speaker, another PC, and a touchpad pull (1 Cat6 and 1 Cat5e....the power for these touchpads comes from an outlet in the attic above). That made it quite a bit more involved, so that room, went pretty slow, even though it was directly around the chase. Like always, we pulled a lot of wire up, then ran each wire to where it had to go, and secured it from its end. Then once they were all connected, we slowly fed the slack back down the chase and secured the wire as we went. It worked like a charm.
There were some lessons learned today, though. First is that we were smart (after all!) to do the longest runs first. The main reason being that I was discovering as we ran more and more wire, it became harder to navigate the attic trusses. Once we had done the master bedroom and bath, it was REALLY tough, as they were criss-crossing all over the place. I also learned that I seem to always put the wire at just the wrong height when I secure it....too high to easily step over, and too low to go under. I'm more focused on keeping it away from the high voltage wires, so I don't usually pay attention to having to get over or under it.
The final lesson we had today was a little epiphany. We had scrounged up some spools the electrician left, and we were going to use them to roll up the wire we had laid out for the next days pull, just to get it out of the way. Well, in the meantime, the wire we had already pulled sat very messily in a big pile of boxes which they filled to overflowing. So we suddenly figured...hey, why not use the spools on the already-pulled wire, to keep them out of the way!
We're much happier with that result.
Tomorrow we have to do some minor pulls across the attic, just wrapping up stuff, but we're essentially done with the 2nd floor. We're really expecting the first floor to go much faster. It'll take some more thinking, as to routing....but no more heavy 30' high wire pulls!
The results of 3 days efforts, from the top of the chase in the attic...
Jan 4: There's a certain almost surreal feeling about working in the house. We've never been able to have this much access to any house that was being built for us, and it's really great feeling like we're actually making a difference. I enjoy walking in the attic and thinking how helpful it will be to be familiar with it already, should the need arise to traverse it post construction.
We didn't make as much progress as I'd hoped today, but I am still pretty optimistic. We pulled some additional wires up the chase....kinda a potluck of stuff we'd not bothered with before, or things we couldn't pull up because the one box of yellow cat5 was already being used in a previous pull...something like that. So, we pulled up a half dozen wires to various places, and then I said that it was time to do the first floor. I wanted a break from the attic, and to see just how quickly we could do the downstairs. I really thought it should go much faster than the upstairs.
Well, I was right and I was wrong. It has all the potential of going faster, but it seems to require a lot more planning. Without the freedom of the attic to navigate to a room, we have to traverse the maze of floor joists and high voltage runs and cold air returns instead. So you have to walk around and try to find a joist channel you can use that isn't already busy...then you go to the first floor and try to find what wall you'll come up...and then once you find that wall, you have to go back downstairs and make sure nothing is below where you want to drill, etc. So again, it takes more planning. By the way, I've decided that speaker wire is the only stuff that might really be negatively affected by high voltage runs, and that they can basically touch if at 90 deg crossing, and if they're parallel, that 18" apart is ok. I hope that's all true, because in the labyrinth that is the basement ceiling, that's about all you can hope for.
What I had planned to do was to have everything meet up in the floor (the basement ceiling) before it made it's trip down to the wiring room. So in other words, all the wires would first travel across the floor in the floor joist channels to a single "highway" that would then head directly for the wiring room. I definitely was not going to try and run wires directly towards the wiring room, as that would mean drilling through each floor joist for each wire. Instead, I'd just drill some large holes in one area and send all the wire through those. Basically, the floor joists run from the front to the back of the house, so running wire in that direction is trivial. But going from side to side means going through a floor joist every 18 inches (I think). The floor joists are those OSB type with a 2 X 2 glued to the top and bottom...so they're kind of like a wooden I-beam. Appearantly they're really strong and straight. Well, every 2 feet, they have pre-drilled knockouts about 1 1/2" across just for running stuff through. I was pretty sure that those knockouts weren't going to be enough to handle everything coming towards the wiring room. The TV bundle itself was more than 1 1/2" thick. So I confirmed with the builder that I could drill additional holes....well, 1 additional hole, 1", between the knockouts. So that gave me 3 holes to try and run stuff through.
I think that MIGHT have been ok...but then while I did other stuff, I set my wife to actually knocking out the knockouts and drilling the extra hole, and it was T-D-OUS! It's not just OSB, it has fiber meshed in there too, and the knockouts weren't at ALL easily knockoutable...you had to bang on it hard with a hammer for a while on one side, then bang on the other side, until it eventually just kind of crumbled, and even then it didn't make a clean hole. And from where she was starting, it was at LEAST 20-30 floor joists to get through in order to get to the wiring room.
The other issue was going to be just running the wire. We had two options. Since the spools and boxes were all sitting in the wiring room area, we could feed it through the floor joist holes as we went until it was finally in place and then cut it.....or we could just drag it across the basement floor until we were under where it was going, run it to location, measure out the wire, cut it, and then feed it from that location down to the wiring room. Either scenario involved a lot of feeding slack from one joist to another until it was finally where it needed to be. It was going to eat up all of our time. We considered just leaving the wire below the floor joists instead of feeding it through, and then dealing with it later...but that would have meant after insulation was put in, which wasn't a problem but just a major inconvenience having to deal with that as well. We then also considered leaving it below the floor joists forever, but then if we ever finished the basement, we'd have a long "bump" running almost the length of the basement in the ceiling.
Then my wife had the idea of the year. She said "What about the I-Beam?". I turned around, and there was the huge steel I-Beam that supported most of our house. It ran from one end of the house to almost the other end....interestingly enough it ends exactly where the wall to the wiring room will be. All of the floor joists are above it, so it has "access" to all of them. And if we ever go and finish the basement, we'll simply enclose it in sheetrock anyway. One entire side of the I-Beam was taken up with HVAC ducting (my idea, so that if we finished the ceiling, we could hide them together instead of separately), but the other side was completely open and free....longing to be filled. I called the builder just to make sure there was no reason we couldn't make use of it, and there isn't. So what we're going to do is run the wire through the floor joist channels to the I-Beam, and then down the I-Beam side to the wiring room. It's BRILLIANT! It's an incredible time saver, too!
So, while I went up and down the stairs and drilling holes in prep, my wife used the stapler and nylon twine to make a sling for the wire every 4 joists. For now we're just going to suspend our wire right next to the I-Beam until we're all done, and then well work on securing it within the I-Beam side. We didn't have the camera, or I would have taken a pic to demonstrate what I mean, so if this doesn't make sense, just wait until tomorrow!
We're poised for an explosive day tomorrow, with me drilling all the required holes for the Living and Dining room wires, and the greatroom is already started. If we can finish everything except the kitchen (sink!) tomorrow, then I'll be giddy.
Jan 5: Well, the kitchen sink and some besides wasn't done. However, after a LONG day, we did get the Living room, Dining room, and Den all done! The worst was wiring for candles. You can put up to about 5 candles on a circuit, so I figured I'd put 4....2 bottom windows on one side of the front, and the 2 windows above. What that mean was a LOT of threading wire back and forth through holes in the floor and joists, etc. Massive time sink. But it's done.
We're running out of wire now more often...we've had to swap out wires midstream sometimes because we failed to see that the spool was getting low. I haven't had to violate my wiring color rules yet, though, which makes me happy.
However, what doesn't make me happy was seeing this:
After we had gone to all the trouble to keep high voltage lines away from our lines, the electrician comes in and installs those wires on the right, heck they almost go through the same hole! Those wires feed the ceiling fan and can lights in the great room. And I had specifically told him to make sure and avoid what we had laid because I knew he wasn't done yet with his wiring.
Now before I get angry with the electrician via the builder....that bundle of wires is for television. So there's RG59's for baseband signals, RG6 for satellite/cable, and Cat5e's for future. Are those likely to experience interference from those HV wires, especially given that one is a motor? At least there's no speaker wires there.
Otherwise, we got a lot done, considering. IF we both go back out tomorrow, we're sure to get the first floor finished. I say IF because she's a little under the weather, and I just figured the kids needed a break of sitting in the car all day. I won't get it all done if I go myself, but I'll get SOMETHING done. We'll see how they feel in the morning.
I'm dead tired, so todays exploits are concise. Suffice it to say that I was right....running wire WAS much quicker, once the way had been prepared.
And here is a pic of the wire we've run for the first floor so far, next to the I-Beam it will eventually inhabit:
Jan 6: I'm tired. Just beat. It's been 7 DAYS STRAIGHT of doing this. We're not done....but we're close enough now that when I die of exhaustion tonight, my wife's next husband will be pretty pleased! Should I actually live, then we'll continue this effort next weekend. Hopefully by then the power people will have finally installed the power line, like they almost did a month ago so we won't have to rent a generator again.
Here's the funniest part (one of those "funny" things where you start off laughing and end up crying)....the temps were in the 40's or maybe even 50's today. It felt like a normal cool Seattle day, very misty and foggy. So what does that mean?? It means that the night before we started working on the house, it snowed, and then stayed cold enough for the snow to remain all week...and now the night we're done, there's no snow at all. So we pulled cable and worked in the house during the coldest week of winter so far. :lol: Oh, but here's the part where it really gets funny. You see, my well driller finally called, and wants to drill the well out there next week. Well, guess what....all last week, the ground was frozen solid, and thus was perfectly passable by the driller's 40 ton truck. Not a problem. Now this week, since it has all warmed up, the ground is pure mud, and thus he can't drive anywhere unless we lay down gravel. So last week would have been perfect for drilling and this week would have been perfect for pulling wire....but instead they were reversed at great discomfort and cost to us.
If I've learned anything, it's that PA has all the weather I WANT.....just never when I want it.Oh ya...wiring. Although we were all gung-ho today, it seemed to just go a lot slower. We were working in the great room, as well as just kicking out various other small pieces of rooms as I'd remember them. As a result, we could never cross an entire room off our list, so it felt like we were moving in slow motion. We actually did really well....we got all of the great room done, we got the foyer and front door area, and started into the mudroom, and a decent stab at the garage and kitchen. So, come next weekend, we've got the mudroom, kitchen, garage, and outdoor left to do, but the good news is that those are all immediately above the wiring room, so they're really quick when it comes to measuring and cutting and stowing the wire, which takes quite a bit of time normally. We got into a pretty good rhythm the past few days. What we'd do is I'd drill the holes, she'd run the wire over to the hole from the basement and feed it up, I'd pull up enough to take where it was needed and secure it, then go downstairs to the basement. We'd rough measure off how far the wire had to go, and then cut it. Then I'd go start drilling more holes and planning wire routes while she routed the cut wire through the floor joists and to the I-Beam, then down our J-hooks to the wiring room. So we were always busy with something, and taking care of routing wire as we went. It was a good pace.
We've run out of a lot of wire. None of it I'm really surprised about, but I've had to violate my coloring code to keep going. We ran out of white Cat5e, which was what I was using for keypads and motion sensors. But we had a ton of orange left. At first I didn't understand this, and then I remembered....I had planned to run 4 orange Cat5e with every TV install...but the morning we started, I realized I had ordered 3 1000' boxes of orange....so that would mean an extra pull for every TV to get a 4th there (I had been on the ball with the RG59, ordering 2 X 1000' and 3 X 500' so we could pull 5 at a time). I decided right then and there that 3 Cat5e's for each TV were juuuuust fine. So that's why I have so much orange left, so I'm using it instead of most everything....I can see the yellow is about to run out too.
I think I've decided I'm not going in to work tomorrow...I need a break. I'll start thinking about the house in a day or so....I'm sure I'll get a few calls from the builder by then, expressing astonishment at what we've done (and hopefully no consternation at something we messed up!). I'll update this if there's anything new to update. There's still testing and window wiring and other stuff to do.....we're far from done, but I'm amazed at how far we've come!
Jan 9: Well, the Monday day off was well deserved and totally blown doing nothing, which was exactly what we needed. I think I slept most of it. However, it wasn't long before I started thinking about what we had left to do. I had talked to our builder, to give him our normal update, and I told him that we would either finish it next weekend, or we'd work every day after that until it's done. He's eager to get on with construction, and heck, so am I! But when Tuesday rolled around, I was just in a daze. First of all because it was the first time I'd been to work since mid Dec....uggg, what a "not-going-to-work" hangover I had. It was hard to remember just how to turn on the PC. But when I got home that night, it was worse. There was just this cloud hanging over my head, this incredible weight of "there's still so much left to do".
And I realized that part of the reason it was so oppressive was because it wasn't defined. So, I got onto google docs and started a spreadsheet listing everything we had left to do...every wire that had to be pulled, all the tasks we had to accomplish, all the nailing of stuff...and it was tremendously helpful. Part of the problem was that as I went throughout the day, I'd suddenly remember something else I had to do, so it kept feeling like there was this endless list of things. But once I put it on the list, it didnt keep popping up in my head. I suddenly felt that we could actually get it done!
So today, I had to go out to the house anyway, so I had my wife meet me out there, and after borrowing my cousin's cordless drill, I just went around and drilled all the places where we still had to run wire. Sometimes making those decisions of where to drill took the longest time...you had to make sure the route was feasible, you had to avoid high voltage wires, you had to make sure nothing nasty was on the other side of that floor, like a drain pipe or something. So I'd just drill a hole that could serve multiple wires, and then put a "D" next to the items on the list that would go through that hole. After just about a half hour, most everything had a D next to it. That meant that the next day, we could meet out at the house again, and this time just start right into pulling wire through the holes. So I'm now kind of optimistic that we can get most of the wiring done even before Saturday, which is really good news. Also, because of how far along we are, we don't need to drill many holes, so my cousin's cordless drill works just fine. So, since we don't need a power drill, and it's during daytime we don't need lights, and because it's 60 out we don't need heat...that means I don't have to waste money renting a generator again!
My thoughts are turning now more towards testing, and I still haven't come upon my final solution yet. Testing the window sensors will be easy enough, but that leaves an awful lot left. We'll see what I come up with.
Jan 11: Well, I went out to the house every day for about an hour and a half around noon, met my wife there, and we got some stuff done. In fact, we got so much done that....we're basically out of wire now. :blink: I overestimated what to buy, and then rounded it up....and we're STILL out of wire. I'm out of everything except Cat6 and the orange Cat5e (just because I used less of that during the pulls than I had planned). Unfortunately, we're not quite done enough to call it quits. I know the great room media area requires more RG59's, and the garage requires a bit more 22/4. The attic would also benefit from more wiring too, for heat detectors. So, I've called around, and it looks like it'd be about 4 times as expensive to buy what wire we need locally than to get it from keystone wiring again....but then I'm going to have to deal with shipping costs as well as just waiting to get the wire. Fortunately, keystone is around Philly, so it'd only take really a day to get here. Tomorrow when we go out, I'm going to have to take stock of everything we need before I decide what to do.
But we'll still be kept plenty busy, even without wire to pull. Tomorrow we do the window and door sensors, since we've already pulled the wire to those locations in almost every case. I drilled some of the windows today just to make sure my plan for them would work...and to make sure the windows still worked after I filled them fulla holes! They still work, and it appears my plan for a sensor in the top and bottom sash will work just fine. So, we'll just work around the house...I'll drill the holes, and then my wife will follow behind and strip the 22/4 wire to reveal the 4 wires....2 will go to the top sash, 2 to the bottom sash. She'll fish them through the holes, and then I'll go back around and connect the actual sensor and put it back in. I think it'll go smoothly, but with that many windows (I bought 50 sensors), it'll probably take all day....at least, all daylight, since that's all we have because I'm not going to rent a generator again.
In good news, though, I bought a new cordless drill. I had been using my cousin's cordless Craftsman drill, and it had never failed us. Granted, we weren't putting it to near the use we had been putting my powered Hitachi when we had the generator....but his drill still did just fine, even in 1" holes through the floor. So, I checked Lowes and Sears, and Sears had a slight sale on a 14.1 volt craftsman drill, variable speed, and it came with a work light too, which made me happy because that meant a 2nd battery! So, I've now got my cousin's drill fully charged, and my new drill and a spare battery.... I think that should be enough for the very simple window drilling we'll be doing. I also plan to drill all the remaining holes needed to run the wire once we get it so we'll be ready to go.
Whether we're done by Monday or not appearantly doesn't matter....they've scheduled the inspection for then. Appearantly, you don't actually have to have everything done when the inspection happens...you just have to have everything fireproofed that is done. My wife bought a can of spray-in foam and hit all the holes in the walls we drilled (including some we were GOING to use...
), so all we have to do is make sure by the time we leave Sunday, with whatever we've done, that the holes are all filled full of insulation, and then appearantly we're good to go!Jan 12: Well, one thing is for certain...we're not going to be done with everything this weekend.
Because of our low wire issues, I decided we'll just take inventory of what we have left, and then call keystone wire Monday and get it as soon as possible and then finish up the wiring. So, today I thought we'd just tackle the windows because there's a LOT of work there. Every window, we have to install 2 magnetic switches and 2 magnets. It's not trivial. So I thought we'd just see how we went today so I'd know how much more time we're going to need to get done (got to finish these before the insulator can get started, because they insulate around the windows). Well, according to today, we'll finish the windows in.....2012.
We got 4 windows done, and they were the easy ones. We've got about 19 more to do, and then doors. *cry*The good news is that we were going faster as the day went....I knew that would happen as we got into a rhythm. We also took a 1 1/2 hour or so break to visit next door, so that was time lost. And then we quit early to catch the playoff game (even worse tomorrow!). So those were all reasons we got so few done. But still, these aren't quick. Sometimes the hardest part is just threading the wire in from around the frame in through the hole drilled in that frame. We've already had to re-consider our routing plan once because the top of the window was flush with the frame of the house, so no wiring could get in there.
We'll probably get may a half dozen done tomorrow if we're lucky. And then it's back to work next week. At this rate, we're going to have to take another week to finish. Honestly, I don't think our builder cares...he knows it'll take as long as it takes me, and now he'll have to wait for us to get more wire anyway....but we're paying interest on our construction loan each month, so every week we delay things is money we're throwing away essentially, plus another week of rent.
Even still, we're still saving a ton of money by doing all this ourselves, so I'm not REALLY unhappy. What I'm STILL most unhappy about is the @#$%^ power company sitting on their fat asses and not getting our power connected. I've already decided that if they do finally get off their fat asses this week and get us power, then I'm going to take an entire day off work and stay out at the house for probably like 18 hours and get it all done. At this point, all it is is just time.
Jan 19: Geez, I've just been so busy and tired....with work, family health issues, and the house....that I've just not been able to update this like I was. So here's a summary:
The power company finally got off its fat ass, and we have power! Woot! What that means is I can now get work done every night after work. And so, since Wednesday, that's what I've been doing. In doing so, by Thursday, all of the windows and the front door were wired. I'm really pleased how it all went, but I still have yet to test all of them. I did some spot checking early on, and they worked just great. The window gets within 1/2" of closed and it signals closed. I'm ok with that tolerance...nobody can get inside a 1/2" opening, and if they open if further, we'll know.
Tanget: Ya know, one thing that I thought of....someone had mentioned that door and window sensors were pointless, because somebody is just going to break the glass to get in. And I realized that I'm actually more concerned about the person who doesn't break the window. If they break a window, they're sure no one is home, and they're just there to rob us....no big deal. But if they're trying to get in sneakily and quietly, then that means they either don't know if anybody is home, or they DO know...either way, they're being quiet for a reason, and I don't like it.
Because the power is on, I told them to schedule the insulation people for Monday...so we have our first real deadline. I'm not worried, though, because we can work all night if needed. On Wednesday the extra wire I ordered had arrived....500 ft more of 22/4 and rg59.
By Friday we were starting to hit other areas of need. That meant finishing the wiring in the garage, and starting to take care of sound-dampening insulation around bathrooms and laundry rooms, etc. We also stowed a lot of OSB boards above the garage, where we have storage trusses, so we can have those for a floor up there. We're not putting the floor in yet because we're probably going to insulate the garage later. I also ran some wires in the wall that had been in very hard to get locations, so I'd been putting them off
On Saturday (today) we just kept hitting things on the list. We did our final attic pulls....1 wire for 2 heat detectors, some RG6QS and Cat5 at the attic access, for future antennas and maybe a wireless access point, and a motion sensor pull at the end of the hallway. We also finished the garage wiring, so all doors have wire for their needs, and so I'll can tell if they're open or closed. However....can you believe it...we ran out of 22/4 again! I can't believe it. I should have gotten another 1k instead of 500 ft....guess I didn't plan it right. I think what keeps kicking my butt on that is all of the excess I leave on the end for the wiring room. I basically pull enough extra off the spool so I can wire all the way to the furtherest/lowest corner of the room. That eats up a lot right there. Oh well. The only wires we couldn't run were for the garage windows and window candles....so what I did was run 2 Cat5's to the top of the garage. Even once we move in, I'll still have complete access to the windows, so I'll just make some patch connections up there and wire them later.
We also ran out of RG59, but that wasn't as big a surprise. I used up almost 85% of it doing another component/audio run from the greatroom wall to the wiring room. I also ran RG59 to 2 locations for the subwoofer.
We've really got like 1 more half day....tomorrow I'll go out by myself and finish up, and be back in time for the football games. But I'll be honest...this was a sick amount of work. I sometimes just look at the huge bundles of wires we've pulled and I can barely seem to remember starting it. It's ridiculous what we've done, I think. I already dread the first day I realize I need to run more wire for something I hadn't thought of.....
Jan 20: It started off as a pretty wretched day, but overall I'm pleased with what got done.
I decided to go it alone today, since the kids were still kinda sickly and I didn't want to keep them in the car all day like we've been doing, and I could tell my wife needed a break. Oh, and the predicted 12 deg temps were another reason. So I took off at a reasonable time to get done the last few things before the insulators start on Monday. The first stop was Home Depot. Unfortunately, the nearest home depot is 40 miles away, so that took a while. I was hoping to find a good selection of mudrings, because I've been VERY disappointed with what Lowes had. In fact, I can safely say, I hate mudrings. Not like I hate those wretched wire pull boxes....but hate nonetheless. All I want is a very simple, cheap ring of plastic I nail to the stud to give me an opening. These things should cost like 20 cents each, for how basic they are. Instead, the only mudrings that Lowes or Home Depot carries are these ridiculous contraptions that have flanges all over, wire size gauges, wire holders...heck, I think they have GPS too. But they're also the ONLY thing that gives you a basic opening into the wall, and 1/2" out for the drywall. So I've been looking all over Lowes repeatedly, and then to Home Depot to try and find a simple mudring that costs only TWICE as much as your basic electrical enclosure box. No dice. I even considered buying some of the 46 cent electrical boxes and cutting the back off them, but I figured the cost of a hacksaw to do that would kill any cost savings.
So while on the way to the house from home depot (about 25 minutes back the way I came), I realized I didn't have the digital camera. We had brought the digital camera with us every day for the past 3 days, but never used it (because we were never really "done" with the wiring), but now was the one time I needed it and didn't have it. The insulators were starting Monday, so this was my last chance to capture at least the exterior wall wiring before it was all covered up. Since I was already near the house, I decided to just go there and get a little bit done before heading back home to get the camera. After I got my tools inside, I started searching for the nails. Then I remembered...my 2 year old had brought me the box of nails last night, at which point I went over and closed the bag she had gotten them out of. But in the process...I had left the box of nails on the desk. So, without getting anything done other than unlocking the front door and putting tools inside, I headed back home, about 30 minutes away. I picked up the camera and nails, and then headed to Lowes to pick up some of the wretched Cadillac-mudrings because I was just simply sick and tired of fighting it.
When I finally got back to the house, it was about 3 hours after I had initially left. However, in the process, I made an executive decision. It was about the mudrings. I noticed in Lowes that they old work mudrings (cut a hole in the sheetrock, insert mudrings, and screw in brackets) and they had new work mudrings (nail to the stud and they sheetrock around it). Well...the old work mudrings were exactly what I wanted. Simple....it's just a plastic rectangular hole. Not only that, but they were the only thing that came in a contractor pack, so you can buy them in bulk and save even more $$/mudring. So I decided that unless it was in the exterior wall, I was not going to put a mudring in for it. I'd wait until we've moved in, and once we decided we wanted access to something, I'll just cut a hole in the sheetrock and put in a mudring. Done! The other thing I decided was to NOT put in mudrings for the TV locations, even on exterior walls. This decision was because I realized we may not want to have external connections to the TV wires, at least not at floor level. What if we decided to buy an LCD TV and mount it on the wall? In that case, I'd want to have the opening for the wires up behind the TV, not down at outlet level. So I'm waiting on those too.
So all in all, I put in 4 mudrings.....1 at our PC network location in the loft, 2 at some subwoofer locations in the great room, and 1 in the kitchen where the touchpad will go. I'm pleased with that
I did some other various items...including running some conduit from the basement to the garage. Even thought I pulled those 2 Cat5's up there the night before, I just felt that if I CAN put 22/4 wires in there directly, then I'd rather do that. So, a short piece of conduit later, I'm all secure. I then took pics of all the exterior walls....wanted to make sure the battery was up to it before I did anything more than that. It was, so I shot the whole upstairs....every wall, and each ceiling in sections. We kinda goofed here, because we had already put in some sound dampening insulation in some walls, which covered up stuff that probably would have been good to capture. None of my wiring, but pipes and wires nonetheless. Oh well...I wasn't going to tear out insulation just for that. I also pulled the LAST WIRE....I had to hit a couple light switches I had missed before. Turns out I had drilled the hole for running the wire, just never pulled it.
Anyway, the insulators start tomorrow, and we're almost done. We have some minor items left to do before the sheetrock goes up, which could be as early as Wednesday....so a few more days and we'll be essentially done. Oh....except for wire testing....
Jan 23: Well, I'm willing to say at this point that we're DOOOOOOOOOOONE. :blink: How can I say that? Well, insulation has gone in all the exterior walls, and sheetrock has been installed in the upper floor ceiling and will continue all week until the interior is covered. So, whether we WERE done or not....we ARE now!
But I can say with confidence that we did everything we wanted to. Here's what we accomplished the past few days, as "cleanup".
Wire Testing:
Got wire testing underway. I decided to only test the window and door wires, as they were most likely to be damaged by insulation and sheetrockers, and also underwent the most manipulating. I bought a couple terminal blocks from Lowes and intended just to wire up each pair of wires to the terminal block, and that way I could easily take my handy dandy circuit tester and check the continuity on each. There were more than a few problems with this, though. First of all, each window has 2 pairs of wire...1 pair per sash. The terminal block I bought could only handle 10 pair (it had 20 connections), and I had 13 windows (so 26 pair) and 3 doors to test on the first floor alone. The other problem was the ease of testing each sash on each window for an open and close connection. The wire tester is down in the basement. It'd be unreasonable to make a trip up and down the stairs for each sash. My original plan was to use the terminal block to wire every pair, make sure all the windows were closed, then I could test all the pairs at once in the basement to check they were closed. Then go up and open all the windows and recheck the pairs to make sure they were all open. So in that way, I'd only have to make 2 trips up and down (for the first floor alone, still). However, I quickly realized I'd have to get a LOT more terminal blocks if that was going to work. So I decided to wire all of the windows in serial instead. First what I did was twist together 1 wire from each sash so that I ended up with a pair of wires per window to work with. I also did that with some rooms just to make sure they all fit on the terminal block. Then I stuck my circuit tester probe into the ends of the circuit. Woot! I got a tone, which was good because everything was closed. Now, to test them. Because the tester had a tone when the circuit was closed, what I was able to do was go upstairs, and one by one test each sash. I could just barely enough hear the tone to know when it was going and when it wasn't...so I'd open a sash, check that I couldn't hear it anymore, close it, hear it, open the other sash, not hear it, close it, hear it, go to the next window. This worked very well.
Two minor problems arose in this....first was that this method wasn't going to work with the 2nd floor, because I wouldn't be able to hear the tone all the way up there. I finally just recruited my wife to be near the tester with her cell phone and I call her and then I can hear it. If it comes down to it, I still have access to each window pair, so I could still do my all windows closed/all windows open test if I had to.
The other minor problem was discovered while I was adding windows to the terminal block. I was checking as I went, and suddenly I wasn't getting a tone anymore. At first I was concerned that a window had a problem...but then I tested that window separately and it worked fine. It didn't take long to figure out that the problem was the natural resistance in the wires....I had so much length tied together that the tester was deciding it was an open circuit instead. So, I had to split the first floor windows into 2 groups to test. Not a big deal.
The jury is out on the 2nd floor so far. Three of the upper sashes didn't test correctly, but I believe I know what the problem is. The way they were wired, the upper sash has a magnet just stuck into a small alcove on the side. There's a piece of metal there for it to stick to, but it also tends to cause the cylinder magnet to want to turn, and I think they're turning enough so the magnetic pole doesn't trip the sensor anymore. An easy fix, and hopefully that's all it is. I couldn't actually check the windows because the sheetrockers had huge stacks of sheetrock leaned up against the wall the windows were on, so I'll just wait. If it doesn't work after sheetrock, I can blame them.
Attic Walkway:
I enjoyed walking around the attic...it was pretty easy, and very spacious. However, walking through the finished attic will be a different story. Mainly, the 12 to 16" of blown in insulation will cover everything, and I won't be able to walk on the bottom of the rafters anymore. Sure, I'd be able to see where the rafter is to step on simply by following it down from above....but I wouldn't know if a wire was laying on top of it, and I'd still have to bury my foot in almost a foot of blown in insulation to step on it....so I wanted to avoid that if possible. So, I went and bought a bunch of 2 X 4's and nails. Starting at the attic access, I built a path by nailing the 2 X 4 to a line of rafters, about 2 ft high. I'd have my wife cut them as needed to fit in tighter places and nail those in. We had to stop because of time, but I managed to build a walkway 2 ft above the bottom of the rafters from the attic entrance over to above the right side of the house. We then stowed the remaining 2 X 4's up in the rafters so that when I do go up there at some point, I can build it as I go (or I'll build the rest of it if I get a chance before they blow in the insulation up there).
Wire Supports:
This was where I sought to quiet you whiny bitches.
That is to say I agreed that hanging all those wires by zip ties was a good temporary solution, but wasn't a good idea for long term. So, I found some handy dandy pipe clamps at Lowes, and viola!
Not bad. I like it. I only worried about places where a lot of wire came to one place, or where an eventual zip tie break would really cause problems. And there right above the chase where it goes down 28 ft, I decided to play it safe and install 2 of the 3" clamps.
And finally, a peace-of-mind fix. Remember the wiring the electrician sabotaged with his close-comfy wiring he did? Well, I had gotten assurances from the builder that, should I find it caused a problem later, they'd "fix" it. Well, I wasn't completely satisfied with that idea, so I went back and looked at it. Turns out there actually was a free and clear stud bay right next to it.
So there ya go! There might be some more updates as time goes on...there will ALWAYS be more work to do. For now, I'm enjoying the idea of not going to the house after work anymore, and we're starting to look "forward" to the next project, which will be putting up stone work on the chimney in the great room. Wheeeee. <_<
Here's the totals:
22/4: 5500
14/4: 1500
Cat5e: 6000
Cat6: 1500
RG59: 4000
RG6: 2000
22/4 Firewire: 500
Here's the breakdown:
22/4, 3000 ft, stranded, White
22/4, 2000 ft, stranded, Brown
14/4, 1500 ft, high strand count, Orange
Cat5e, 1500 ft, solid, Yellow
Cat5e, 1000 ft, solid, White
Cat5e, 1000 ft, solid, Grey
Cat5e, 2500 ft, solid, Orange
Cat6, 1500 ft, solid, Blue
RG59, 3500 ft, solid copper core, "precision video" rated w/copper braid, Black, in 3 X 500' and 2 X 1000' boxes.
RG6QS, 2000 ft, solid copper core, 3 Ghz rated, White.
Additional ordered later:
22/4, 500 ft, stranded, orange
RG59, 500 ft, black
I ran out of everything except orange Cat5e, the RG6, and Cat6. It's kinda weird, I ended up with a LOT more Cat6 than I would have thought. I'm thinking part of the problem was I may have been counting a cat6 wire for each tv, as well as for a PC location in each room, and in most rooms I just ended up co-locating TV and PC with 1 cat6. Oh well, at least my patch cables will be high quality....
