Assistance w/replacing older Brinks with new DIY installation?

vacationer said:
@RAL-
 
Thanks for the pic...I see what your talking about now.  I am not an expert at electrical wiring but I assume when you have one line coming into the surge and then daisy chain it to the other reg outlet both outlets are covered as far as surge protection goes....I wasn't aware of that.
 
I wonder if something like this would work as well:  https://www.amazon.com/dp/B00006BBAC?psc=1
 
It has a center screw I might be able to mount the transformer.
 
Yes, the surge suppressor will protect a daisy chained receptacle.
 
I'm not sure if you could use the Belkin surge suppressor to mount the transformer.  On some, the mounting screw is captive and can't be removed.
 
vacationer said:
@DEL-
 
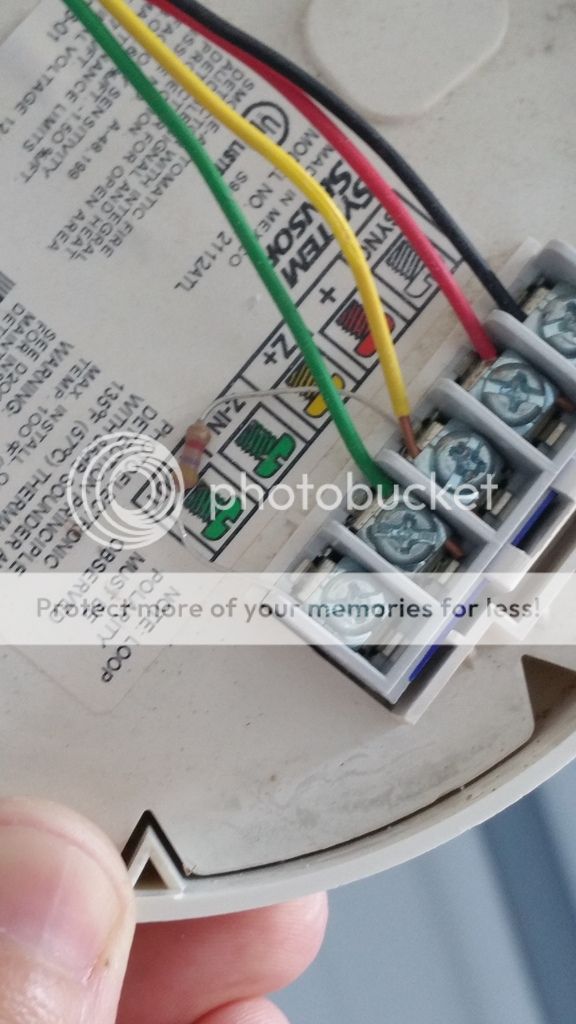
Thanks for chiming in as well....appreciate it.  Currently I have a system sensor smoke 4 wire with resistor attached:


I noticed you said to replace with a 2 wire since I am a novice installer....couldn't I just replace with a similar newer model (4 wire) and follow the hookup as it is now or would the difficulty be hooking it up on the panel end?
 
I am going to look through the list of compatible devices and see what works for the 20p.  Also, any way to tell if that resistor is a 2k so I can reuse it or should I just buy a new one?
 
Here are a few that I found on ebay just not sure the differences in the model numbers:  2W-B vs 2WT-B vs 2WTA-B
 
http://www.ebay.com/itm/SYSTEM-SENSOR-2W-B-Smoke-Alarm-12-24-VDC-2-Wire-w-Base-/331310823796
http://www.ebay.com/itm/SYSTEM-SENSOR-2WT-B-Smoke-Alarm-12-24-VDC-2-Wire-Therm-Sen-/331310895423
http://www.ebay.com/itm/SYSTEM-SENSOR-2WTA-B-Smoke-Alarm-12-24-VDC-2-Wire-Therm-Sen-/331725160015
 
Since the existing smokes are 4-wire detectors, you could install new 4-wire smokes. 
 
In that case, you could connect them to any zone of the 20P (e.g. zone 8, like it is on the old panel).  It's only 2-wire smokes that must be connected to zone 1.
 
The old EOL resistor looks like it is 4.7K (yellow, violet, red color bands).  So you'll need to get a 2K resistor for the new smokes. The 20P kit might even include some.
 
If you go with 4-wire smokes, you will also need to install an end of line power supervision relay on the last smoke in the daisy chain in addition to the end of line resistor.  This creates a trouble condition if power to the smokes is lost for some reason.
 
The relay and additional wiring (4 vs 2) is what makes 4-wire smokes more complex to deal with.
 
A 4-wire version of the 2W-B is the System Sensor 4W-B.  The end of line relay is the EOLR-1.
 
The 2WT-B has a 135 degree thermal sensor in addition to the smoke detector. 
 
The 2WTA-B has a thermal sensor and audible sounder. 
 
Both the 2WT-B and 2WTA-B can be used with the 20P according to the System Sensor web site.
 
From the label in your photo, it looks like your old smoke detector has a thermal sensor and sounder.  The installer didn't do a proper job and didn't install a power supervision relay.
 
RAL said:
Yes, the surge suppressor will protect a daisy chained receptacle.
 
I'm not sure if you could use the Belkin surge suppressor to mount the transformer.  On some, the mounting screw is captive and can't be removed.
Just FYI I read in the Q&A that the screw comes out and some people use it to secure the surge to the outlet cover behind it.  I think I may give it a go and see if it works......
 
RAL said:
Since the existing smokes are 4-wire detectors, you could install new 4-wire smokes. 
 
In that case, you could connect them to any zone of the 20P (e.g. zone 8, like it is on the old panel).  It's only 2-wire smokes that must be connected to zone 1.
 
The old EOL resistor looks like it is 4.7K (yellow, violet, red color bands).  So you'll need to get a 2K resistor for the new smokes. The 20P kit might even include some.
 
If you go with 4-wire smokes, you will also need to install an end of line power supervision relay on the last smoke in the daisy chain in addition to the end of line resistor.  This creates a trouble condition if power to the smokes is lost for some reason.
 
The relay and additional wiring (4 vs 2) is what makes 4-wire smokes more complex to deal with.
 
A 4-wire version of the 2W-B is the System Sensor 4W-B.  The end of line relay is the EOLR-1.
 
The 2WT-B has a 135 degree thermal sensor in addition to the smoke detector. 
 
The 2WTA-B has a thermal sensor and audible sounder. 
 
Both the 2WT-B and 2WTA-B can be used with the 20P according to the System Sensor web site.
 
From the label in your photo, it looks like your old smoke detector has a thermal sensor and sounder.  The installer didn't do a proper job and didn't install a power supervision relay.
Thanks for the clarification on the 2 wire vs 4.  I found (I believe) a comparable one to the one I have:  http://www.ebay.com/itm/SYSTEM-SENSOR-4WTA-B-Smoke-Alarm-12-24-VDC-4-Wire-Therm-Sen-/221576347061?hash=item3396fabdb5:g:64IAAOSw6btXRMZj
 
From what I can see it looks like it is a thermal sensor and audible sounder.
 
I guess I will wait to see if the new panel comes with any resistors unless rat shack sells them locally?  Or I can get a pack of 25 on amazon...of course I don't need 25...lol
 
I was just looking to have items to replace system as is on hand when everything gets here but I will try to stay patient:)
 
Thanks again for your assistance....between you and DEL you all are why people come to support forums!  Thanks for clarifying and answering all my "newbie" ?'s.
 
The panel comes with resistors. What it does not generally come with (from memory) is the 4 wire plug/header that is needed for a 4 wire smoke reset.
 
I would not recommend a 4 wire detector. Even if you have heat detectors wired on the loop, I still would not point a novice to a 4 wire loop or detector. Also introduces the need for a supervision relay.
 
Not extremely difficult, but the reset portion needs to be addressed and programmed on the 20P and the pigtail becomes the issue if it's not included with the kit.
 
2WTAB or 2WTB.....depends on if you want a sounder on the smoke or not.
 
DELInstallations said:
The panel comes with resistors. What it does not generally come with (from memory) is the 4 wire plug/header that is needed for a 4 wire smoke reset.
 
I would not recommend a 4 wire detector. Even if you have heat detectors wired on the loop, I still would not point a novice to a 4 wire loop or detector. Also introduces the need for a supervision relay.
 
Not extremely difficult, but the reset portion needs to be addressed and programmed on the 20P and the pigtail becomes the issue if it's not included with the kit.
 
2WTAB or 2WTB.....depends on if you want a sounder on the smoke or not.
@DEL-
 
Thanks for the feedback.  I will go with the 2 wire as suggested since from what I understand the 2 wire will not require the supervision relay as well as extra programming on the panel side?
 
I understand it will still require the 2k resistor but that will hopefully come with the kit.  I like the sounder option on the smoke so I will go ahead and order the 2WTAB.
 
Got the panel in the mail today and no 2k resistors that I see so I guess I will need to order some:
 
 
RAL said:
For the jumpers for the zones, just connect a short wire between the two terminals (HI and LOW) for each zone.  That will simulate a normally closed contact.  Then, after you configure the zones, you can arm the system and test each zone by creating an alarm condition by disconnecting one end of the wire.
RAL - Quick question after watching a few online vids...I noticed online vids showed for testing the panel prior to hooking everything up (what you referred to as bench testing) hooked up 2k resistors between the HI / LOW for each zone as jumpers.  Is there a reason they are using resistors as a jumpers instead of just a reg piece of wire as you instructed? 
 
Next question, I also have been watching a lot about the programming aspect of the panel from the keypad and one part that is confusing me is when it takes you through the different aspects of programming a zone (i.e. zone type, partition, etc) you get to this next part called HW (hardwire I think) where basically you need to identify what kind of wiring you have for your contacts:  EOL, NO, NC...every video I watch they always chose EOL resistor meaning that their zones are wired with resistors....but as far as what I can tell by testing my basement door the reading on the volt meter indicated no EOL resistor was used...so what option do I chose from those choices when programming each zone?  I am really perplexed by this one.....
 
Thanks for any assistance you can provide....
 
vacationer said:
RAL - Quick question after watching a few online vids...I noticed online vids showed for testing the panel prior to hooking everything up (what you referred to as bench testing) hooked up 2k resistors between the HI / LOW for each zone as jumpers.  Is there a reason they are using resistors as a jumpers instead of just a reg piece of wire as you instructed? 
 
Next question, I also have been watching a lot about the programming aspect of the panel from the keypad and one part that is confusing me is when it takes you through the different aspects of programming a zone (i.e. zone type, partition, etc) you get to this next part called HW (hardwire I think) where basically you need to identify what kind of wiring you have for your contacts:  EOL, NO, NC...every video I watch they always chose EOL resistor meaning that their zones are wired with resistors....but as far as what I can tell by testing my basement door the reading on the volt meter indicated no EOL resistor was used...so what option do I chose from those choices when programming each zone?  I am really perplexed by this one.....
 
Thanks for any assistance you can provide....
 
You can use either a wire or an EOL resistor to jumper zones 2-8 for a bench test.  You just need to set the Hardwire Type accordingly for the zone.  Zone 1 is always set for EOL, so you will need to use a resistor there, rather than a plain wire.
 
For the existing zones on your doors and windows that don't have an EOL installed, you would set the Hardwire Type to "1" for a NC contact.
 
vacationer said:
@DEL-
 
Thanks for the feedback.  I will go with the 2 wire as suggested since from what I understand the 2 wire will not require the supervision relay as well as extra programming on the panel side?
 
I understand it will still require the 2k resistor but that will hopefully come with the kit.  I like the sounder option on the smoke so I will go ahead and order the 2WTAB.
 
Got the panel in the mail today and no 2k resistors that I see so I guess I will need to order some:
That is VERY odd. I would check the bags carefully. NEVER have I had a panel that did not come with the requisite resistors, and that's from installing at least 1 or 2 panels a day for over 10 years in a prior life.
 
vacationer said:
Got the panel in the mail today and no 2k resistors that I see so I guess I will need to order some:
 
 
The 2k resistors are in the bag marked EOL RESISTOR ENCLOSED. I don't understand why Honeywell lists the 820 OHM bell supervision resistor (which is a solitary resistor tagged as the bell supervision resistor) but doesn't mark that the EOL resistors are the required 2ks. There will be a strip of the 8 2ks along with the bell supervision resistor and cam lock for the panel in that bag on the left.
 
DELInstallations said:
That is VERY odd. I would check the bags carefully. NEVER have I had a panel that did not come with the requisite resistors, and that's from installing at least 1 or 2 panels a day for over 10 years in a prior life.
 
 
SterlingDonnelly said:
The 2k resistors are in the bag marked EOL RESISTOR ENCLOSED. I don't understand why Honeywell lists the 820 OHM bell supervision resistor (which is a solitary resistor tagged as the bell supervision resistor) but doesn't mark that the EOL resistors are the required 2ks. There will be a strip of the 8 2ks along with the bell supervision resistor and cam lock for the panel in that bag on the left.
 

DEL and SterlingDonnelly-
 
You all were right...I looked through the bag labeled EOL Resistor enclosed and there was one bell supervision resistor and a pack of 5 or 7 other resistors that weren't marked but I am assuming they were 2K and used them on the smoke detector zone (until I receive smoke this week).
 
I made some progress this weekend installing the new board, hooking up keypad and even hooked up my existing door / window contacts and programmed all zones except for two:


I do have some follow up ?'s if everyone doesn't mind to much:)
 
1.  I installed keypad locally to be close to the panel in case I ran into any issues...I will relocate this one to my garage entry door (where the old brinks one was located) and assigned it address 16.  Now when I hook up the other keypad in our master bedroom (also where the other existing brinks one was located) all I should have to do is assign it address 17 and it will automatically know the config of the alarm and I won't have to reprogram the zones on that one correct?
 
2.  When ever you are hooking up new contacts / keypads etc is it always a best practice to unplug the panel from AC and battery?  Just AC...?  Neither...?  When hooking up additional keypads I believe you just put them all together on the panel under screws 4,5,6,7 but wanted to make sure?
 
3.  I did not install the motion because it has 4 wires (red, black, white, and green) I believe.  I know the red goes to HI and black goes to Low on the zone screws...in my case zone 2 I have it slated for...but I do not know where the white and green wires go?  Also, I assume I would configure this zone once hooked up to be "NC" on the hard wire type just like I did the other doors and windows because the motion prob does not have a EOL resistor?
 
4.  I also need to do some reading and watching some installation vids on the whole installer code / master code stuff because that is really confusing for me.  I need or want to be able to do a few things:  Change installer code from 4112 800 so not just anyone could come in the house and mess with or attempt to configure the panel and two I need to change the default master code from 12341 to cancel out an alarm to something else so it's not the default code and something I create...so as you can imagine someone breaking in cannot just cancel out the alarm by putting in the default code.
 
5.  I also need to do some research to see how and where exactly (I assume I would mount right under the main panel board in the can) the EVL-3 self monitoring board.  And how all that hooks up....not real sure. 
 
I think that's it for now..but def making some progress...thanks for everyone's help..I am getting closer to get this up and operational.  I even programmed one of the quick function buttons last night (A, B, C, D) with Arm Away and once it was armed I opened the basement door and it worked like a charm.  I did not know how to arm on the keypad so I just reconfigured the quick function keys!


1. Yes, once you set the address and connect the second keypad, there is no need to re-enter the zone definitions.  The configuration information is stored in the panel, so you only enter it once.
 
2. It's always a good idea to be on the safe side and power everything down when making connections.  That includes unplugging the AC transformer and disconnecting the battery. 
 
There is a lot of energy stored in the battery, and it is capable of delivering hundreds of amps in an instant if it is shorted. The AC transformer is current limited, but the battery is not, making it more dangerous.
 
I like to disconnect the battery and either cover the terminals with the plastic shields that it was shipped with, or remove the battery from the panel until I'm finished working.
 
That said, there are lots of folks who will make a connection while things are powered up. I'll even admit to having done it myself. But is just isn't good practice.
 
All the keypad cables get wired together to the keypad terminals on the 20P.  It's easy to get 2 wires on a screw, but for more than 2 wires it is best to twist them together along with with a short pigtail wire using a small wire nut. Then connect the pigtail wire to the screw terminal.  Since you'll have the 2 keypads plus the EVL-3 to connect, that's the way to go.
 
3. You can connect the green and white wire from the motion detector to the zone inputs either way.  It has no polarity since it is just a relay contact.  It's a good idea to follow a convention about which wire you connect to the "Hi" and "Lo" terminals and be consistent from one device to another.  I like to connect green to the "Lo" terminal, since it is the ground reference and makes it easy for me to remember since in AC wiring, green is also ground. 
 
4. You definitely should change the installer code and master code at some point.  You change the installer code by changing System Setup Field *20.   To change the Master Code, you will need to enter the current Installer or Master code first.
 
The difference between the Installer code and Master code is that the installer code is used to configure the panel, while the master code is used to operate the panel (e.g. by the head of the household).  The master code has some authority, such as being able to add or change user codes, but can't change the basic configuration of the panel. The user codes are for other household members, guests and workers and can only arm/disarm the panel.
 
5. The EVL-3 can be mounted in the enclosure with the 20P if you have room.  It connects up just like a key pad to the same terminals on the 20P.
 
To arm the system without using a function key, you enter the security code and then press the number key that corresponds to the armed mode you want.  For example,  1234 followed by 2 would arm the system in Away mode, since the 2 key is also labeled as "Away."
 
I probably wouldn't pigtail the keypads. 3 conductors under the clamps isn't really a huge issue. The only difference would be the positive and negative connections, which are also the aux power of the panel. The key is to balance the conductors on each side of the cable clamps so the clamp doesn't rock.
 
I also probably wouldn't change the IC in this situation.....there's no further security being gained and the system has limited connectivity to the outside world. 
 
I'd leave the A-C keys on the keypad open and unused. They're also used as system panic alarms and D is the common macro button on the system. Then again, I always had monitored systems.
 
RAL said:
3. You can connect the green and white wire from the motion detector to the zone inputs either way.  It has no polarity since it is just a relay contact.  It's a good idea to follow a convention about which wire you connect to the "Hi" and "Lo" terminals and be consistent from one device to another.  I like to connect green to the "Lo" terminal, since it is the ground reference and makes it easy for me to remember since in AC wiring, green is also ground. 
Just so we are clear, the red and black wires would connect up to the same screw terminals as the keypads I believe 4 and 5 to get power.  Then the green to Lo and white to Hi (since green can also be negative in regards to AC wiring)?  If this is the case, it looks like I will have 4 wires on each screw terminal 4 and 5 (2 keypads, motion, and the EVL-3 (possibly even the smoke too....)?
RAL said:
5. The EVL-3 can be mounted in the enclosure with the 20P if you have room.  It connects up just like a key pad to the same terminals on the 20P.
I saw a video on mounting the EVL in the panel but it was for a DSC panel and the can had holes in the side where the white pop in screw things go in the side and the EVL attaches to it.  I don't see any holes on the side of my can to mount the EVL to.  Maybe I am missing something...which is very possible.
RAL said:
To arm the system without using a function key, you enter the security code and then press the number key that corresponds to the armed mode you want.  For example,  1234 followed by 2 would arm the system in Away mode, since the 2 key is also labeled as "Away."
Any idea what number key would give me an "instant on" affect instead of the away with the 60 second countdown....that way you don't have to wait for arming...basically happens immediately.
 
RAL said:
3. You can connect the green and white wire from the motion detector to the zone inputs either way.  It has no polarity since it is just a relay contact.  It's a good idea to follow a convention about which wire you connect to the "Hi" and "Lo" terminals and be consistent from one device to another.  I like to connect green to the "Lo" terminal, since it is the ground reference and makes it easy for me to remember since in AC wiring, green is also ground. 
Just so we are clear, the red and black wires would connect up to the same screw terminals as the keypads I believe 4 and 5 to get power.  Then the green to Lo and white to Hi (since green can also be negative in regards to AC wiring)?  If this is the case, it looks like I will have 4 wires on each screw terminal 4 and 5 (2 keypads, motion, and the EVL-3 (possibly even the smoke too....)?
RAL said:
5. The EVL-3 can be mounted in the enclosure with the 20P if you have room.  It connects up just like a key pad to the same terminals on the 20P.
I saw a video on mounting the EVL in the panel but it was for a DSC panel and the can had holes in the side where the white pop in screw things go in the side and the EVL attaches to it.  I don't see any holes on the side of my can to mount the EVL to.  Maybe I am missing something...which is very possible.
RAL said:
To arm the system without using a function key, you enter the security code and then press the number key that corresponds to the armed mode you want.  For example,  1234 followed by 2 would arm the system in Away mode, since the 2 key is also labeled as "Away."
Any idea what number key would give me an "instant on" affect instead of the away with the 60 second countdown....that way you don't have to wait for arming...basically happens immediately.
 
Back
Top