22/4 wire

I used 22/4 for motion, glass breaks, and keypads and 22/2 for window and door sensors in my friend's house. The only difference is I used "stranded" Belden wire instead of solid type you linked to (I hate solid wire). :D
 
BraveSirRobbin said:
I used 22/4 for motion, glass breaks, and keypads and 22/2 for window and door sensors in my friend's house. The only difference is I used "stranded" Belden wire instead of solid type you linked to (I hate solid wire). :D
Ah ok, I had an impression that sensors should be used with solid always. Since there are really sparse to NO stock on 22/4 solid right now, I will purchase 22/4 stranded instead. Right?

Thanks BSR.
 
Everyone has their own perference, but I prefer stranded over solid.

Stranded takes a little more time to install as you have to "twist" the strands together with your thumb and finger, and you have to make sure ALL the strands enter the terminal strip (so no stray strands will stick out and possibly short to something else).

But, take a look at the tight bend radius that will exist on my expander boards as (I believe) the boards stick out to far and the wires exit that board "straight out" instead of slanted as in the main board.

Solid wiring is a lot less forgiving to a sharp bend radius. Also, I looped my wiring so I can remove any board without taking off any wires. Stranded is also better suited for this as solid wire does not like to be bent many times.

In cases where I have to have more than two wires share a terminal block, I solder them together first to make insure no strands will be outside that block.

Anyways, this is of course just my opinion.

Shown below are is the Elk install I'm currently working on.

The only reason I am posting this is because I know a couple of our members are soon going to be doing their installs and just wanted to show them a glimpse of this setup.

One thing I did not like was that Elk did not put a lot of thinking into their spacing of their mounts and the overall box size. I like having all the major components of the security system inside a locked box.

I had a heck of a time getting two zone expanders, battery, DBHR Hub and yes of course the Elk itself mounted inside its supplied box.

The expansion boards could not be mounted on one vertical row (this was very annoying). I didn't want to mount them beside each other as you would never get to the terminal screws on one of the boards (yes, they are removeable, just didn't like this fact).

I finally wound up putting in the expansion boards to the left and right of the Elk and the data base hub near the main unit as shown below. I then just postioned the Elk so all would fit and be accessable, then I just redrilled mounting holes for them main unit so it would mount in that desired location.

This took a LOT of time and was a VERY annoying start of this project (grant it the plus 100 degree temps inside the house didn't help matters, but none the less, I wish more thought was put into the mechanical layout of this system.

Also, I remember someone who said they were going to use 18 gauge wire on an expansion board (did I remember this correctly). I would worry a little about how this wiring would "bend" from that expansion board when the door was closed.

Anyways, take the pics for what they are worth! Will try to finish up most of the wiring and apply power tomorrow.
 

Attachments

  • Elk1.jpg
    Elk1.jpg
    98.8 KB · Views: 191
Awesome jobs. Everytime I see a wiring like that, I don't want to continue this project anymore. LOL. I'm hoping guys that you're going to help me. :)
 
v1rtu0s1ty said:
Awesome jobs. Everytime I see a wiring like that, I don't want to continue this project anymore. LOL. I'm hoping guys that you're going to help me. :)
Hehe, what are you worried about?

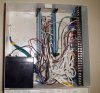
One thing I did was take this one step at a time. There are 45 different zones (including your doors, windows, glass breaks, motion detectors, washer/dryer monitor, air filter monitor, temp monitors, etc...), three keypads, three sirens, plus a couple relays and switches.

There was a post somewhere about monitoring the garage door and why to do it. My friend's family always has a problem in there house where they leave the garage door open at night. I put some LED's in the house indicating if the doors were open or closed.

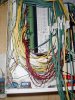
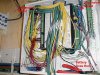
Anyways label everything. Nothing will drag you down better than when you go to terminate wiring in your box and you can't find that "kitchen motion sensor" and have to trace it out.

We had some labels fall off during the handling of the cables (especially getting it through conduit to the box. What a pain.

Also, I took things in steps and actually tested all of my magnetic sensors for the doors and windows, glass breaks, and motion sensors at the wiring inside the box when I installed them a long time ago (brought in a 12 volt DC power supply).

Make sure you have your channel listing and any special schematics on hand. I put mine in plastic sleeves so I could just tape them to the wall without them getting damaged.

Get in a comfortable position at the wiring box. I put some boards down to raise myself up about six inches. You are going to be there for a while.

I also had all of my manuals in a book for the motions, glass breaks, anything that was part of the install. This came in handy when I was deciding between powering items off of the Elk or the external power supply I purchased. I was able to quickly add up the current draw for each item (read off the manuals). Of course I should have done this before the install, but forgot :) .
 
One thing I did not like was that Elk did not put a lot of thinking into their spacing of their mounts and the overall box size. I like having all the major components of the security system inside a locked box.

I had a heck of a time getting two zone expanders, battery, DBHR Hub and yes of course the Elk itself mounted inside its supplied box.
I'm sorry, but I have to ask. So why did you use the supplied 14" box? Seems like it would have been alot easier with a larger box, or surface mount on the wood? I think you did a very admirable job but just curious why you didn't upgrade to a bigger, more flexible can? I don't think Elk anticipate someone putting that much into the standard can. That can I think was designed for your basic install, not the BSR special! :)
 
Steve said:
One thing I did not like was that Elk did not put a lot of thinking into their spacing of their mounts and the overall box size. I like having all the major components of the security system inside a locked box.

I had a heck of a time getting two zone expanders, battery, DBHR Hub and yes of course the Elk itself mounted inside its supplied box.
I'm sorry, but I have to ask. So why did you use the supplied 14" box? Seems like it would have been alot easier with a larger box, or surface mount on the wood? I think you did a very admirable job but just curious why you didn't upgrade to a bigger, more flexible can? I don't think Elk anticipate someone putting that much into the standard can. That can I think was designed for your basic install, not the BSR special! :)
I just browsed M1 at automated oultet and price is like $599. What can is included there, is it the larger one?
 
Steve said:
I'm sorry, but I have to ask. So why did you use the supplied 14" box? Seems like it would have been alot easier with a larger box, or surface mount on the wood? I think you did a very admirable job but just curious why you didn't upgrade to a bigger, more flexible can? I don't think Elk anticipate someone putting that much into the standard can. That can I think was designed for your basic install, not the BSR special! :)
I really don't think my install is that much above a "typical" install from the posts I've read here. I only have two zone expanders and a data hub. Notice also that I don't have any wireless modules (a lot of installs do).

It would have been nice if I would have taken the time to configure this before installing, but the way the wiring schedule and the later install went, I really didn't get a chance to do this (which is why I'm posting this for our members who will be installing their systems).

My main complaint is the two zone expanders could not be mounted in one vertical row. If some thought was placed into the PC board's mounts and the hole locations, this could easily have been accomplished and thus most of the problems would have been eliminated!

I've done a lot of component selection into I/O boxes and have also performed my own mechanical drawings as well as electrical drawings for these systems. You have to take the time and "scale" the components on a CAD package. That's all it would have taken.

I'm not "bashing" the Elk product as everyone knows here that I love their stuff. Rather I'm suggesting some obvious problems that can easily be overcome for a better overall package! :)

Take a look at my Caddx NX8e system pictured below. It's a lot more mature (been around a long time) but notice how the cards sit in relation to the battery location. Also note that their is room for more expansion cards (even with its battery in place). This system has a sixteen zone expansion card plus a relay output module (typical install).

Of course this is all just my opinion (but it's a good one! :) ).
 

Attachments

  • caddx.jpg
    caddx.jpg
    82.9 KB · Views: 108
You can't compare the Caddx to the M1, look how little room the Caddx board takes! For the record, I don't disagree that the Elk can can be optimized, just that with all those wires, etc a larger can would have given you a lot more breathing room. My sisters install will have less than that to start, but I put in a 50" can!
 
Steve said:
You can't compare the Caddx to the M1, look how little room the Caddx board takes! For the record, I don't disagree that the Elk can can be optimized, just that with all those wires, etc a larger can would have given you a lot more breathing room. My sisters install will have less than that to start, but I put in a 50" can!
Your missing the point :rolleyes: .

The Caddx box is also a lot smaller. I'm saying that the Caddx was a more mature system whose component layouts better matched the provided box.

Wire breathing room is also not an issue (I never felt cramped while wiring inside that box).
 
Back
Top