Pete's Blog HOW LIGHTNING WORKS and use of automation methodologies

Blog posts by pete_c

pete_c

Guru
Here since the 1990's always fascinated with Lightning. Used a 1-Wire lightning sensor back then with Homeseer 1. (late 1990's - early 2000's) Still have the sensor and it still works fine.

LD3-R2 Lightning Detector - How it works

connected to a Mideon Temp05/08

This blog is about Lightning and what sensors I use today. Last night had a storm pass through. Using text to speech notifications today for local lightning.

First a video called HOW LIGHTNING WORKS - Weird World of Lightning


Sometime in the 2000's found Blitzortung.org

Live Lightning

For Homeseer at the time used a custom PHP page to view lightning on my touchscreens.

Will post it here when I find it.

Integrate into your own website
 
Last edited:
Fast forward now to a post from Homeseer:

AS3935 Lightning Detector Sensor to MQTT - 2020 Version
September 9, 2020, 04:56 AM

This is a revisit of an old project that used an RPi a few years back.

Orginally tried to do this with Buster 64bit on the Pine64. Didn't work probably cuz the Buster 64bit libraries do not match or do not exist yet to the 32bit Buster libraries. When I used the 32 bit Buster on the RPi all worked well.

Trying this two ways. One is to connect to an RPI and the other is to use a XXX and Tasmota firmware.

Hardware and mod adds utilized:

1 - Rpi 2 with Buster 32 bit
2 - enable i2C via rasbi-config
3 - sudo apt install git python3 python3-pip python3-pigpio pigpio
4 - sudo git clone https://github.com/ironsheep/lightni...MQTT2HA-Daemon /opt/ISP-lightning-mqtt-daemon
5 - cd /opt/ISP-lightning-mqtt-daemon
6 - sudo pip3 install -r requirements.txt

2 - GY-AS3935 AS3935 Lightning Detector Sensor Thunder Storm Warning Distance Detection Module for Arduino Raspberry Pi Weather Station(Max 40km)- Amazon

Pins from Lightning detector module to RPI
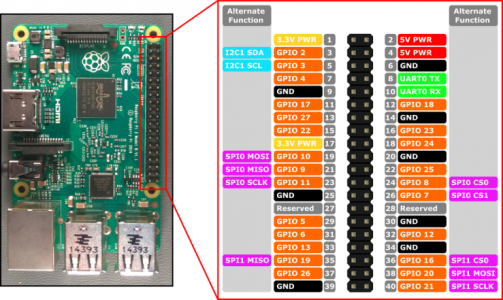
1692436878847.png

AS3935 Lightning Detector Sensor to RPi wiring

This wiring part to the AS3935 Lightning sensor is missing in the original discussion here:

Lightning detector to MQTT2HA daemon.

Guessing author guesses that all of the lightning sensors are made the same way and wired the same way.

So referencing this page for my wiring of my Amazon purchased GY-AS3935 Board
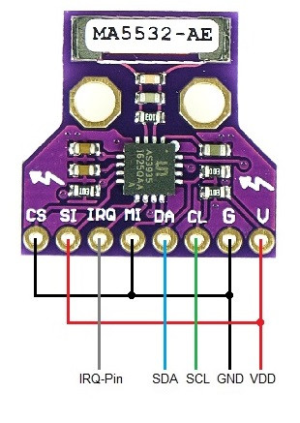
1692436963491.png
And connecting the above to the RPi using authors wiring schema to RPi.
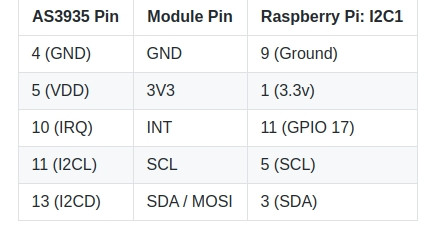
1692437047473.png

I almost returned my Amazon purchased GY-AS3935 Board thinking it was defective until I wired it correctly this morning after tinkering with it for 2 days and wondering why it wasn't working.

Testing it now and see the AS3935 Lightning sensor.

Code:
ICS-Lightning:~# sudo i2cdetect -y 1

0 1 2 3 4 5 6 7 8 9 a b c d e f
00: 03 -- -- -- -- -- -- -- -- -- -- -- --
10: -- -- -- -- -- -- -- -- -- -- -- -- -- -- -- --
20: -- -- -- -- -- -- -- -- -- -- -- -- -- -- -- --
30: -- -- -- -- -- -- -- -- -- -- -- -- -- -- -- --
40: -- -- -- -- -- -- -- -- -- -- -- -- -- -- -- --
50: -- -- -- -- -- -- -- -- -- -- -- -- -- -- -- --
60: -- -- -- -- -- -- -- -- -- -- -- -- -- -- -- --
70: -- -- -- -- -- -- -- --

Code:
ICS-Lightning:~# python3 /opt/ISP-lightning-mqtt-daemon/ISP-lightning-mqtt-daemon.py
[2020-09-16 08:19:38] - * init mqtt_client_connected=[False]
[2020-09-16 08:19:38] * Sensor on I2C bus
[2020-09-16 08:19:38] - log: Sending CONNECT (u0, p0, wr1, wq0, wf1, c1, k60) client_id=b''
[2020-09-16 08:19:38] - log: Sending PUBLISH (d0, q0, r0, m1), 'b'home/nodes/sensor/lightningdetector/status'', ... (6 bytes)
[2020-09-16 08:19:38] - * Wait on mqtt_client_connected=[False]
[2020-09-16 08:19:38] - log: Received CONNACK (0, 0)
[2020-09-16 08:19:38] MQTT connection established
[2020-09-16 08:19:38]
[2020-09-16 08:19:38] - on_connect() mqtt_client_connected=[True]
[2020-09-16 08:19:39] - - stopped MQTT timer
[2020-09-16 08:19:39] - - started MQTT timer - every 60 seconds
[2020-09-16 08:19:39] - - ip=[192.168.244.165], mac[b8:27:eb:d2:c0:51], interface=[eth0], uniq-id=[AS3935-b827ebd2c051]
[2020-09-16 08:19:39] Announcing Lightning Detection device to MQTT broker for auto-discovery ...
[2020-09-16 08:19:39] - log: Sending PUBLISH (d0, q1, r1, m2), 'b'homeassistant/sensor/lightningdetector/last/config'', ... (539 bytes)
[2020-09-16 08:19:39] - log: Sending PUBLISH (d0, q1, r1, m3), 'b'homeassistant/sensor/lightningdetector/energy/config'', ... (301 bytes)
[2020-09-16 08:19:39] - log: Sending PUBLISH (d0, q1, r1, m4), 'b'homeassistant/sensor/lightningdetector/distance/config'', ... (336 bytes)
[2020-09-16 08:19:39] - log: Received PUBACK (Mid: 2)
[2020-09-16 08:19:39] - log: Received PUBACK (Mid: 3)
[2020-09-16 08:19:39] - log: Sending PUBLISH (d0, q1, r1, m5), 'b'homeassistant/sensor/lightningdetector/count/config'', ... (298 bytes)
[2020-09-16 08:19:39] - log: Sending PUBLISH (d0, q1, r1, m6), 'b'homeassistant/sensor/lightningdetector/settings/config'', ... (418 bytes)
[2020-09-16 08:19:39] - log: Sending PUBLISH (d0, q1, r1, m7), 'b'homeassistant/sensor/lightningdetector/crings/config'', ... (406 bytes)
[2020-09-16 08:19:39] - log: Received PUBACK (Mid: 4)
[2020-09-16 08:19:39] - log: Received PUBACK (Mid: 5)
[2020-09-16 08:19:39] - log: Sending PUBLISH (d0, q1, r1, m8), 'b'homeassistant/sensor/lightningdetector/prings/config'', ... (403 bytes)
[2020-09-16 08:19:39] - log: Received PUBACK (Mid: 6)
[2020-09-16 08:19:39] - log: Received PUBACK (Mid: 7)
[2020-09-16 08:19:39] - log: Received PUBACK (Mid: 8)
[2020-09-16 08:19:39] - - Testing AS3935 Communications...
[2020-09-16 08:19:39] - - TEST write=5, read-back=5
[2020-09-16 08:19:39] - - TEST write=2, read-back=2
[2020-09-16 08:19:39] Publishing to MQTT topic "home/nodes/sensor/lightningdetector/settings, Data:{"settings": {"timestamp": "2020-09-16T08:19:39-05:00", "hardware": {"min_strikes": 5, "afe_inside": true, "disp_lco": false, "noise_floor": 1}, "script": {"period_minutes": 5, "end_minutes": 30, "number_rings": 5, "distance_units": "km"}}}"
[2020-09-16 08:19:39] - log: Sending PUBLISH (d0, q1, r0, m9), 'b'home/nodes/sensor/lightningdetector/settings'', ... (240 bytes)
[2020-09-16 08:19:39] - log: Received PUBACK (Mid: 9)
[2020-09-16 08:19:39] << INTR(17) >> Noise level too high - adjusting

Code:
ICS-Lightning:~# python3 /opt/ISP-lightning-mqtt-daemon/ISP-lightning-mqtt-daemon.py --calc_tuning_cap
[2020-09-16 08:26:12] * Mode: Calculate Tuning Cap value and exit
[2020-09-16 08:26:12] - * init mqtt_client_connected=[False]
[2020-09-16 08:26:12] * Sensor on I2C bus
[2020-09-16 08:26:12] - - ip=[192.168.244.165], mac[b8:27:eb:d2:c0:51], interface=[eth0], uniq-id=[AS3935-b827ebd2c051]
[2020-09-16 08:26:12] - - Testing AS3935 Communications...
[2020-09-16 08:26:12] - - TEST write=5, read-back=5
[2020-09-16 08:26:12] - - TEST write=2, read-back=2
* Please allow a long time for this function to stop. It should take a little over 3 minutes to test the 16 values
For tuning 0x0: average frequency of 351817.047007 Hz (diff: +9261.4)
For tuning 0x1: average frequency of 364055.514169 Hz (diff: +8496.5)
For tuning 0x2: average frequency of 367525.060691 Hz (diff: +8279.7)
For tuning 0x3: average frequency of 350404.798561 Hz (diff: +9349.7)
For tuning 0x4: average frequency of 370185.383957 Hz (diff: +8113.4)
For tuning 0x5: average frequency of 358331.860467 Hz (diff: +8854.3)
For tuning 0x6: average frequency of 361992.328115 Hz (diff: +8625.5)
For tuning 0x7: average frequency of 349564.880004 Hz (diff: +9402.2)
For tuning 0x8: average frequency of 370973.106840 Hz (diff: +8064.2)
For tuning 0x9: average frequency of 344442.531351 Hz (diff: +9722.3)
For tuning 0xa: average frequency of 376547.161107 Hz (diff: +7715.8)
For tuning 0xb: average frequency of 405590.304774 Hz (diff: +5900.6)
For tuning 0xc: average frequency of 353628.876312 Hz (diff: +9148.2)
For tuning 0xd: average frequency of 423530.487778 Hz (diff: +4779.3)
For tuning 0xe: average frequency of 396381.250568 Hz (diff: +6476.2)
For tuning 0xf: average frequency of 398582.262969 Hz (diff: +6338.6)
- Your best tuning capacitor value is 0xd: which is off by +4779.3
root@ICS-Lightning:~#

Now adding capacitor value of 0xd in config.ini file

# Value to use for your board
# Internal Tuning Capacitors (from 0 to 120pF in steps of 8pf) - A value of [0-15]
# run the script with a --tune paramater to determine value for your board
# NOTE: this runs for 3 minutes so be patient! Then record your best value here.
tuning_capacitor = 0xd

Configuring the daemons to auto start on boot:

1 - NOTE: Daemon mode must be enabled in the configuration file (default).

By default the isp-lightning.service file indicates that the script should be run as user:group daemon:daemon. As this script requires access to i2c and gpio you'll want to add access to them for the daemon user as follows:

# list current groups
groups daemon
$ daemon : daemon

# add i2c, gpio if not present
sudo usermod daemon -a -G i2c,gpio

# list current groups
groups daemon
$ daemon : daemon i2c gpio

sudo ln -s /opt/ISP-lightning-mqtt-daemon/isp-lightning.service /etc/systemd/system/isp-lightning.service

sudo systemctl daemon-reload

# configure services so they start on reboot
sudo systemctl enable pigpiod.service
sudo systemctl enable isp-lightning.service

# start services now
sudo systemctl start pigpiod.service
sudo systemctl start isp-lightning.service


# see if services are running (ensure no start errors)
sudo systemctl start pigpiod.service
sudo systemctl status isp-lightning.service

reboot

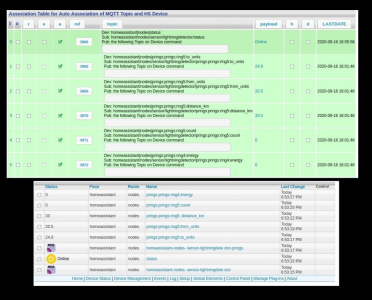
Check MQTT status via MQTT explorer

1692437369593.png
2 - add to Home Assistant Lovelace cards
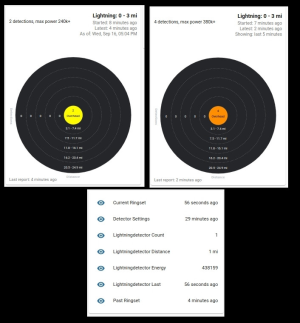
1692437419700.png

3 - Add to Homeseer mcsMQTT

1692437455639.png

4 - Text to speech via SAPI and via Alexa devices
5 - extend sensor using a pvc tube and round plastic ball for mounting RPi/ POe sensor in attic.
 
AS3935 Lightning Detector Sensor to MQTT - 2023 Version
August 9, 2020, 04:33 AM

Reference:
Tasmota AS3935 Franklin Lightning sensor

AS3935 Franklin Lightning sensor~
This feature is included only in tasmota-sensors and tasmota32 binaries
The AS3935 is a programmable fully integrated Lightning Sensor IC that detects the presence and approach of potentially hazardous lightning activity in the vicinity and provides an estimation on the distance to the head of the storm. The embedded lightning algorithm checks the incoming signal pattern to reject the potential man-made disturbers.

Tasmota driver includes:

support for all AS3935 Parameters
support of all related commands for configuration
support of NF-Auto Function to auto Threshold the Noise Reduction
support of Auto Disturber
support of calibrating the internal OSC with switchable Caps

Wiring~
AS3935 ESP
GND GND
VCC 3.3V
SDA GPIOx
SCL GPIOy
IRQ GPIOz

Tasmota Settings~
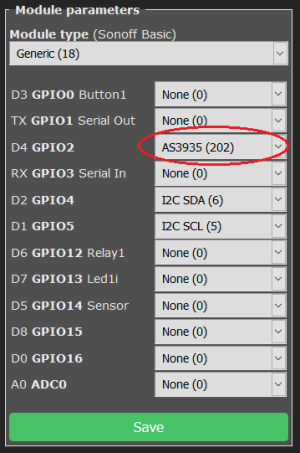
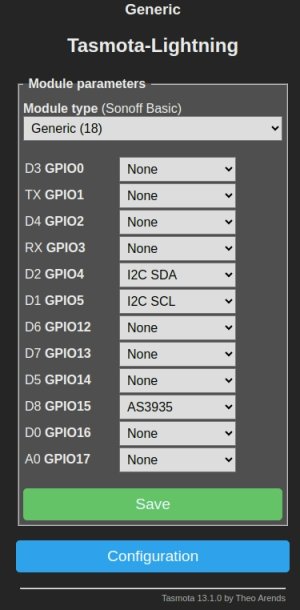
In the Configuration -> Configure Module page assign:

GPIOx to I2C SDA
GPIOy to I2C SCL
GPIOz to AS3935

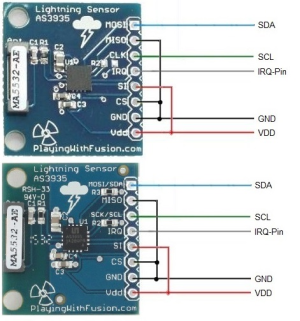
You will need to wire up all of the associated pins for the different boards.
  • Always connect CS and MISO to GND.
  • If "SI" is present, you need to connect to VCC.
See some wiring on the Board pictures below. I2C wiring

1692437959341.png

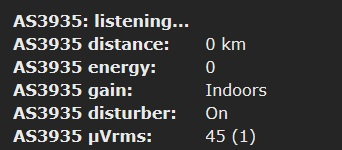
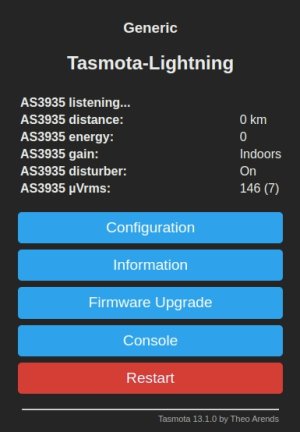
After a reboot the driver will detect AS3935 automatically.

1692438001010.png

and in MQTT topic when an Event occurs:
Code:
{"Time":"2020-01-01T17:07:07","AS3935":{"Event":4,"Distance":12,"Energy":58622,"Stage":1}}

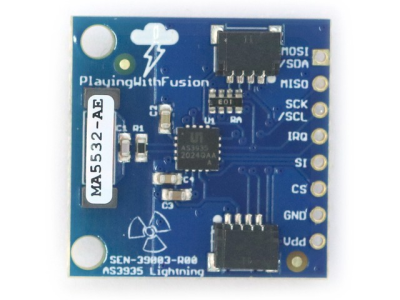
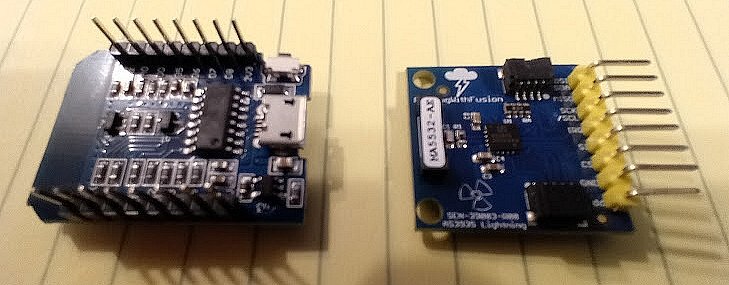
Playingwithfusion board:
1692438109510.png
 
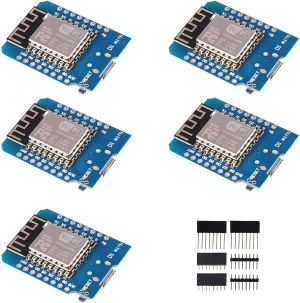
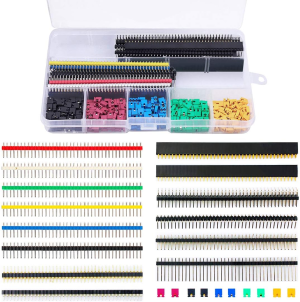
Hardware used or purchased for Tasmota AS3935 Lightning Detector Sensor

1 - Playing with Fusion Qwiic Digital Lightning Sensor AS3935 SPI and I2C Breakout Kit $24.95 plus shipping
1693489194733.png
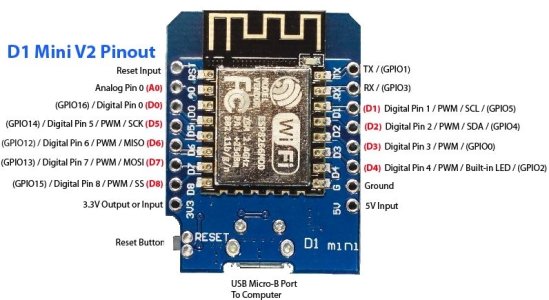
2 - ACEIRMC ESP8266 ESP-12 ESP-12F NodeMcu Mini D1 Module for WeMos Lua 4M Bytes WLAN WiFi Internet Development Board Base on ESP8266 ESP-12F for Arduino,Compatible with WeMos D1 Mini (5pcs) - Amazon $14.99 (using these for a few projects now)

1693489389863.png
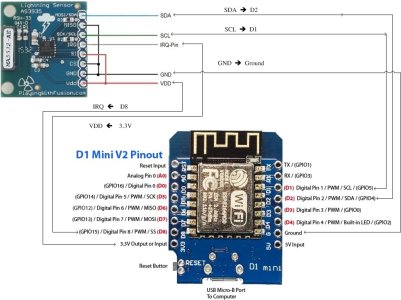
ESP8266-D1-Mini-Pinout.jpg
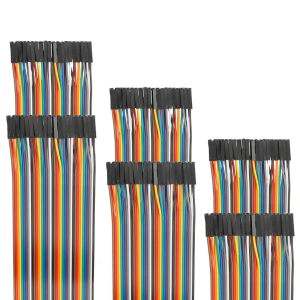
3 - WayinTop Pin Headers Socket Connectors and Jumper Caps Assortment Kit, 300pcs 2.54mm Computer Jumper Caps + 35pcs PCB Board 40Pin Straight/Right Angle/Round Single/Double Row Male Female Pin Headers - Amazon $13.99 - previously purchased for projects
1693490072066.png

4 - EDGELEC 120pcs 50cm Dupont Wire Female to Female Breadboard Jumper Wires 19.7 inch 1pin-1pin 2.54mm Connector Multicolored Ribbon Cables DIY Wires Length 10 15 20 30 40 50 100cm Optional - Amazon -$13.99
1693490266509.png

5 - Ferrit clamp filter
 
Last edited:
Assembly - Soldering - Wiring
NOTE: used D8 (GPIO15) instead of D4 (GPIO4)

Lightning-AS3935-Tasmota-WemoD1.jpglightning3.jpg
lightning4.jpg
 
Last edited:
Here is a TTS script that I use with Blitzortung Home Assistant add on.

NOTE: Blitzortung creates 3 sensors. Lightning Azimuth, Lightning Counter and Lightning Distance

Code:
alias: "Notification: Lightning Strike"
description: ""
trigger:
  - platform: state
    entity_id:
      - sensor.blitzortung_tp_lightning_counter
    not_from:
      - unknown
      - unavailable
    not_to: "0"
condition:
  - condition: template
    value_template: |2-
        {{ as_timestamp(now()) - as_timestamp(state_attr(this.entity_id,
          'last_triggered')) | int(0) > 60 }}
action:
  - service: notify.alexa_media_ics_echodot1
    data:
      message: >-
        '"Attention! A lightning strike has been detected {{      
        states('sensor.blitzortung_tp_lightning_distance') }} miles from
        your         location."'
mode: single
 
10th of September, 2023
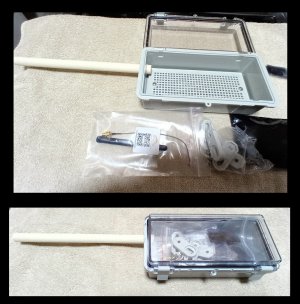
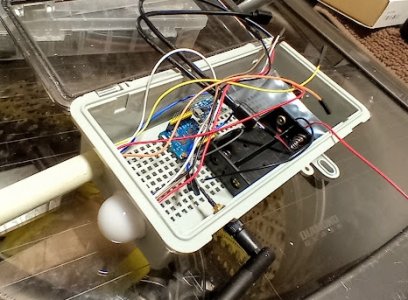
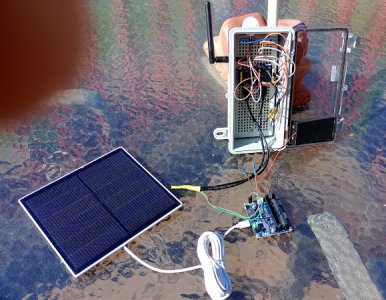
Exterior mounting with outdoor case and solar charger.

Hardware:
1 - outdoor case
AIRTAK Electrical Waterproof Custom Junction Box, Outdoor Hinged Clear Cover Stainless Steel Buckles, Plastic Enclosure Weatherproof Box with Mounting Plate and Wall Bracket IP67 Case 200×100×70mm $13.50 on Amazon
2 - Wemo D1 Mini battery shield -
Comimark 3Pcs Battery Shield for WeMos D1 Mini Single Lithium Battery Charging & Boost
Brand: Comimark $8.99 on Amazon
3 - Battery - KBT 3.7V 3500mAh Li-Polymer Battery: 933871 Lipo Rechargeable Lithium-ion Replacement Batteries with PH 2.54 JST Connector, PH1.25/2.0 JST Connector for Replacement $15.99 on Amazon
4 - Wemos D1 mini with antenna
Mayata WEMOS D1 Mini Pro 4MB/16MB External Antenna Connector NodeMCU Based esp8266 Series Antenna ESP-8266EX CP2104 Development Board (Development Board + Antenna 128MBIT=16MB) $17.99 on Amazon
5 - small project box that fill sit on top of plastic PVC tube - LeMotech Electrical Box ABS Plastic Project Box IP65 Waterproof Junction Box Project Case Universal Enclosure for Electronics Black 2.48x 2.28x 1.37 inch(63x58x35mm)(Pack of 2) $8.99 on Amazon
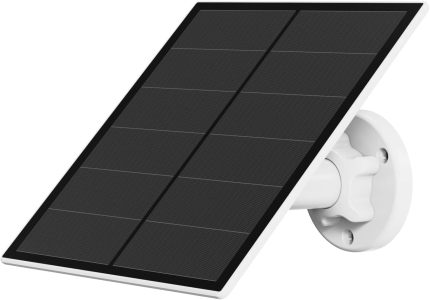
6 - Solar panel - 5W Solar Panel for Security Camera, USB Solar Panel for DC 5V Outdoor Rechargeable Battery Camera, Solar Panels with Micro USB and USB-C Port, Adjustable Security Mount, IP65 Waterproof, 9.8ft Cable $19.99 on Amazon
1694988703759.png
7 - mount for weather mast - BeElion Universal Stainless Steel Vertical Pole Mount Adapter with 2 Loops, Wall Mounting Bracket for CCTV Security Camera PTZ Dome $7.99 on Amazon

Initial build - going slow - (concurrently it's Kika (parrot) clean up day (every FRI)) and doing new tape taping and mud on new wall in garage.
Extending lightning / light sensor from main project box.

LightningOutdoor-1.jpg
14th of September, 2023
Testing hardware with battery shield, battery and external wifi antenna. Tested charged battery which gives me 3 days.
 
Last edited:
21st of September, 2023

Mounted external WiFi antenna on box and connected solar panel charger to Wemos charger / battery shield.

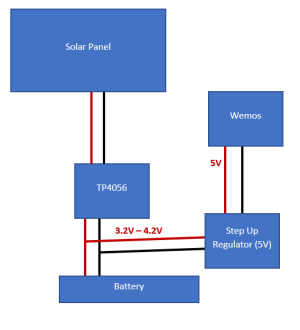
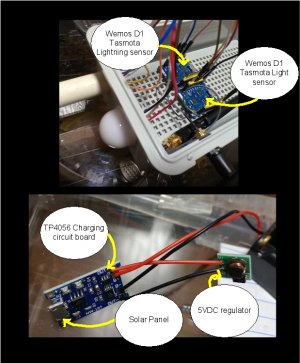
Noticed when I plug in solar panel power goes off to the Wemos D1. Redesigning circuit for charging battery so that it looks like this:

Hardware ordered:
1 - TP4056
2 - Step up regulator.

Removing shield.

1695329113992.png

Working on part 2 of said endeavor adding a light sensor to case.

23rd of September, 2023
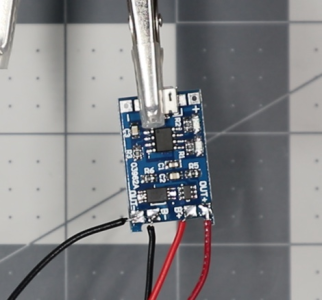
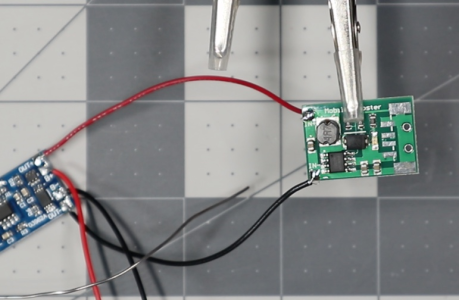
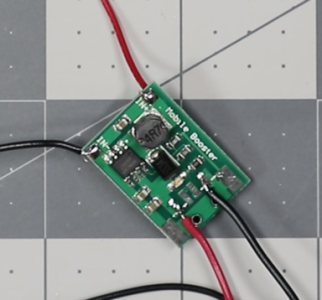
  • Received TP4096 and Step up regulator - soldering these pieces together today
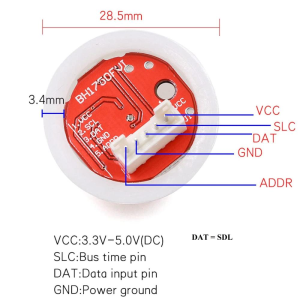
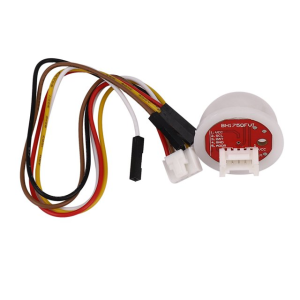
  • testing BH1750 light sensor connectivity to same said Wemos D1 using two GPIOS. Not sure if it will show up.
BH1750 ambient light sensor

Did not work. So using two Wemos D1 devices in box now. One for Lightning and the other for a light sensor.

Reconfiguring battery / solar charging power supply as mentioned earlier.

Power Your Projects With a Built-In Lithium Battery and a TP4056 Charger
1695484469707.png1695484498916.png1695484538520.png

Drilled a small hole and glued BH1750 to top of outdoor project box. Clamped it and letting glue dry.
Back to working on garage wall / storage (side project). Here is the pinout for the BH1750. Note the connectivity to the Wemo D1.

1695684390515.png1695486587843.png
 
Last edited:
25th of September, 2023

Removed all hardware from outdoor project case such that I can drill holes et al. IE: now implementing lightning sensor, light sensor and temperature sensor and new battery - power supply - solar panel for two Wemos D1's each with its own outdoor antenna and switching from using the Wemos D1 battery shield to the separate TP4096 and step up regulator to drive two of the Wemos D1 devices.

combo.jpg

WemosD1 Mini's X 2 ==> Step up regulator with two micro USB connectors ==> TP4096 with new batteries and solar panel trickle charger.

Received second WemosD1 mini today with antenna connector. Configured and tested it with light sensor and working.

Now may be adding another lightning sensor. This one just counts up to 500 strikes per second sort of like the old 1-wire lightning counter.

This one would be connected to another WemosD1 and just using it as a counter.

 
Last edited:
27th of September, 2023
Ordered a WiFi antenna coupler such that I can combine both WemoD1's antennas to one.
Soldered the TP-4056 charging circuit board to 5VDC voltage regulator. Note: The "el cheapo battery shield clone" micro USB port fell off probably due to a cold solder joint. It did charge the battery just fine. The newly soldered charging circuit board and up converter will be supplying power to two WemosD1's now with the solar panel. Not sure yet if this is going to work.

Also purchased a 12VDC to 5VDC automotive style bucky transformer which I use today for automobile and microfirewall in OP2 panel.

5vdc power ==> TP-4056 (connected to rechargable batteries) ==> 5vdc voltage regulator ==> two micro USB to two Wemos D1's

combo2.jpg

30th of September, 2023

Tested the new charger board trickle charging 2 18650 Li-ion batteries. Works great. Output at 5vdc voltage regulator remained at 5vdc.
Thinking of gluing the two tiny boards on the battery pack.
 
Last edited:
3rd of October, 2023
Relating to the new charger board / regulator set up. While it works it suffers from a brownout when both charging the batteries and drawing 5vdc for powering up the two Wemos D1's.

Purchased another power management module for solar charging batteries.

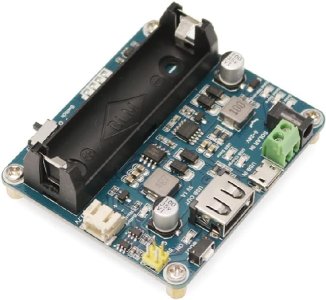
Waveshare Solar Power Management Module for 6V~24V Solar Panel Supports Solar Panel/USB Connection Battery Charging Onboard MPPT Set Switch

Solar power manager

This one has indicators for battery voltage and charging voltage. Using the 5VDC output it works powering two Wemos D1's (one lightning board and one illuminance board). Desolding single battery socket as it is not being utilized. All fits fine in outdoor project case.

charging module.jpg

Connected the 5VDC output to two micro USB connectors here and using two 9900mAh18650 Rechargeable Batteries which are3.7V Li-ion18650. Put everything outside today to test.

Getting a decent WiFi signal outside of (92%, -54 dBm) 11n

OutsideTest.jpg

5th of October, 2023

Noticed I made an error in my rechargeable batteries. The battery pack is in series which is 7.4VDC and will not charge that way. Rewired it to 3.7VDC and now charging fine. Redoing my testing here to see if the solar panel trickle charges the 3.7 VDC battery and continues to supply the 5VDC voltage required for the two Wemos D1's.

Also noticed that I purchased fake 18650 batteries from Amazon rated at 9000mAH which do not exist. Amazon has been sued for selling these fake batteries in 2021. (https://www.classaction.org/news/am...ngerous-defective-lithium-ion-18650-batteries)
 
Last edited:
9th of October, 2023

Built a new battery pack with two 18650 cells to provide 3.7 VDC / 4400mAH. Tested it in my concoction with the batteries fully charged and it did not last as long as my smaller 3.7 VDC 3500mAH pack.

Testing concatenation outside noticed that originally purchased 5w solar panel works but doesn't provide enough juice to charge the battery pack to full capacity. Ordered a 10w solar panel and giving that a try to charge new battery pack. Received 10 W solar panel.

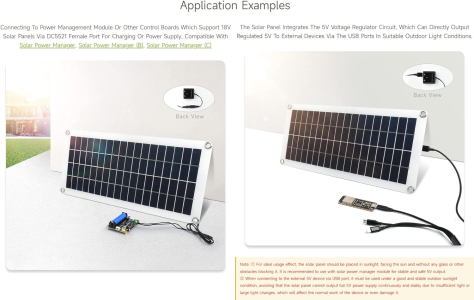
Waveshare Semi-Flexible Polycrystalline Silicon Solar Panel (18V 10W), Supports 5V Regulated Output

1696908994087.png
Will test and may upgrade to a 25 watt solar panel with a 6600mAH 3.7VDC battery pack.
 
Last edited:
Back
Top