Is this an acceptable practice to do? My HAI OmniPro II enclosure only has two 1/2" knockouts on the top and bottom. This time around I'm mounting the enclosure to plywood and would like the cables to come in from the top. I was thinking about drilling it out to 1 1/2" and installing a bushing. I'm trying to avoid drilling a hole in the plywood and having to route the wires through an insulated wall through the enclosure back holes. My other thought was to space the enclosure off the plywood with 1"x4" wood and run the cables behind through the built in back holes. I just don't think this would look professional.
You are using an out of date browser. It may not display this or other websites correctly.
You should upgrade or use an alternative browser.
You should upgrade or use an alternative browser.
Drilling holes for knockouts in an enclosure
- Thread starter rsw686
- Start date
pete_c
Guru
Is this an acceptable practice to do?
I am guessing as long as the edges are clean (with the bushings) it'll work. I have not ever done this before with the Leviton or OPII cans / insulation.
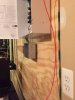
Here I mounted the OmniPro 2 enclosure on plywood taking the knockouts in the back off before mounting it, drilling the holes in to the plywood and feeding the cabling from to top and behind the plywood. It provided me with more room inside of the panel having the LV wires coming from the two knockouts right below the Omni-pro 2 boards. The wall behind the plywood though is not insulated and is cement.
I did the same for the 42" Leviton panel next to the OmniPro 2.
I am guessing as long as the edges are clean (with the bushings) it'll work. I have not ever done this before with the Leviton or OPII cans / insulation.
Here I mounted the OmniPro 2 enclosure on plywood taking the knockouts in the back off before mounting it, drilling the holes in to the plywood and feeding the cabling from to top and behind the plywood. It provided me with more room inside of the panel having the LV wires coming from the two knockouts right below the Omni-pro 2 boards. The wall behind the plywood though is not insulated and is cement.
I did the same for the 42" Leviton panel next to the OmniPro 2.
Desert_AIP
Senior Member
My understanding, electricians drill holes wherever they need to.
Fitted with the proper entrance fitting to prevent chafing, etc.
Fitted with the proper entrance fitting to prevent chafing, etc.
pete_c your right I would have more room to work and could leave slack on the cables if I drill the plywood and route the wires behind. This would be easier if I had all the wires run, but I'm doing the doors and motions one at a time. For the main level windows I'm just going to go wireless.
Right now I just want to get the OmniPro II, the System Sensor i4 module, and a keypad operational. My house only had 3 smoke alarms so I installed 8 smoke detectors and it would be great if they were functional.
I just need to figure out how I want to lay out all these components on the plywood. I have the OmniPro, GE wireless module, ZigBee module, System Sensor i4 module, and RadioRA 2 controller. I tend to over think this stuff and should probably just screw the stuff on the plywood and move on.
If you need a large hole for an electrical fitting (e.g. 1-1/2"), the right way to do it is with a knockout punch tool. A poor way of cutting the hole is with a hole saw, which often makes a mess of things.
Good punches, such as Greenlee, are expensive, but will last a long time. You can also buy some less expensive ones that will be good for punching just a few holes before they get dull.
Good punches, such as Greenlee, are expensive, but will last a long time. You can also buy some less expensive ones that will be good for punching just a few holes before they get dull.
pete_c
Guru
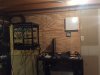
Here I went to either side of the fuse panel. The plywood is level with the fuse panel knockouts. I did the grounding and electrical stuff first. There is around 12" plus of space on either side of the panel. Here have a commercial style surge protection (with monitoring), Volp's TW-523 device, UPB repeater, et al. Local HV comes out via conduit from the bottom of the panel. Rest of the house HV comes off the top of the panel. I made many assumptions and needed to expand beyond. My guess is that if you are not running all of the cables now then make provisions to do so either with chases or from the top as you mention as once the panel / can is mounted and has a few wires going to it you will not be moving it again. Most difficult was installing conduit and running new HV wires as this stuff has never been moved. I did add more HV lighting in the whole section for servicing all of the utility stuff. I did the same helping a friend with his new home before it was finished. IE: redid a bit the service electrical section (well it was a room with cement walls). Initially running more circuits from the fuse panel, adding lighting to turn it day light like if necessary, outlets and more switches. Did all of this way before mounting a Leviton 42" panel. All of the LV cabling was left near the ceiling (9 feet so it was way out of the way then).
2nd set up is compact in a small wiring closet. It is just stacked cans. HAI on top and Leviton on bottom of one wall in a closet. All LV wires come from the attic in to the wall and directly in to the cans from the wall. It is not close or adjacent to the fuse panel. You do not see any wires. I prebuilt a landing over the com closet in the attic as almost all of the LV cabling is coming from the attic.
The two set ups are totally different. One started in an unfinished basement utility room section in a two story home where as the other was prewired in a closet within a closet in an elevated ranch style home.
RAL said:If you need a large hole for an electrical fitting (e.g. 1-1/2"), the right way to do it is with a knockout punch tool. A poor way of cutting the hole is with a hole saw, which often makes a mess of things.
Good punches, such as Greenlee, are expensive, but will last a long time. You can also buy some less expensive ones that will be good for punching just a few holes before they get dull.
I figured there was a tool to do this the right way. Not sure its worth the expense for a one time thing. Thanks for the info!
pete_c said:Here I went to either side of the fuse panel. The plywood is level with the fuse panel knockouts. I did the grounding and electrical stuff first. There is around 12" plus of space on either side of the panel. Here have a commercial style surge protection (with monitoring), Volp's TW-523 device, UPB repeater, et al. Local HV comes out via conduit from the bottom of the panel. Rest of the house HV comes off the top of the panel. I made many assumptions and needed to expand beyond. My guess is that if you are not running all of the cables now then make provisions to do so either with chases or from the top as you mention as once the panel / can is mounted and has a few wires going to it you will not be moving it again. Most difficult was installing conduit and running new HV wires as this stuff has never been moved. I did add more HV lighting in the whole section for servicing all of the utility stuff. I did the same helping a friend with his new home before it was finished. IE: redid a bit the service electrical section (well it was a room with cement walls). Initially running more circuits from the fuse panel, adding lighting to turn it day light like if necessary, outlets and more switches. Did all of this way before mounting a Leviton 42" panel. All of the LV cabling was left near the ceiling (9 feet so it was way out of the way then).
2nd set up is compact in a small wiring closet. It is just stacked cans. HAI on top and Leviton on bottom of one wall in a closet. All LV wires come from the attic in to the wall and directly in to the cans from the wall. It is not close or adjacent to the fuse panel. You do not see any wires. I prebuilt a landing over the com closet in the attic as almost all of the LV cabling is coming from the attic.
The two set ups are totally different. One started in an unfinished basement utility room section in a two story home where as the other was prewired in a closet within a closet in an elevated ranch style home.
My setup is going in an unfinished basement of a two story house. The breaker panel is in the garage, with the wires running across the roof rafters and into the house at the second story level. A bit strange and it makes it hard to pull new circuits. Luckily they ran four circuits to use for finishing the basement. I am a bit annoyed that they are multiwire circuits. Basically the ran 12/3 to the first two pull lights on either side. Then ran 14/2 off these to the rest coming off the black wire. The red wire is unused and they installed four 15A breakers in the panel. I'm using one of the red wires to install 12/2 to a dedicated outlet for the security / automation. I'll leave the 15A breaker for now, but could always upgrade to 20A down the road. I was surprised to find one of the multiwire circuits had the breakers on the same phase so 0V between the black and the red instead of 220V. Not sure if the previous owner rearranged the breakers or if this was just an oversight on the original install. Either way its fixed now.
The basement has a utility closet with HVAC, water heater, and well pressure tank. There isn't much additional room in this closet so I'm designating another section of the basement for the low voltage. The previous security system was in this closet, but all the wires were cut when the previous owner swapped out the doors and windows. I've removed all that cabling, the cat3 phone daisy chain mess, and the old coax. I've already run 32 drops of ethernet and 7 coax and have a wall mounted rack on the left side of a 4x7' sheet of plywood. The security panel and other modules are going on the right side of this. I have wires run for the smokes, a keypad, and one door sensor. The smoke detectors are all installed. Just need to mount the panel tonight and connect the wires.
pete_c
Guru
The basement has a utility closet with HVAC, water heater, and well pressure tank. There isn't much additional room in this closet so I'm designating another section of the basement for the low voltage. The previous security system was in this closet, but all the wires were cut when the previous owner swapped out the doors and windows. I've removed all that cabling, the cat3 phone daisy chain mess, and the old coax. I've already run 32 drops of ethernet and 7 coax and have a wall mounted rack on the left side of a 4x7' sheet of plywood. The security panel and other modules are going on the right side of this. I have wires run for the smokes, a keypad, and one door sensor. The smoke detectors are all installed. Just need to mount the panel tonight and connect the wires.
Well then you are doing fine. Baby steps now. Take your time while concurrently sticking to your schedule.
I would add chases just in case you want adds next year to your currently run LV cables.
Here in the two story and post build LV wiring stuff did it over 2-3 years while in a new home pre wire did it all in 2-3 days.
I did separate the wiring "closet" from the server room and have separate LV and electrical (separate circuits) in both sections in the two story basement. In the server section their is a subsection just for audio with patch panel cat5e and audio cables which go to every room in the house (literally). In the wiring closet section there is a sub section for RG6 as I wired for satellite (and used two satellite services plus OTA plus cable at one time) and RG6 cable (some X4) going everywhere here. There are some almost or over 100 wired ethernet devices today on managed and unmanaged Gb switches. (well and POE stuff). I did or do still a lot of catxx to RS-232 stuff. IE: originally my irrigation was serially controlled and the wire was on the other side of the house. I went here with an arm based CPU / OS that runs autonomously from the mother ship or from the mother ship if that makes sense? I had a GPS antenna on the roof and went to the attic with a GPS with PPS with a serial wire running to the basement (two floors down). That and doing other satellite stuff from inside of the attic today which works fine considering the antennas are in the attic. IE: not in to wireless automation today but do play much with radio stuff....I use one main wireless AP and have some 10 that I play with.
Helping a friend a couple of years back in a large 2 story we did all of the LV wiring before the walls were finished and built out the com closet way before they moved in to the house (which really was just another house on the farm and it did take some 3 years to finish). The fuse panel there was in the garage which was next to the laundry room and over or near the new com closet. I just went to the fuse panel (walls open) and added more circuits to the fuse panel and ran more wires down to the basement comm closet area following the electricians paths. ( did add lighting on separate circuits).
pete_c said:Well then you are doing fine. Baby steps now. Take your time while concurrently sticking to your schedule.
I would add chases just in case you want adds next year to your currently run LV cables.
Here in the two story and post build LV wiring stuff did it over 2-3 years while in a new home pre wire did it all in 2-3 days.
Yeah it is going to take me at least a year to get this all done. It's already been 4 months. I did get the RadioRA switches installed throughout the downstairs, which has been great! It's a slow process as its mainly just me doing the work. I like working on it, but I also would just like everything to be functional like I had at my previous place. I'm sure once it is done I'll be itching to find another project to do.
pete_c
Guru
Here purchased my first home before I finished school. I used the physical projects as a stress reliever of sorts.
IE: I would get home sometimes at 8 PM (starting at 4 AM) and paint a ceiling before going to sleep to relax me some way long time ago when I was younger and had more energy.
Recently feel asleep under one automobile finishing up the DIY project of replacing every piece of the cooling system mostly to learn and not that it really needed to be replaced.
pete_c said:I did separate the wiring "closet" from the server room and have separate LV and electrical (separate circuits) in both sections in the two story basement. In the server section their is a subsection just for audio with patch panel cat5e and audio cables which go to every room in the house (literally). In the wiring closet section there is a sub section for RG6 as I wired for satellite (and used two satellite services plus OTA plus cable at one time) and RG6 cable (some X4) going everywhere here. There are some almost or over 100 wired ethernet devices today on managed and unmanaged Gb switches.
I did the same. I have a 30A for the UPS (3000VA), which has the servers and network switches. Switches are all managed and I'm using PoE for phones and access points. I'm only drawing 5A, but I like the run-time it provides, which is around 45min at the current load. It helps I got it for a deal I couldn't refuse years ago. If it ever dies I can always pickup a 30A PDU to break it out to 15A/20A circuits. I also have a dedicated 15A for the security side, which is really just going to be the OmniPro controller.
Slugbuster is a good idea, but for a single or couple holes, no foul in an appropriately sized hole saw (electrical KO size, not general) and then I'd suggest using a proper chase nipple and fittings or then even consider stubbing up a small piece of EMT the trade size, with a fitting/bushing on the top end, then connected to the box and feed the cables down through that.rsw686 said:I figured there was a tool to do this the right way. Not sure its worth the expense for a one time thing. Thanks for the info!
Of course, I don't know how far up your cables are and your layout.
Barring that, a simple chase nipple would work.
Similar threads
- Replies
- 12
- Views
- 452
- Replies
- 11
- Views
- 320
- Replies
- 0
- Views
- 257