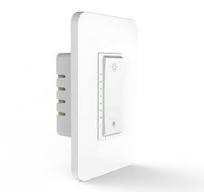
Gosund WiFi dimmer replacing firmware

New unused generic boxes with no labels on Ebay ...$10 in bulk ...this is the older version of the switch.  New version has an LED dimmer value display which I do not like.
 
Manual user guide is titled:
 
Dimmer Switch User Guide
KS-7012
 
Back of manual:
 
Smart Home
 
The instructions are for mobile app only.
 
PITA is to take apart the switch.  Doing one today and will post pictures of the take apart.  No soldering required for the JTAG.  Initially used the wrong marked pin holes...
 
Here are the box pictures.
 
Note you can also install the Virage firmware and Virage plugin for Home Assistant.
 
The company has firmware for the Sonoff 433Mhz wireless hub too.
 
[sharedmedia=gallery:images:1524]
[sharedmedia=gallery:images:1525]
[sharedmedia=gallery:images:1526]
 
Next will be the take apart pictures...

1 - remove back tape over wires and remote two screws (used a jeweler type philips screwdriver)

[sharedmedia=gallery:images:1527]

2 - remove metal cover and plate over regulator and bend regulator up 90 degrees and remove 4 corner screws

[sharedmedia=gallery:images:1528]

3 - lift up on case and remove it. There are two plastic tabs connected to the two side switches. Look at them in place. Screws are tiny..don't lose them. remove two screws holding top board on. Lift the board off and put it to the side. You do not need

[sharedmedia=gallery:images:1529]

4 - here is where you connect your JTag wires RX, TX, GND, VCC and GPIO (to ground) for programming

[sharedmedia=gallery:images:1530]

Put all of the pieces in a little baggies bag. I just did 4 of these in about 15 minutes. I put all four switch parts in one bag. Put all of the tiny screws and plastic switch tabs in a small parts plastic container and switch parts in a larger baggie.

I use Tasmotizer and a USB to TTL device on my Ubuntu Linux laptop.

Used current version of Virage firmware first. Tinkered a bit with it then replaced it with current version of Tasmota. Tweaked the Tuya settings and saved the configuration to use on all of the switches.

Using the HA Tasmota admin program in House #2. Works great.
 
Noticed doing this that the dimmer center on off switch is only capacitance touch (on plastic???).  I kept pressing with a dry finger and it never worked thinking it was a physical switch like the up and down dimmer switch.
 
Really liking this new Tasmota dimmer switch added features...
 
1 - slider switch for relay or dimmer function such that I can use it everywhere.  
2 - slider switch for LED lighting voltages
3 - separate reset switch on bottom of toggle
4 - separate dimming of LEDs on switch with 4 levels of brightness
A - brightness level 3
B - brightness level 2
C - brightness level 1
D - no illumination of on switch LEDs
 
pete_c said:
Noticed doing this that the dimmer center on off switch is only capacitance touch (on plastic???).  I kept pressing with a dry finger and it never worked thinking it was a physical switch like the up and down dimmer switch.
Took me ages to also figure out the ON/OFF switch was not a physical switch.....
 
Could you recap on how you got the KS-7012 dimmer working nicely? I have flashed with Tasmota v12.x and applied the template specified at the link below.
But I have no control of on/off or dimmer etc... I'm assuming I've missed a step(s)???
 
https://templates.blakadder.com/virage_labs_KS-7012.html
 
@TommySharpNZ  
 
I have purchased enough here to replace all of the previously installed WiFi in wall switches.  
 
Tested each one with line input but have yet to put them in place.  
 
Due to some other stuff that came up have not implemented the switches at this time.  
 
Will post a step by step shortly.
 
Documented here ==> Homeseer Forum
 
I did not use the template posted.
 
Back
Top